Screen recordings add a powerful visual element to product demos, internal messages, tutorials, and lots of other communications. Sending a screen recording in place of an email can help humanize feedback and remove the risk of misinterpreting messages delivered in text.
So it’s no surprise that screen recording technology is in high demand, or that lots of tools are available. These tools range from built-in shortcuts on your device to apps like Descript that offer a variety of features beyond simply capturing what’s happening on your screen.
Here's a quick list of ways that you can record your screen, plus a tutorial on how to use Descript to record your screen, and an explanation of why we think Descript is the best app for the task.
Hotkey options: recording Windows PC or macOS screens
The most basic way to make screen recordings is by using the built-in shortcuts on your desktop device.
How to Record Your Screen on Mac
On Apple devices, the screen-recording command is a simple hotkey. So long as you have macOS Mojave or a newer operating system, you’ll be able to use this shortcut.
- Press Command + Shift + 5
- When you do, a bounding box will appear. You can adjust it to capture a part of the screen or the whole screen. After you’ve decided on how much you want to appear, click Record.
- To end the recording, press Command + Shift + 5 again. Then, click Stop Screen Recording.
- After you end the recording, it will show up as a thumbnail in the bottom right-hand corner of your screen. Click on it to watch your recording.
You can also record your screen with macOS’s built-in QuickTime app.
How to Record Your Screen on Windows
Like macOS, Windows 10 allows you to record your screen with a front-loaded application called the Xbox Game Bar. To use it, you'll need to make sure you've first downloaded, installed and enabled the app in your system settings.
After the tool is enabled, you can begin to record. To do so:
- Press Windows logo key + G.
- A new screen will pop up. Click the "Record from now" circle icon to start recording. One quick thing to note is that the placement of this icon and its appearance may vary slightly, depending on the version of Windows that you’re running
- To end your recording, click "Stop recording." The icon will look like a square.
How to Screen Record on iPhone
With mobile devices, you can record your screen with built-in tools, too.
To enable this function on the iPhone:
- Tap on “Settings,” then “Control Center.” Scroll down to “Screen Recording”.
- Next to “Screen Recording,” tap the +.
- Swipe up from the bottom of your screen to view your Included Controls. Look for a circle inside a circle — that’s your screen recording icon. Swipe up from the bottom of your screen to pull up the quick option. If you're using an iPhone X, swipe down from the upper right-hand corner to complete the same action.
- The screen recording icon will appear. Tap it to start recording.
- To stop recording, tap the red bar in the screen's top left-hand corner.
How to Screen Record on Android
To record your screen using Android’s built-in tool, you’ll need Android 11 or higher. To turn it on:
- Navigate to “Quick Settings” to find the screen recorder toggle.
- Once there, tap Screen Record. From there, tap on the toggles that appear on your screen that will allow you to adjust the video and audio settings in the app before you record.
- Once you’ve completed those adjustments, tap "Start" to begin the recording.
- To end the recording, tap on the red banner that says, "Tap to stop."
Using Third Party Screen Recording Apps
Pre-loaded screen recording apps work fine for capturing what’s on your screen. But they don’t do much else.
Specifically, they provide limited options for editing. That’s a major shortcoming if you’re using screen recordings in a professional setting. You could upload your videos to conventional video-editing software — if you’ve got the training or the experience to use it.
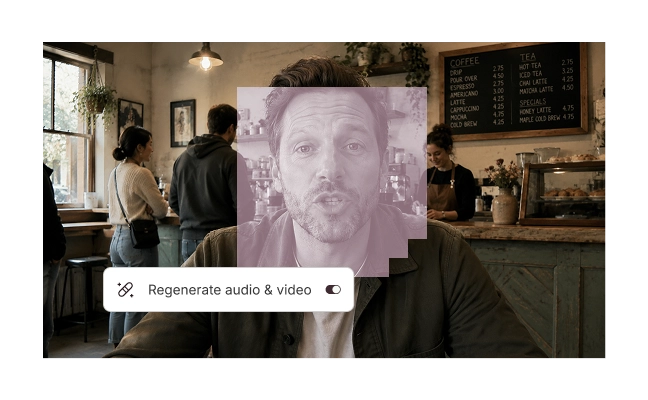
Or you could capture your screen recordings in Descript, then edit them by editing the transcript, just like editing a doc. You won’t need any experience working in video, and you’ll have access to all the editing and mixing features you’d have in a fully powered editing suite.
For an in-depth tutorial on how to record your screen, complete with screenshots, check out this help desk page on the Descript Screen Recorder. If you already have the Descript app on hand and want a quick refresher, here’s a short tutorial.
How to record your screen with Descript
To find and use the Descript Screen Recorder:
- Click the Descript icon in the menu bar at the top of your screen (in Windows, it’s in the system tray in the task bar).
- Choose your webcam and microphone. You can also turn computer audio off or on, depending whether you want to hear the sounds on your screen. Make sure transcription is turned on — Descript will automatically generate a transcript. You’ll want that for editing.
- You’ll see your face in a circle at the bottom left of your screen. You can make that bigger, change it to a square, or get rid of it if you don’t want your face to appear in your recording (if you’re doing voiceover narration, it’s nice for the viewer to see your face as you talk).
- Click on "Start Screen Recording." Like the pre-loaded apps, you can record your full screen or just a portion by dragging your mouse.
For Windows users, specifically:
- While recording, you'll see a red "Stop" button on the right-hand side of your screen.
- If you record your entire screen, you'll find this button within the viewable recording space.
- To remove this button from your recording window, use the bounding box to manually adjust the area you want to record instead of the full-screen option.
When you've finished recording, click the "Stop" icon to end the show.
After you've stopped recording, you’ll be able to edit your screen recording using the Quick Editor, where you can clean up your recording and easily post it on the web.
If you want to do a full edit, you can simply click on the "Edit" menu in Descript. In the main editor you can remove filler words (“um,” “uh,” etc.) in a few clicks, use the timeline to make fine edits, add effects — including Studio Sound, which will make you sound like you recorded in a studio, even if you didn’t — and a bunch of other valuable stuff.
You can also quit the Screen Recorder and come back to edit the file later. If you have the Screen Recorder set to "Run in the Background," you'll have to close it directly by clicking "Screen Recorder" followed by "Quit."
After closing the Descript app, you can view what you've recorded anytime in the program by clicking "File," "Open Drive View" and "My Recordings."
Overall, Descript’s audio- and video-editing tools are among the best options out there. With its abundance of features, simple recording steps, and ease in editing files, the Descript app can help you with all your screen-recording needs.