


Our brains are good at picking out and focusing on the sounds we want to hear, like the human voice. But background noise can still be annoying, distracting, and even overbearing.
As a creator that’s a challenge, because you don’t want anything to distract a listener or viewer from the ideas you’re trying to express. Expressing them is hard enough.
Fortunately, there are ways to eliminate or reduce background noise in your audio—and video. Whether it’s humming air conditioners, street traffic, or gusts of wind, these everyday noises can wreck your recording if you don’t address them. The following sections explore a few techniques you can try both before and after recording.
What is background noise?
In audio recording, noise refers to residual low level sounds, the ambient noises you sometimes hear during the quiet parts of a recording. Even if it’s minor, that noise can distract from your core message or conversation, so it’s worth finding ways to remove it. Noise is a normal byproduct of sound recording, but when it consists of obvious, unwanted background sounds it can have a noticeable—even negative—effect on your recordings.
My colleague Prem Seetharaman, an AI and audio researcher at Descript, breaks noise down into three categories, each with its own causes:
- Room tone. Every recording environment has a certain audio quality when no one or nothing is making sound. Professionals call it room tone—the sound of the room, or sound of silence. “When you speak into a mic in any sort of room, there’s also this kind of noise that’s happening all around you,” Prem says.
- Reverb. When we talk we produce two kinds of audio sounds. One is called the direct sound. “That’s the sound that goes directly from my mouth to the microphone,” Prem says, pointing to his recording setup. Indirect sound, on the other hand, is the residual sound left bouncing, or reverberating, around your recording environment. It’s the difference between how you sound in a closet, where clothing or carpeting dampens the sound, versus a parking garage, where sound reflects off the hard surfaces, causing echo.
- Mic response. All mics pick up sound differently. A high-quality mic responds to a range of frequencies, and stays mostly true to your room’s recording conditions. But lesser-quality equipment, like built-in laptop mics, tend to hear sound differently; they don’t pick up low frequencies as effectively, and some may introduce mic noise—noise generated by the mic itself. This noise mostly comes from a current running in the circuitry. It sometimes sounds ‘smooth’, and other times more ‘crackly’, depending on the mic.
To achieve clean audio, and the superior listening experience that comes with it, you need a good speech-to-noise ratio: subtle room tone, and the right balance between clear direct speech and indirect background sounds.
There are two main ways to control the variables that affect the quality of your sound: (1) before recording, choose the right gear and create a good recording environment; and (2) after recording, use an audio editing tool to remove remaining background noise in post-production.
The easiest way to remove background noise from audio
These days, artificial intelligence (AI) and machine learning are making it easier to fix bad audio when you’re editing a podcast, even if you’re not a pro.
Descript’s Studio Sound is a good example. With one click, it removes background noise, reverb, plus other sounds you don’t want, like subtle static or a faint hum, and makes voice enhancements so it sounds like you recorded in a studio.
Here’s a quick tutorial:
Step 1: Open Descript on your computer
Open up your Descript app. If you don’t have an account yet, create a free one in minutes.
Step 2: Upload your audio or video file
Click Create Project. Then drag and drop your video file into the Descript panel.
Step 3: Identify the speakers
Descript will create a transcription of your video file. Identify all the speakers in your video and add their names.
Step 4: Toggle on Studio Sound
Head to your Properties Panel on the right side of the screen. Click Audio Effects. Then toggle Studio Sound on.
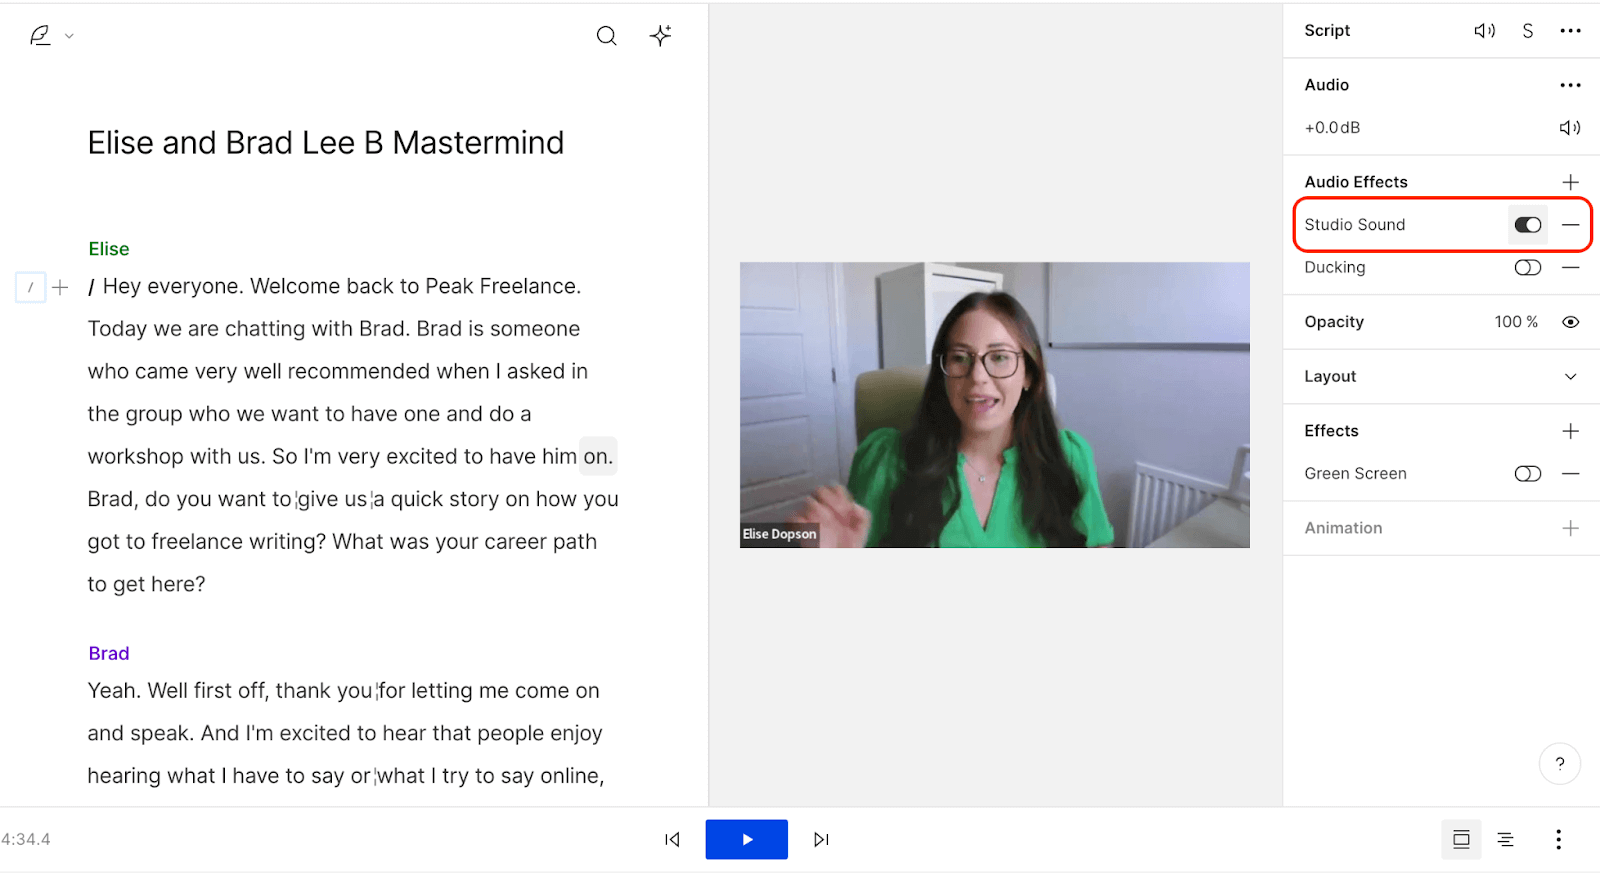
Studio Sound, which Prem helped develop, is a powerful feature that enhances voices while reducing and removing background noise, room echo, and other sounds you don’t want—the easy answer for how to extract clear voice from a noisy recording.
Studio Sound’s machine learning model takes incoming audio, takes out its desired aspects—like what’s being said and who’s saying it—then re-synthesizes the audio as if it was produced in a clean recording condition, stripping away reverb, mic noise, and other unwanted audio detritus in a single pass.
It’s way more simple for beginners than noise removal tools like Izotope’s De-noise filter or audio editors like Audacity and Adobe Audition. Plus, with Descript, you can add elements like sound effects, background music, voiceovers, and transitions in the same dashboard, which makes production workflows incredibly seamless.
Read: How to record high-quality audio for podcasts
How to remove background noise before recording
While Studio Sound can work wonders, you should still be doing everything you can to get the best possible audio when you record. Here are five things you can do to capture clean audio.
Record in the quietest environment possible
The most obvious way to eliminate noise from your recordings is by finding a quiet space away from potential interruptions, ambient sounds, and background noise.
Equally important is keeping echo to a minimum by choosing spaces without hard, reflective surfaces—this cuts down on reverb so your voice stays clear.
Keep in mind that the sound of your voice bounces off hard surfaces like windows and tiles—which you want to avoid. Try recording in a room with carpet, and ideally one with soft furniture and curtains, all of which can absorb and dampen echoes. Or, even better, record in a closet, surrounded by clothes.
Soft surfaces are less likely to bounce back sound than hard surfaces like concrete. “So you get a very dry sort of sound off the mic, and that dry sound is what we want,” Prem says. “That’s the goal.”
Once you’ve found a good spot, get familiar with the ambient sound of the space. Your mic picks up more than you might think. Do the obvious first: close your windows, turn off or move nearby electronics, including loud appliances and even your computer, if possible. Then listen carefully for traffic noise, fan noise (including from your heater or air conditioner), or even the faint buzzing of a light. Headphones help you hunt down these sounds.
Use a dynamic mic
A good mic makes a world of difference. Look for one with a cardioid pattern, which mainly picks up what’s in front of it rather than what’s in the background.
There’s now a wide range of USB mics that conveniently plug directly into your computer or laptop. These are affordable and easy to use, but don’t perform well as XLR mics, which are pricier but produce professional-sounding audio and give you more control over recording levels.
If you can, avoid using your computer’s built-in mic. “It’s not going to get that low, deep end that you often get from a better microphone,” Prem says.
Get close and turn down the gain
The most effective way to improve your speech-to-noise ratio is by reducing the distance between your mouth and the mic. About six inches is a good rule of thumb.
Then turn down the gain, which is the decibel (dB) input of your audio system — the volume, basically. Even with a high-quality mic, recording with too much gain will produce a lot of audio noise.
Point your mic away from the noise
Mics—especially those with cardioid patterns—pick up sounds in the direction they’re pointing. Point yours away from unwanted noise, and away from solid surfaces, especially windows.
Record room tone
Capture a few consistent quiet seconds of your environment before or after recording your voice. Depending on your software, room tone can be useful for noise reduction in post-production.
It can also be useful for making creative edits to your audio sequence, like adding pauses — the silence will sound more natural with the room tone that was already there. Of course, if you’re using Descript, you’ll get room tone added to pauses automatically.
Clean up your podcast or video audio with Descript
Even if you’re working with a good setup in a relatively quiet space, you’ll probably still notice some unwanted background noise in your audio file. (If you’re working with a less-than-ideal setup in a less-than-ideal space, you’ll notice a lot of it.) In most cases, you can still fix it in post-production.
There are many software options available for audio and video editing, some paid, some free, and some more effective and easier to use than others, especially when it comes to noise removal. Most include some sort of native background noise remover tool or plugin.
In most cases, you can still fix it in post-production. Even if you’re working in a noisy space, Descript’s AI can remove that background hum without flattening your voice or making you sound tinny. It’s a quick path to pro-quality audio.
Get yourself a good recording setup and use Studio Sound, and background noise shouldn’t be a problem. So you can focus instead on creating what your viewers and listeners want to hear: your content.
Frequently asked questions
Is there a way to remove background noise from audio with Descript?
Yes. Just upload your audio into Descript, then toggle on Studio Sound in the properties panel. Descript’s AI will reduce or remove background noise—no advanced editing skills required.
Can I remove background noise for free in Descript?
You can get started with Descript’s free account, which lets you try noise removal on shorter projects. For unlimited or larger files, you’ll need a paid plan.
Does Descript remove background noise from video files too?
Yes. Just import your video into Descript, enable Studio Sound, and the app will process the audio track. You’ll end up with reduced background noise in both audio and video exports.
Do I still need to record in a quiet place if I can remove noise later?
It’s best to record in a quiet environment. Studio Sound and other tools can help remove noise, but clear original audio ensures a better result.


