In the era of the camera-phone and the handheld, unedited, off-the-cuff TikTok video, anybody can make a video that’s good enough.
But going from “good enough” to “good” is where those of us without professional video skills often get stuck in quality limbo:
- Sifting through dozens of pro tips that are as likely to confuse you as to help you
- Googling best video cameras
- Putting the Amazon cart before the horse (the horse’s name is Knowing What You’re Doing)
It’s easy to do the wrong things, or the right things in the wrong order, and get videos that just don’t look or sound as good as the ones published by the brands and creators you look up to.
To help close my knowledge gap, I got some coaching from Descript’s video team, then went about applying their tips to see if I could go beyond good enough with my own video content.
What I came away with is this hierarchy of video needs that reshuffled my assumptions around what actually makes a difference on screen and what someone like me—a marketer and writer who wants and needs to create video—should prioritize to raise the bar on their videos.
Foundations: The must-haves
High impact changes that don’t cost much. Do all of this, every time you make a video.
1. Get the audio right
“Audiences can forgive bad video, but they can't forgive bad audio. You don't need to buy expensive equipment, but if you can shell out some money for a cheap little mic that does a good enough job, that's already leagues better than a laptop/phone/camera mic. (also, Studio Sound is great).”
—Ramdy Marte, Video Creator
Among all the team’s tips, nothing got emphasized more consistently or adamantly than audio.
Then I watched this video where Descript CEO Andrew Mason interviews Shopify VP Product Glen Coates. "When it's hard to listen to someone, you don't want to listen to them,” Glen says, talking about how important Descript’s Studio Sound has been for making his team’s videos tolerably good.
Clearly, audio is the thing I can’t afford to get wrong.
I usually record using the built-in mic on my webcam or Macbook (newer laptops offer pretty solid built-in mics and audio processing features). I then apply Studio Sound, adjusting the intensity to improve the clarity of my audio and remove background noise like the ongoing construction outside my window.
This combination gets me a surprisingly clean sound, but I also had a mid-range wireless mic lying around, so I tested the two audio recording methods:
- Macbook Pro's built-in mic with Studio Sound
- DJI wireless mic with Studio Sound
The difference in actual quality wasn’t as noticeable as I thought it’d be—Studio Sound is the truth.
More than the quality of the mic though, the ability to adjust the position and gain levels with a dedicated wireless mic gave me a lot more control when recording audio, like if I wanted to record away from my desk.
Note: I still feel like I could squeeze better audio quality out of this setup, so after this I'll be combing through Best tips to improve the audio quality of a recording on the Descript blog.
2. Get the lighting right
“Good lighting can make your video look 10x better. It doesn't have to be some complicated setup—even just sitting in front of a window during the day is better than mediocre house lights.”
—Ramdy Marte, Video Creator at Descript
Whether a camera costs $100 or $1000, its core function is to capture light.
Playing around with lighting had the single biggest impact on the quality of my video, and I’m kicking myself for not doing it sooner.
The Descript team’s directions:
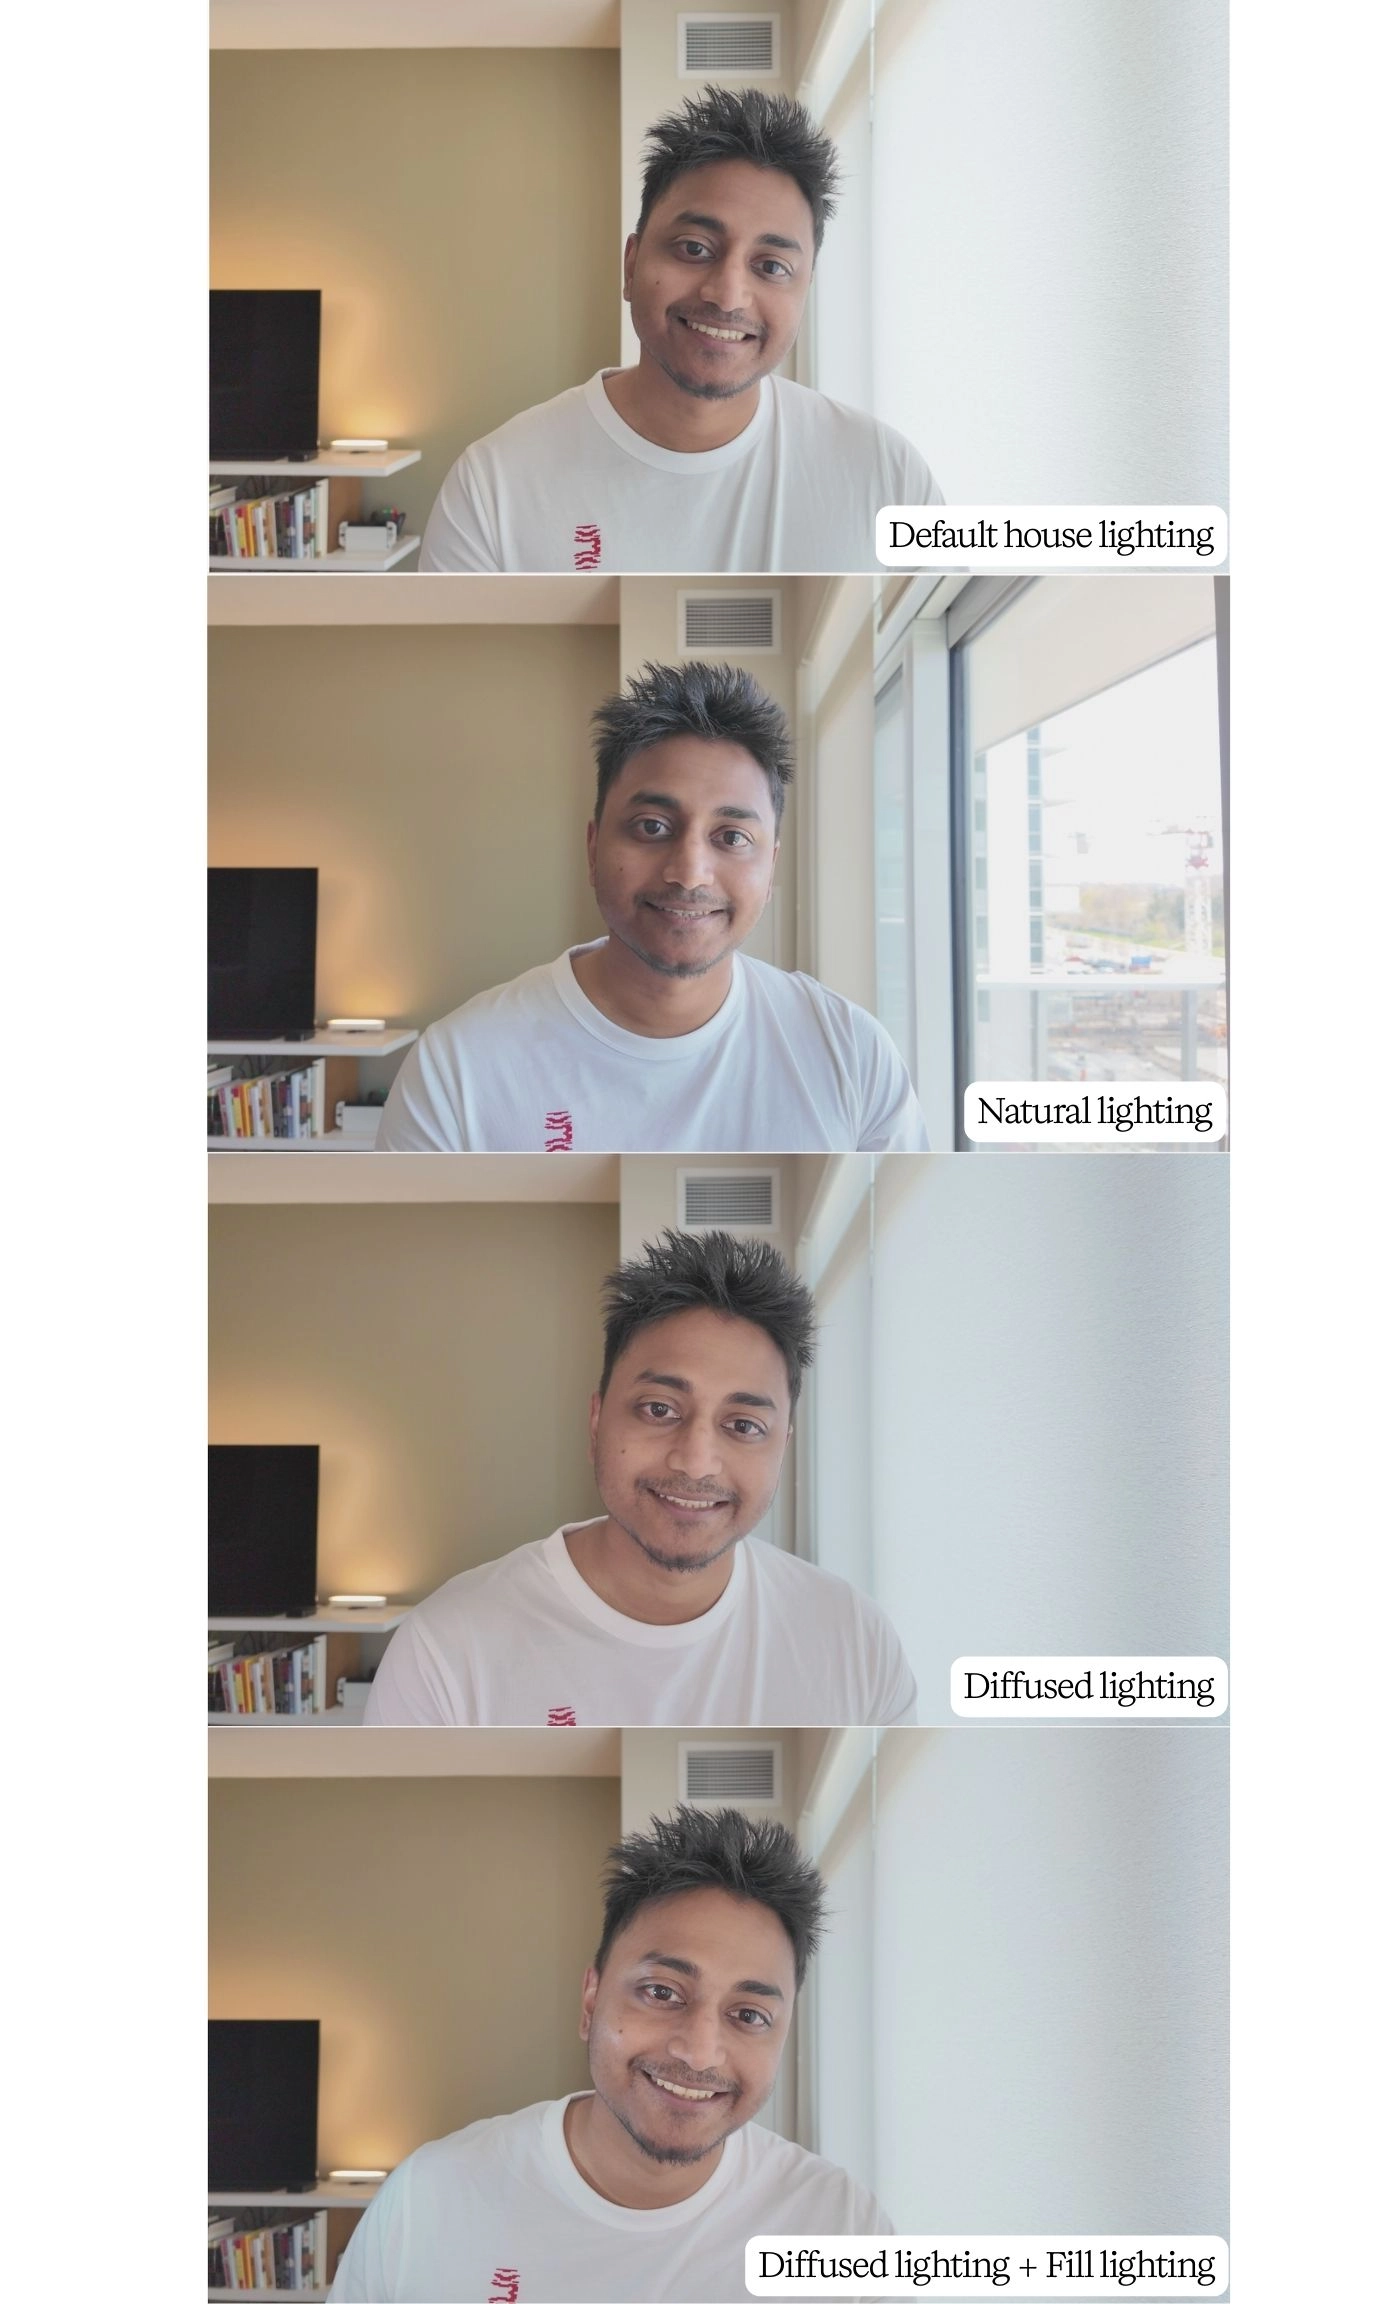
- Avoid backlighting, like with a bright window behind you, where the light makes you look like a silhouette. Seem obvious? But if you’re making video at your desk, at work or home, you might have a window in the background; don’t shoot video from there.
- Use diffused lighting, wrunhich can totally be a cheap ring light, for even lighting without harsh shadows.
- Substitute natural light for regular home lighting at the very least.
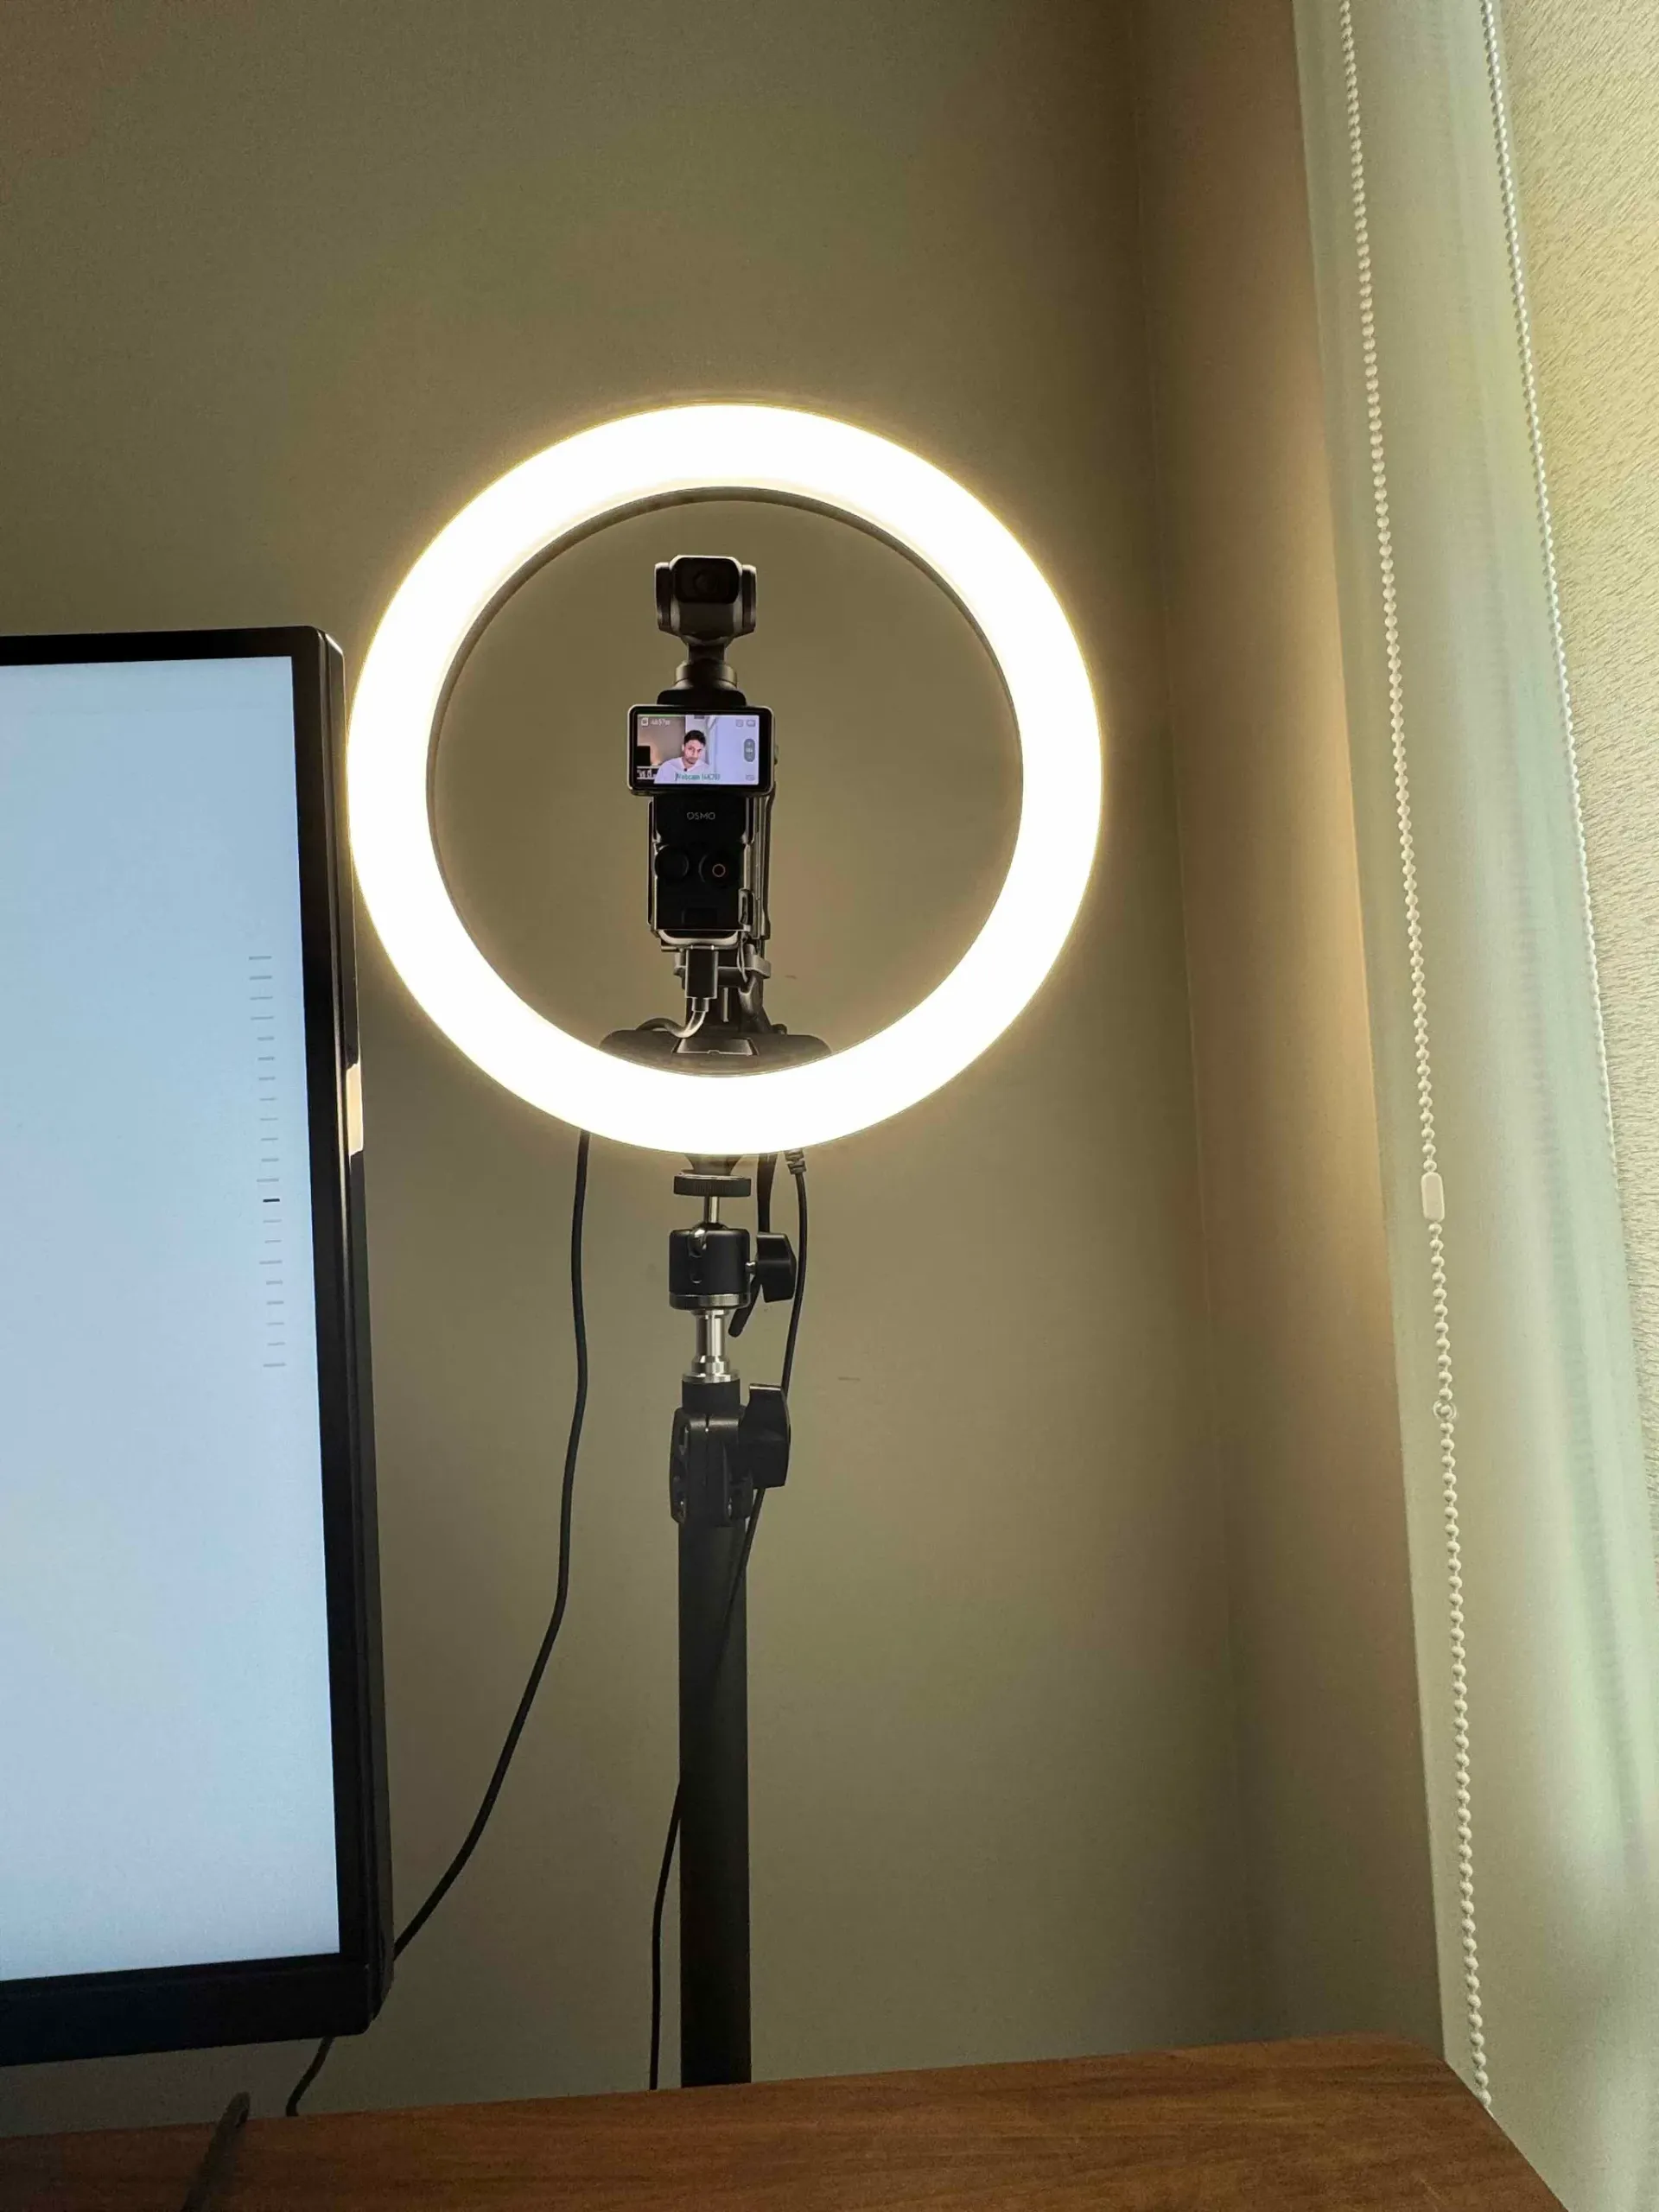
I happened to have a cheap ring light and portable photography light to test a few different approaches.
Each treatment might look like it was recorded on a different camera with different settings, but the only thing I changed was the lighting.
A ring light gave me the best result by far, especially when I added some fill lighting to my left to create more depth. A little goes a long way and you don’t need to burn your retinas or look like a deer in headlights to capture better video.
3. Compose your shot before you record
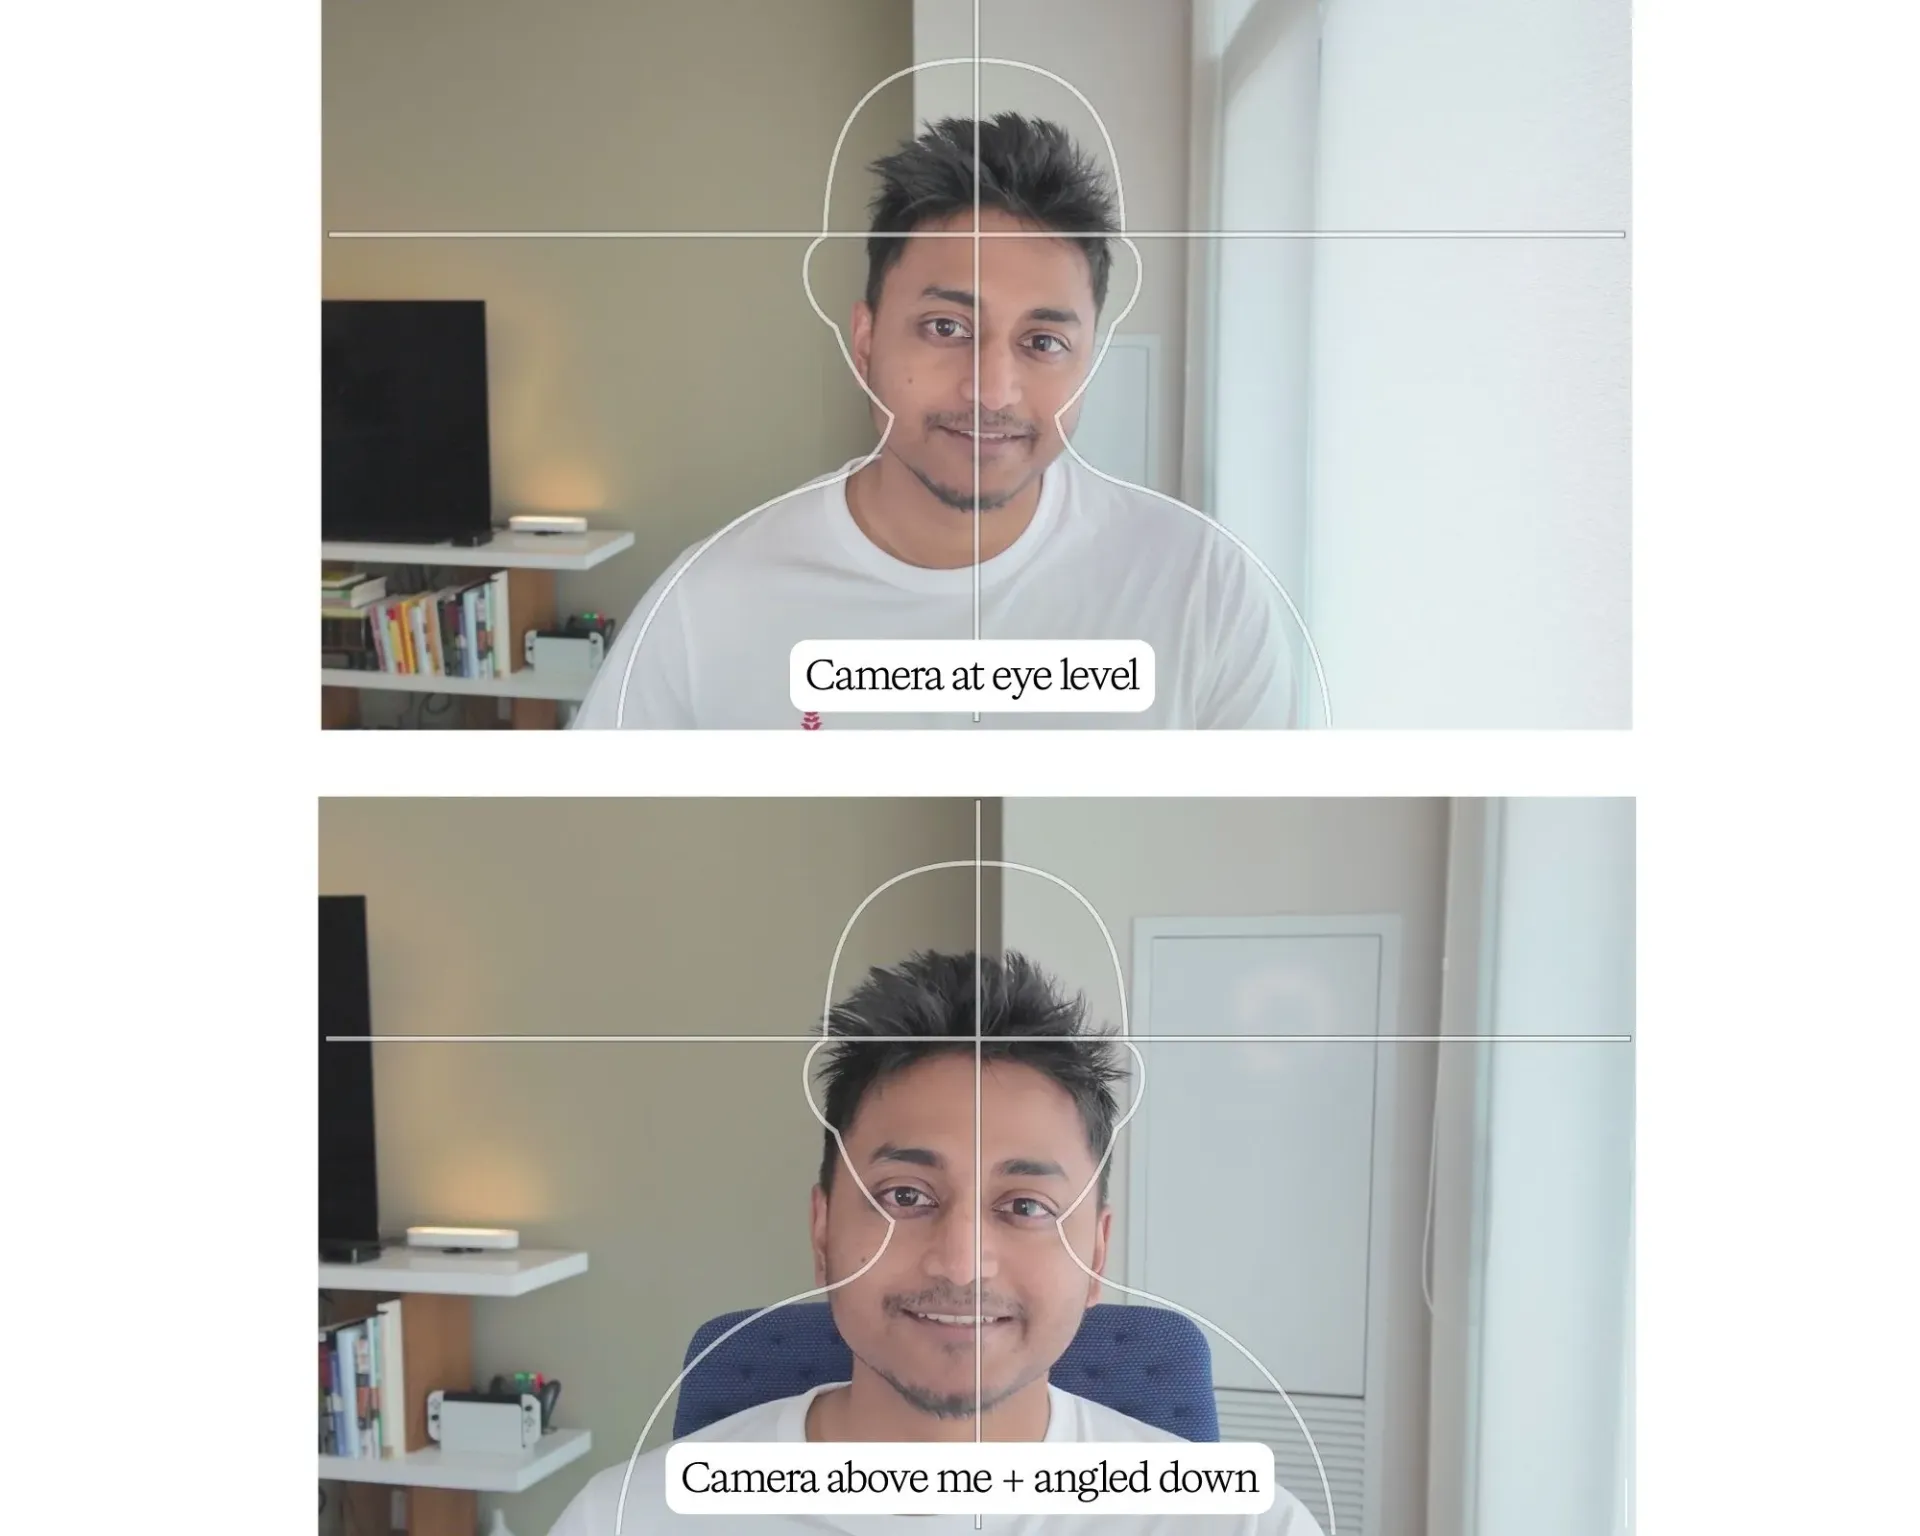
“If in doubt, leave a little extra headroom at the top of your shot because you can always crop in. It’s harder to fix in post if you start with a shot that’s too tight. And extra headroom gives you flexibility to make vertical versions of your video. But! Don’t sit below your camera—if the camera is angling down on you, you’ll be perceived as less authoritative and less competent.”
—Katie Sunku Wood, Video Editor
Sure enough, I tend to record too close to my face, which is a pain to edit when I don’t have enough room to add visuals or create vertical versions for social media.
So this time, I used the recording preview in Descript to check that I’m in the center of the frame and that there’s enough space around me.
Tip💡: Turn on the Center me guidelines in Descript’s recorder and line it up with your shoulders
I ended up having to stand to follow Katie’s advice and avoid angling my camera down at me, but it made a huge difference.
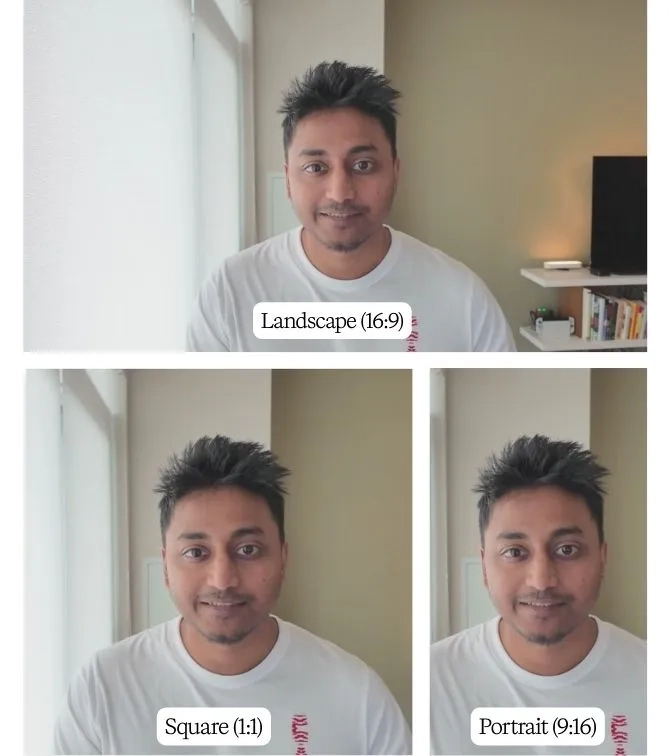
Sure enough, these small changes to how I framed myself before recording made it much easier to create landscape, vertical, and square versions of my video that didn’t feel claustrophobic.
4. Practice being on camera
“If you’re struggling with how to talk on camera, imagine that you’re explaining something to a friend. Try doing a take at the end where you’re at least 30% more animated than you feel you need to be, and just riff and get silly. You may be surprised when you go to edit just how natural and good that take is.”
—Katie Sunku Wood, Video Editor
I’m an introvert so just the idea of filming multiple takes with the high energy (and high volume) of MrBeast is enough to make me want to go back to bed.
But I can talk to a friend for hours on end.
Using that approach to establish a baseline for what my own natural energy feels like on camera, then dialing it up by 30% made me not only more engaging on screen, but also felt way more sustainable than trying to emulate what I thought was good energy.
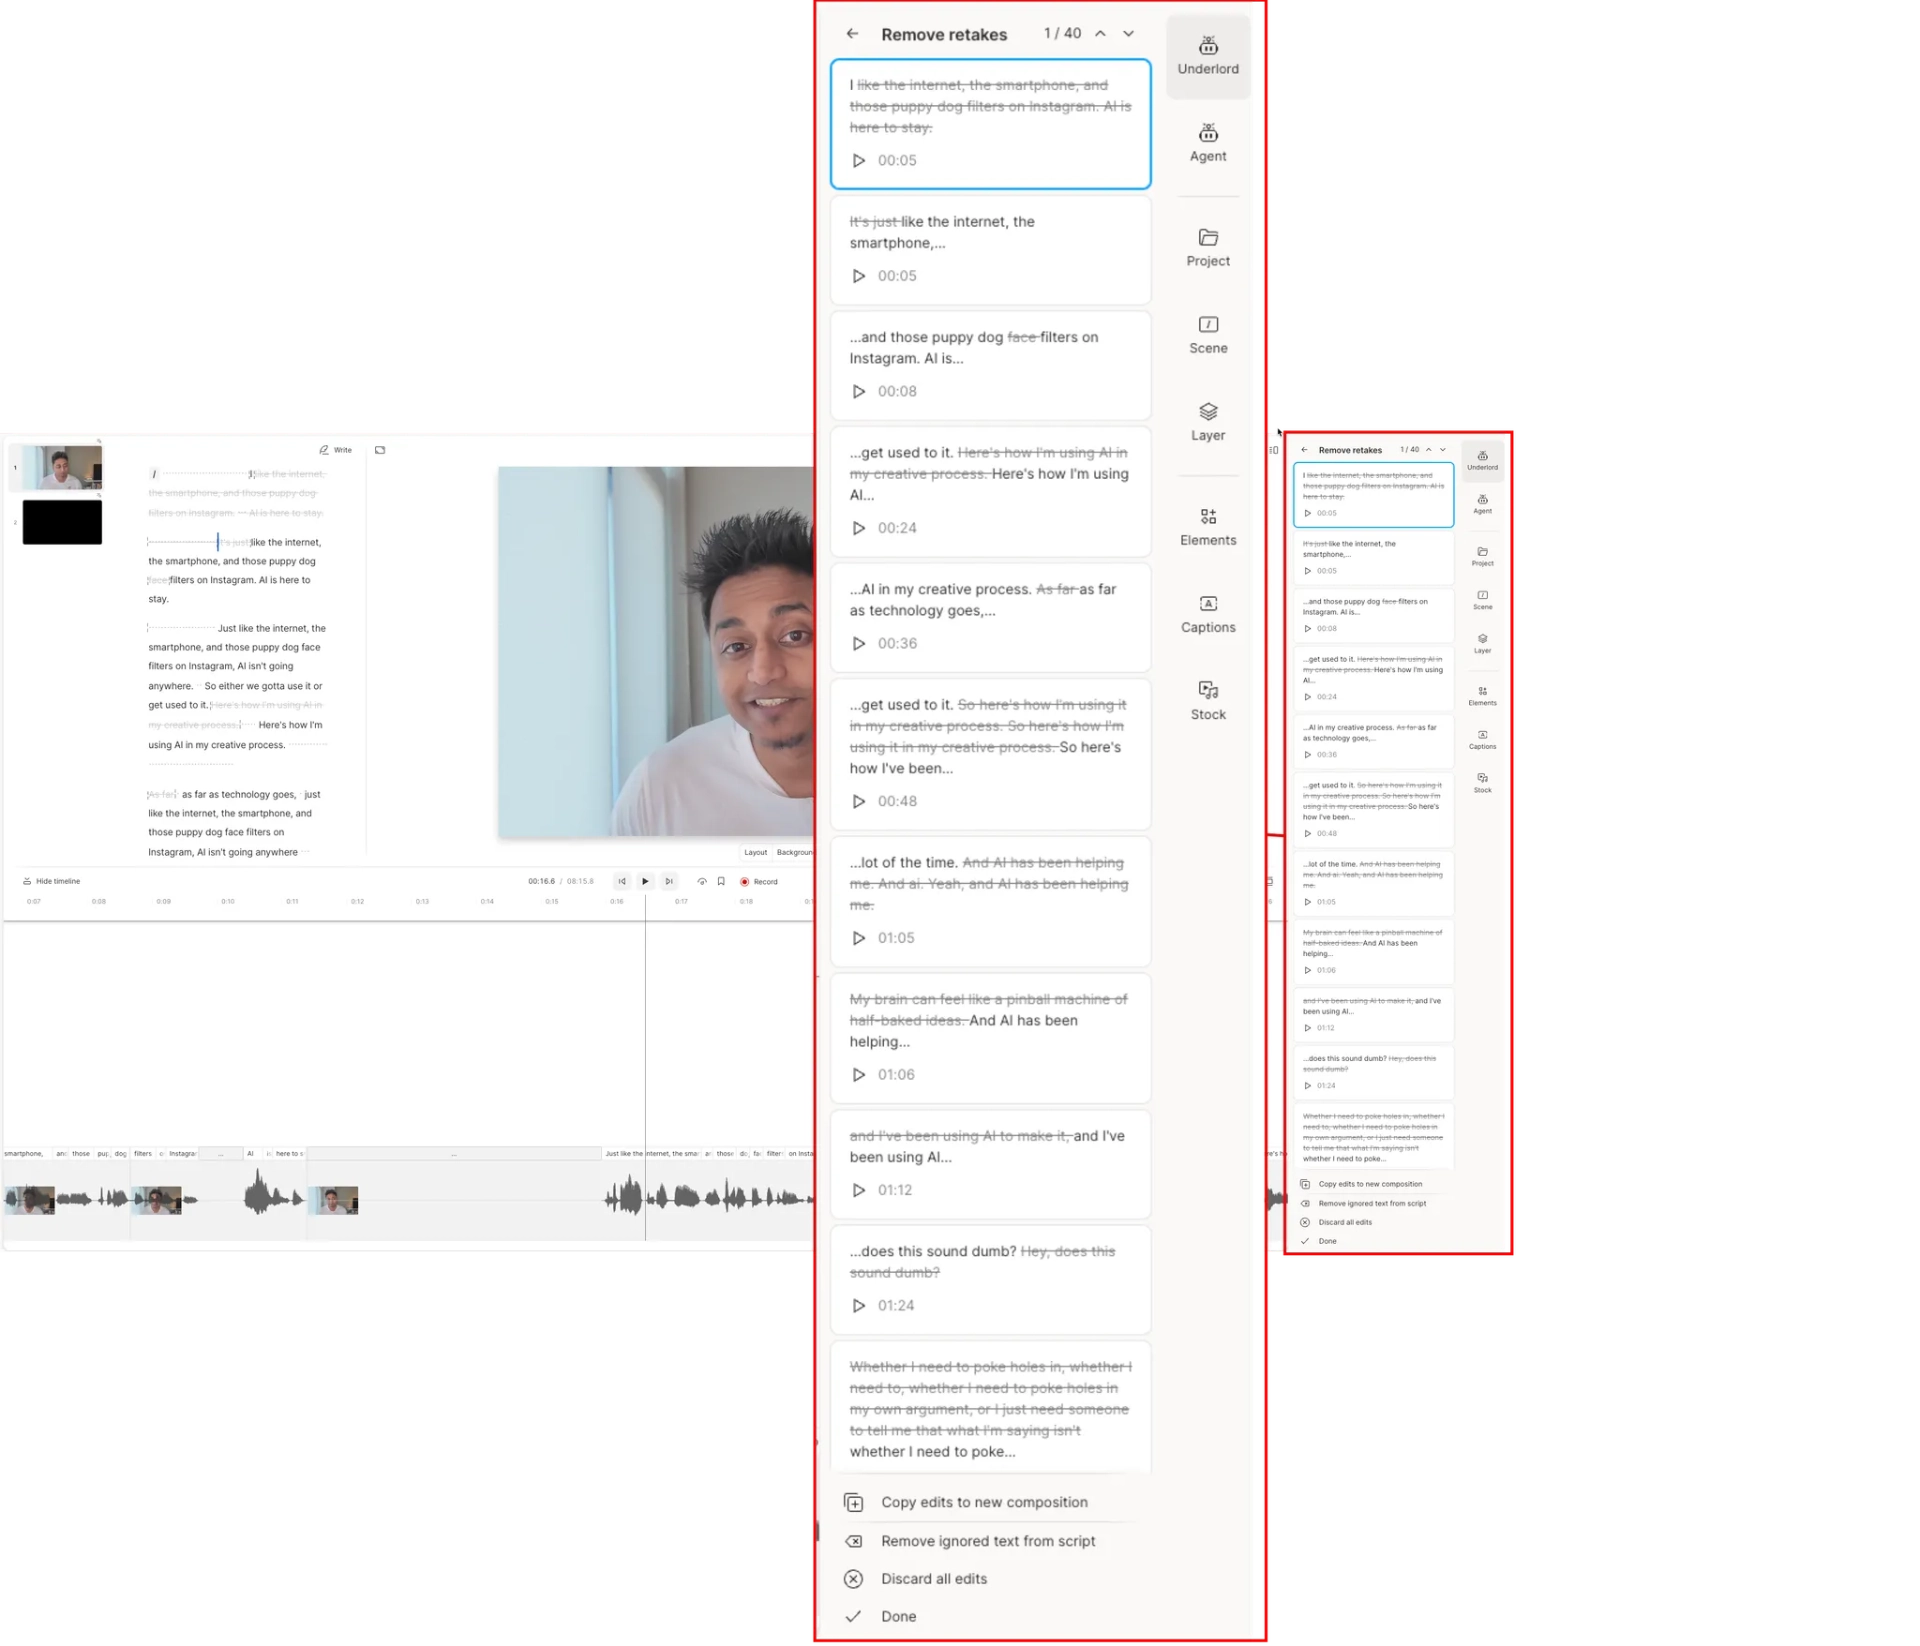
Using Descript gives me another advantage here: I can record multiple takes and then ask Underlord to Remove Retakes and leave only my best takes. So if I fumble a line, or want to try a different energy level, I can just say it again.
I didn’t need to memorize my script or use a teleprompter. I just delivered my lines, one scene at a time, while looking into the camera. That let me maintain eye contact without looking like I’m reading. If my gaze ever looked off, I could fix it later with Eye Contact.
Knowing I’d have those two AI tricks in editing, I was able to really put myself in that zone where I’m talking to a friend, without worrying about how articulate I sound, or stopping to restate myself, or keeping my eyes locked in one place.
5. Simplify your background
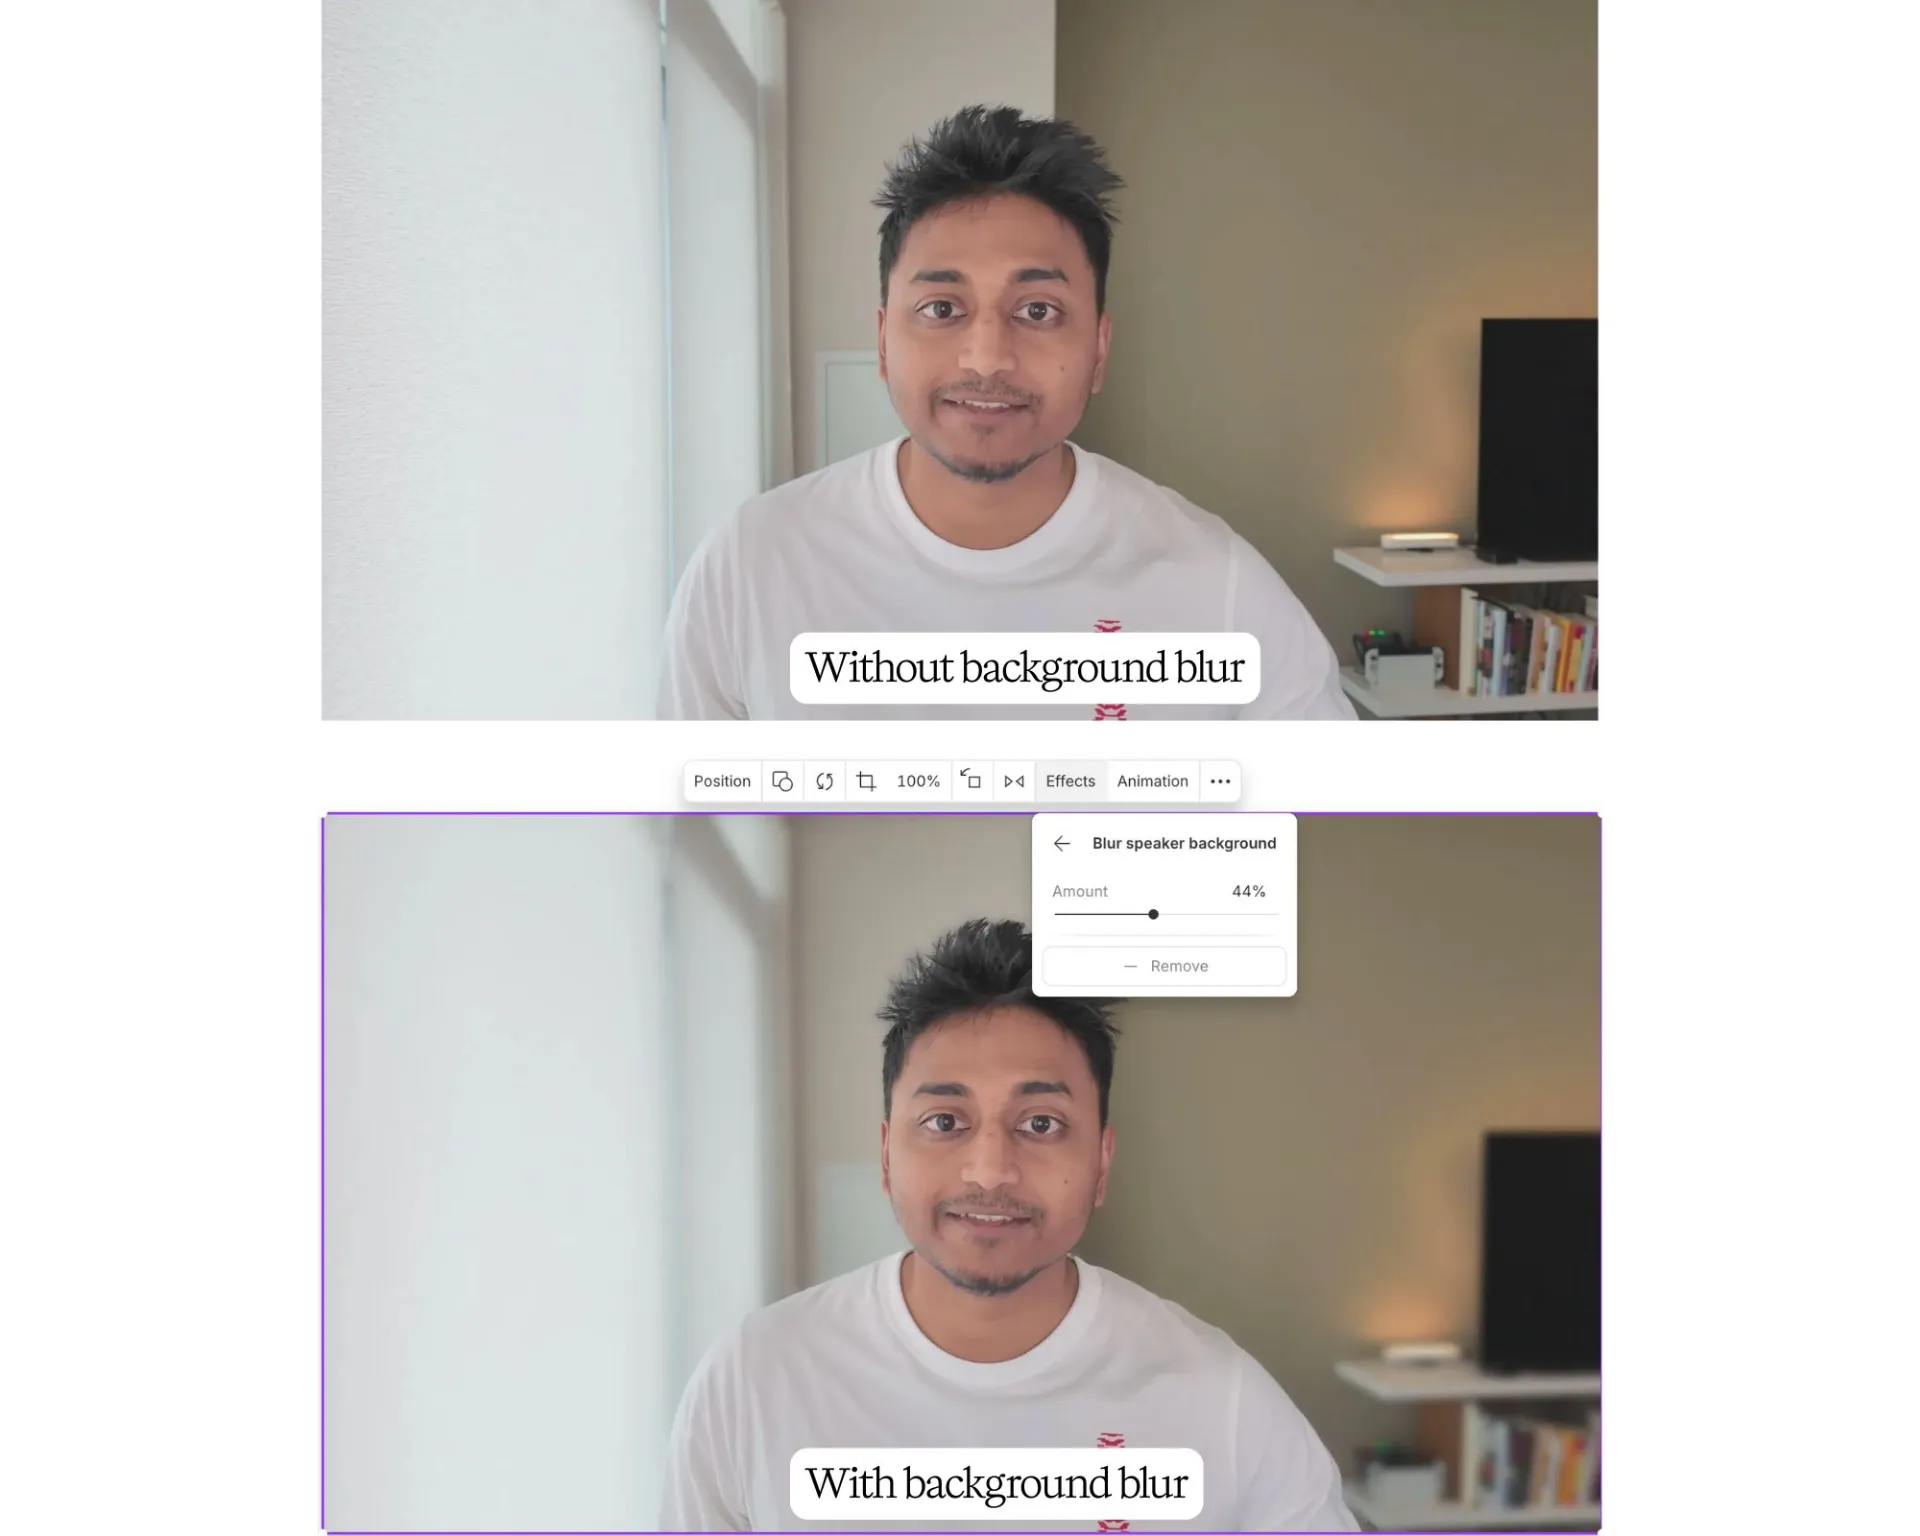
“Simplify your background. The more space you can get from your background, the better to keep the viewer’s eyes on you.”
—Katie Sunku-Wood, Video Editor
This is a hard tip to follow for a guy who lives in a one-bedroom condo, but the focus on “simplifying” helped me to work with what I had rather than try to replicate the fancy backdrops I saw on YouTube.
An unmade bed or cluttered room can pull attention away from your message, while a thoughtfully curated space enhances your presentation. When setting up your shot, remove unnecessary items and consider using a plain wall, subtle decor, or even a professional backdrop to create a polished look.
There’s nowhere in my apartment where I can set up a perfectly neutral backdrop. But with a little tidying up, Descript’s blur-speaker background feature, and some of the framing considerations from earlier, I was able to minimize the distracting clutter.
6. Nail the content with a “radio edit” first
“Start with a ‘radio edit’: getting your A-roll, main interview, or talk-track edited first. Make sure it flows well and sounds good. Then go back and add window dressing like captions and B-roll and Descript’s fancy layouts to jeuje it up.”
—Katie Woods, Video Editor
It sounds obvious—there’s no point polishing something you’re going to cut later—but it’s all too easy, and tempting, to start adding fancy visuals before you have a solid rough cut.
So this time I forced myself to cut, trim, and rearrange my video until I was happy with the length, pacing, and flow, before I touched any transitions, effects, or enhancements.
Descript’s text-based editing makes this super easy and intuitive (another shameless plug but just so true)—you’re working with words instead of futzing around in a timeline. Going from recording to rough cut would take hours in another video editor. In Descript I can do it in minutes.
Plus, with AI agents like Descript’s new Agent Underlord (in Beta as of this writing), turning raw footage into a clean rough cut or radio edit will only get easier, especially when it can accept specific instructions, ask follow-up questions, and even take feedback.
Note: I got early access to Agent Underlord by signing up for the A-team, but anybody can use Underlord's Remove Retakes AI action in Descript.
7. Review what you have before dismantling your equipment
“Fix it in post only works so well. If you've finished recording, don't break down your setup until you've reviewed your footage. There's nothing more painful than realizing you have to choose between re-recording right after you just put away all your gear, or spending hours trying to edit around the problem.”
—Ramdy Marte, Video Creator
I’m definitely guilty of abusing the "fix it in post” trope to get through a video. That often leads to continuity issues in lighting, framing, audio, and appearance that I have to creatively crop out, cover up, or just live with—a sure sign that I’m settling for good enough.
By following Ramdy’s simple advice, when I had to record more footage after my initial shoot, I was able to avoid:
- Lighting changes due to recording at different times of day
- Forgetting the exact placement of my camera, mic, and lights to replicate my original recording conditions
- Trying to match my framing and background in the original recording
- Wardrobe changes (I spilled coffee on the shirt I recorded in)
Because Underlord can create a rough cut faster than it would take me to manually review the footage myself, I let my AI co-editor do all the culling, cutting, and organizing for me, which made it even easier to review my footage and flag areas where I might need to re-record.
Only once I was happy with my rough cut did I take down my recording setup.
Enhancements: The nice-to-haves
For nice-to-watch videos.
8. Use a camera mount for stability, flexibility, and consistency
“Use a tripod or some kind of mount so your camera isn’t shaking, and to ensure you get the same composition if you record multiple times.”
—Adrien Colon, Video Producer
I’ve always recorded my videos using a webcam that sat on top of my monitor, which, looking back, was pretty limiting.
I didn’t want to go out and buy a tripod, but Adrien advised me to just find some way to hold my camera in a steady, consistent place.
A lot of ring lights come with smartphone mounts, which, if you're using your phone camera, is exactly what you need (and by the way, most modern smartphone cameras are good enough for any video). I was recording with a handheld DJI Osmo Pocket 3 so I had to improvise using a couple mounts I had lying around.
Using a portable mount I could freely move and reposition allowed me to:
- Record away from my desk or while standing up
- Have more control over the camera angle and framing
- Maintain a consistent shot composition across multiple takes
9. Use a variety of shots to hold the viewer’s eye
"Using a variety of shots (medium shots, close-ups, B-roll, etc.) keeps your video visually engaging and helps maintain viewer attention and break up what could otherwise feel like a monotonous talking head video."
—Adrien Colon, Video Producer
At first, I assumed I’d need multiple cameras to incorporate the kind of shot variety Adrian suggested.
But this is actually an editing tip. You can do your whole video in a single shot, and then use different tricks to vary the look:
- Simple zooms when you’re on camera to add dynamic movement and visual interest without being distracting; they’re a good way to hide editing cuts as well
- B-roll footage from Descript’s stock media library, to add context or hide a cut; a good rule of thumb is to leave it up for 3-4 seconds at a time
- Screen recordings so you’re showing, not just telling
- Layouts that move the speaker around and bring in different elements like B-roll, screen recordings, text, and titles
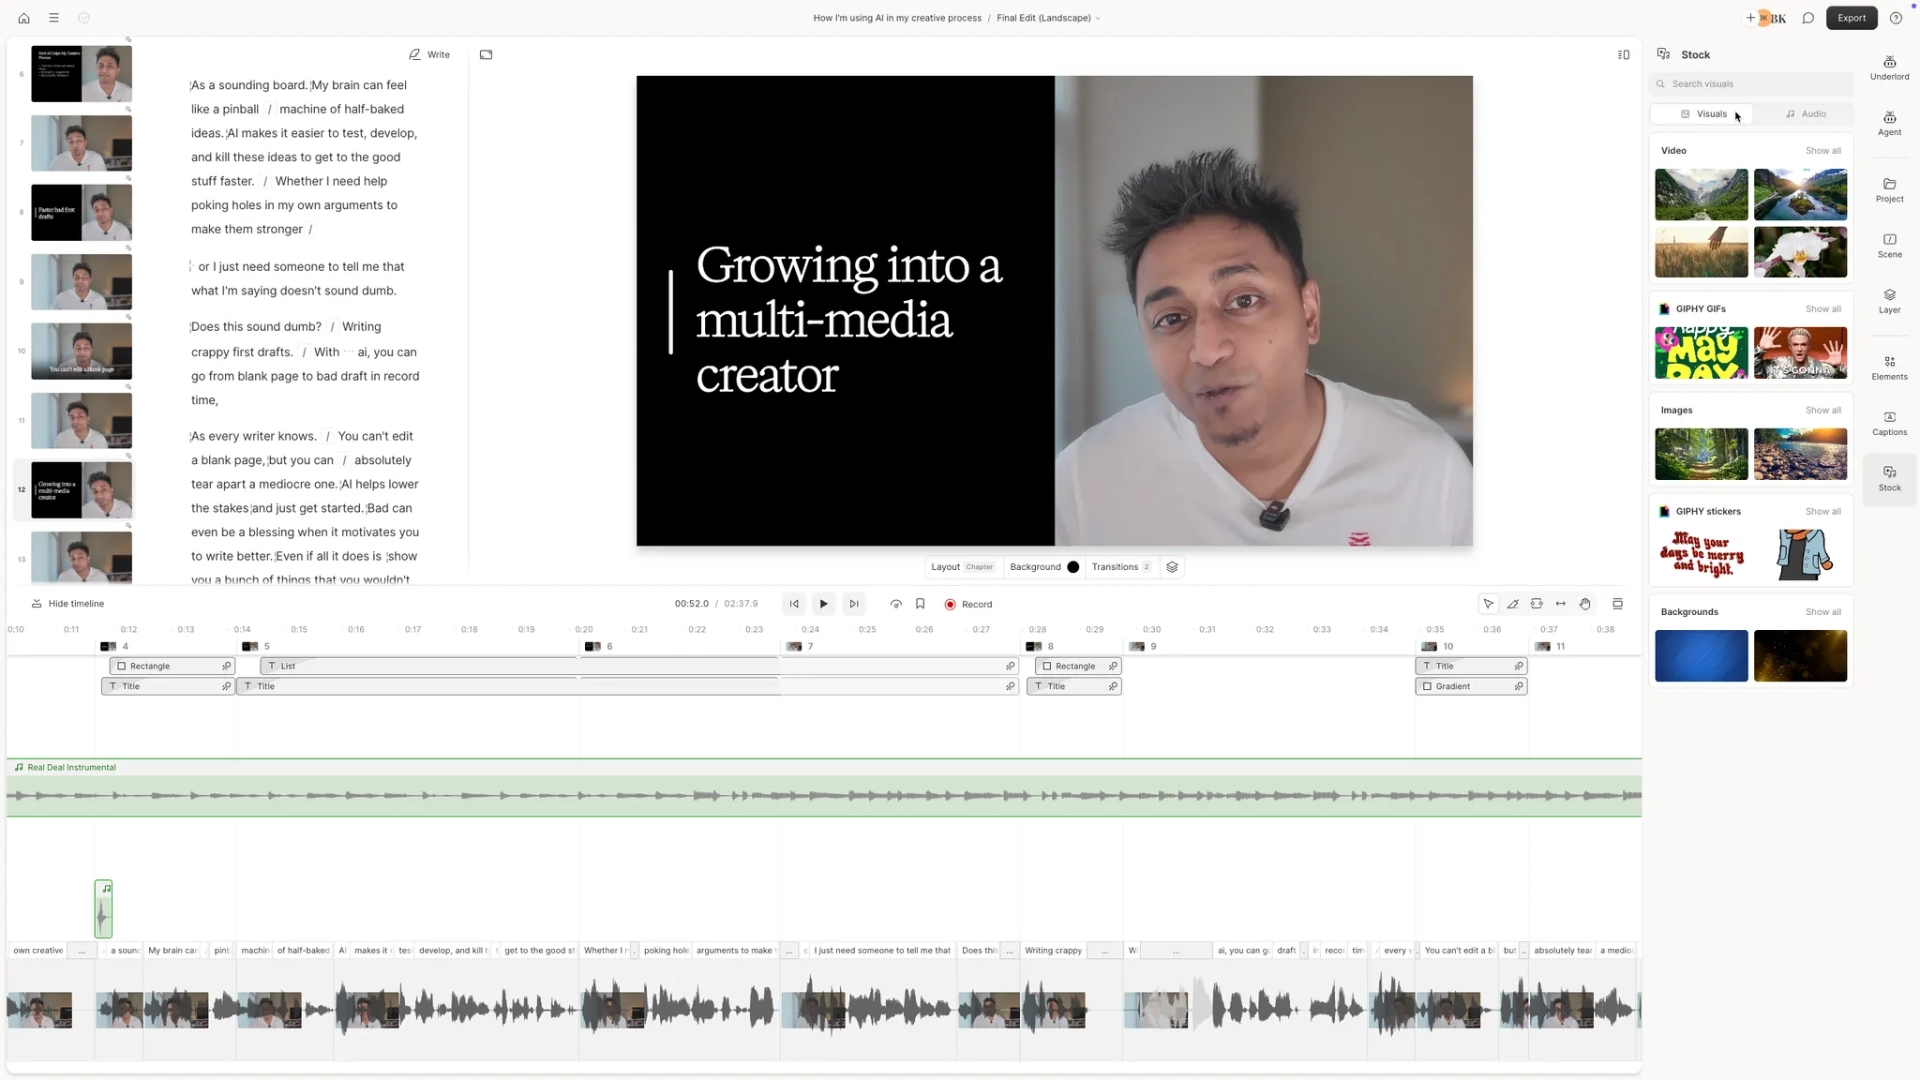
10. Use layered sound design to boost the energy
“Sound design is a really underrated way to increase the production value of your video. Not just music—also adding sound effects that match with your visuals to provide a cohesive viewing experience. The absence of sound design can make your video feel emptier and more boring. It doesn't have to be anything insane—just don’t neglect it.”
—Ramdy Marte, Video Creator
Until I added music and sound effects, I never noticed how dull a video could be without them.
Like Ramdy said, audio is easy to forget when you’re caught up in editing your video, but it goes a long way in pacing, and in enhancing transitions, animations, and storytelling.
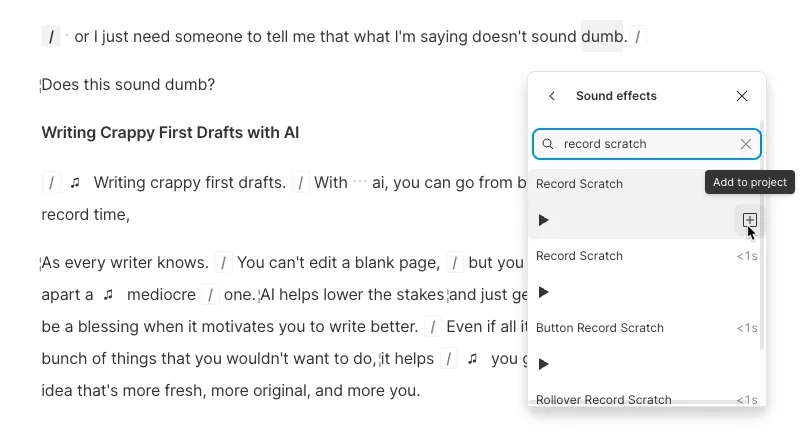
Descript makes it pretty easy to add sound and music since I can just highlight the part of the transcript where I want to add a sound effect or some music and search for something that fits that scene in the built-in media library.
11. Use pacing to keep things moving
“Pacing is very important to making sure your video doesn't get boring. Make sure to cut any unintentional silences or dragging moments in (even if that means cutting stuff out that you really like!) We always aim to make our videos feel shorter than they are.”
—Ramdy Marte, Video Creator
Pacing starts with your script. It’s influenced by your delivery on camera. But mostly, it’s an editing thing: cutting, trimming, and structuring your video to get rid of dead air and dull moments so you keep the viewer engaged, start to finish.
When you’re editing, you might feel the impulse to leave some breathing room between sentences so cuts don’t feel so quick and harsh. If you were making a feature film, that might be the right impulse. But in the unforgiving world of the scrolling feed, where we’re all acclimated to videos that hit fast and hard, silence is deadly.
My rough cut for this video was 4:29, but by ruthlessly cutting some more, I was able to get it down to around 2:37.
For the vertical video versions of my video, I cut even more since fast-paced is still too slow for social media.
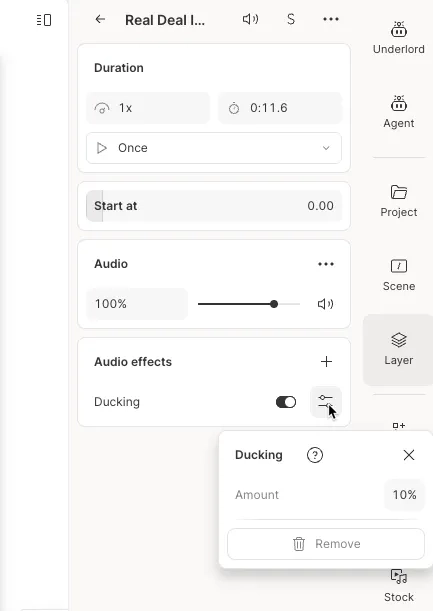
12. Use ducking and limiters so background audio stays in the background
“We don't want parts of our video to be very loud and others to be very quiet, because nothing's more annoying as a viewer than having to adjust your volume multiple times. Ducking is great for making sure your dialogue isn't overpowered by background music or sound effects. And using a limiter is very important for making sure your audio never spikes.”
—Ramdy Marte, Video Creator
One of the reasons I shied away from adding music and sound effects to my videos: I was never sure how to make it blend in with the rest of the audio in a way that didn’t distract the viewer. At different parts, it’d either be too loud and overpower my voice track, or it’d be too quiet and difficult to hear.
I usually see the ducking and limiter effects on my way to applying Studio Sound in Descript, but after applying them to my video, I’m sold—they add a sheen of professional quality, where you can hear me clearly and I’ve got ambient sound to keep you engaged. They’re also so simple; I feel a lot more confident about using music and sound going forward.
Extras: The "pro" pro tips
The final polish and workflows that help you add a pro-quality touch.
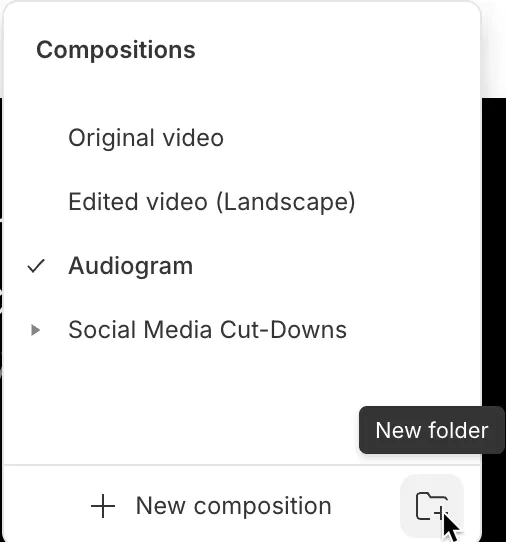
13. Create multiple versions of your video project
"Make a new version of your video every time you make significant edits. Pro editors will do this daily so they can go back and reference things in earlier versions. Descript has version history, which helps. But for times when you don't want to fully revert back to an earlier version, keeping separate compositions (or files) is super helpful."
—Katie Sunku Wood, Video Editor
This is an organizational tip, but a powerful one. I usually end up creating multiple versions of my videos for the purposes of promoting them on different channels, which is table stakes on today’s internet.
But what I do less often is create different versions of my video to experiment with different edits.
Since I was trying so many different things for the first time here, I relied more on multiple compositions than Descript’s revision history for managing several distinct edits within the same project. That allowed me to experiment freely, to compare the impact of various changes, and to keep track of what I’d changed.
14. Make global edits early in the editing process
“Apply things like Studio Sound and Eye Contact first—before you edit your content—so you can hopefully only do those global edits once.”
—Katie Woods, Video Editor
Global edits like color correction, Eye Contact, and Studio Sound are applied consistently across the entirety of your audio and video tracks. These are things that you more or less want to remain consistent throughout the video.
Looking back to previous video projects, I’d often make these edits later on in my process when I had multiple clips, layers, and scenes in the project to manage. Doing it at the start made it easier to ensure every edit I made or element I added was consistently based on the same polished audio and video tracks.
Note: If you’re editing in Descript, it’s worth applying these global edits even before the rough cut we mentioned earlier. Since these effects only take a few seconds to apply, you’re not wasting any time applying them to stuff you end up cutting.
15. Maintain consistent volume and brightness levels while editing
“It's super tempting when editing to adjust your brightness or volume to better see or hear your video. But it can lead to inconsistencies. When I edit I always make sure to set my brightness (on a laptop) to about 70%–80%, and I set my volume to about 80%. Then I don't touch them again until I'm done editing. That way I'm getting the most accurate and consistent representation of my sound and visuals.”
—Ramdy Marte, Video Editor
I never really thought about how adjusting my actual computer’s display and audio settings could impact the edits I made throughout the same project.
This is definitely more of a pro pro tip since I don’t do much granular color correction or audio editing, letting AI be my eyes and ears here to keep things even throughout.
16. Get organized, create folders, and name your files clearly
“File organization is a MUST—it's something you might not think to do especially for lighter editing but nothing is more annoying than spending a bunch of time hunting for a file or project that's buried somewhere.”
—Katie Sunku Wood, Video Editor
Like Katie said, good organization saves time and stress. While the exact folder structure depends on your workflow, maintaining separate folders for raw footage, audio, images, and final exports does make it much easier to find what you need when you need it.
Descript keeps my project files pretty organized and makes it easy enough to preview them that I don’t need clear names for every file.
Where I found this advice most helpful was in creating folders and compositions with clear names that made it easy to keep track of the several different versions of my video I created. That will also be helpful if I want to return to different versions to re-use the layout or other elements.
A hierarchy brings order to making good video
The last time I made an honest effort to upgrade my video creation from “good enough” to “good,” I remember it being a lot more difficult and having a lot less to show for it. TL;DR I didn’t know what I was doing—which upgrades would have the most impact with the least effort.
This time was different though. Some of it was the AI workflows that make it easier for beginners like me to execute pro tips.
But the biggest thing was taking a more structured approach—knowing which tips I needed to follow first, second, and tenth to make a better video.
By the way, here's the video I made. I included a clip from one of my old videos so you can see the difference it makes when you prioritize the right things in the right order.