


Before CGI, before million-dollar VFX rigs, there was Georges Méliès literally removing his own head on camera in 1898. In his silent film The Four Troublesome Heads, Méliès appeared to pluck his head off his shoulders and place it on a table—where it kept right on talking.
He repeated this trick three times, ending up with a headless Méliès standing beside three of his own chattering heads. Then—because why not?—he grabbed a banjo and serenaded his disembodied audience.
This wasn't sorcery—it was clever filmmaking. Méliès created this illusion by selectively blocking parts of the frame, re-exposing the film multiple times, and capturing his head in different positions. He was essentially performing the world's first green screen effect, just without the green screen.
That rudimentary technique evolved into the green screen effects that power everything from Marvel movies to weather reports. The surprising part? You don't need a Hollywood budget or a film degree to create professional-looking green screen videos yourself. With today's digital tools, anyone can pull off impressive visual effects that would make Méliès drop all his heads. Here's how to get started.
What is a green screen?
Green screen—sometimes referred to as blue screen, or as it's technically called, chroma key—is a digital video production technique for compositing, or layering, different video streams based on color hues. In other words, a green screen lets you superimpose one photo or video stream over another, making it look like a single stream. This powerful technique is how filmmakers create everything from weather forecasts to blockbuster movie special effects.
How does a green screen work?
Using a green screen involves shooting your subject against a solid color backdrop, usually bright green. You might be wondering why this technique calls for a green-colored background as opposed to another color. The answer is that green is furthest from human skin tones, making it easier to separate subjects from the background during the keying process.
- For one, green doesn't match natural human skin tones or hair colors, making it easy to remove without compromising your subject and/or other elements in the foreground.
- The green color requires less light, registers brighter on electronic displays, and works well for outdoor settings where a blue screen might match the sky.
- It's also less common in costumes. If you can't use green—if you have a green prop or one of your characters is a Martian, for example—use blue, which is considered second best.
Using editing software, you then digitally remove, or key out, that color based on its chroma range—a process known as chroma keying. You can then drop the isolated subject onto a new background of your choice. The keying process works by identifying and removing all pixels within a specific color range, leaving your subject intact.
This way, footage shot in a small studio, or a closet draped with green screen, can appear to take place in a sunlit valley or busy streetscape—and, if done correctly, can look very convincing.
Why use a green screen?
Using a green screen is a time- and budget-friendly alternative to building an elaborate set or renting a studio. Your ideal shooting location might be too expensive, too busy, or inaccessible. Filming in front of a green screen makes shooting “anywhere” possible—so any filmmaker on Earth can set a scene on the moon. And any filmmaker on the moon can set a scene in Indianapolis.
It's also useful for delivering information visually. TV news meteorologists use green screens to report the weather forecast, pointing to parts of a map and showing weather patterns in motion. Not only does this make it easier for the viewer to grasp the information, it also personalizes the broadcast and helps connect with the audience. Plus, it's super cool.
Consider using a green screen to replace the background of your video with a graphic, photo, or video element if you're, say, recording presentation slides on your desktop, or making an instructional video.
How to use a green screen
- Set up your green screen
- Use the right camera settings
- Set up your lighting
- Position your subject
- Remove certain clothing and props
- Edit your green screen videos
1. Set up your green screen
The basic video equipment you need for the green screen effect is:
- A green backdrop
- A high-resolution camera
- A tripod
- A light source
- Video editing software with a chroma key tool
Before working on your green screen setup, decide whether an indoor or an outdoor setting allows you to create a better lighting situation.
If you aren't working with powerful lights, consider shooting outside in sunlight or overcast daylight, but keep in mind that you will be at the mercy of the weather and sudden light changes. An indoor setting, like a studio, provides a more controlled creative environment, giving you better command of your lighting.
Keep your camera completely still with a tripod. Make sure your shot centers on the green screen background, which should cover the entire frame. It also helps if your green backdrop is flat and smooth. Even slight wrinkles can cause issues in video production. Iron out creases.
Here are some of the best green screens you can find on Amazon:
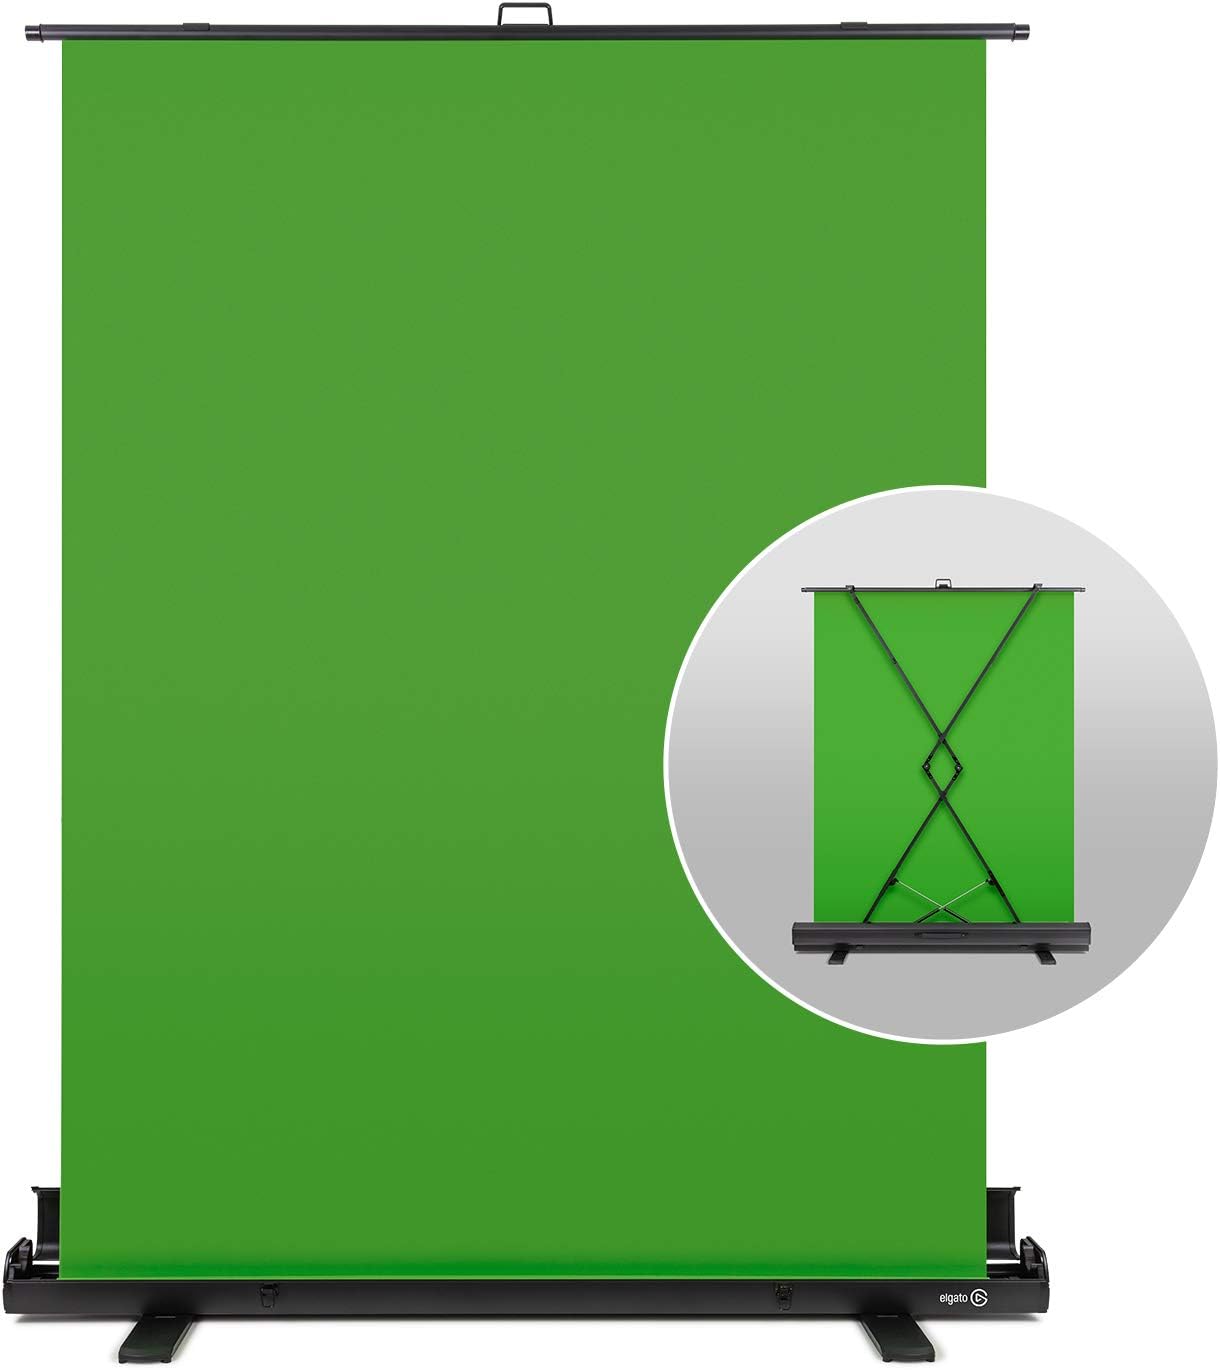
- Elgato Green Screen ($160): Collapsible, heavy-duty panel measuring 58.3”x70.1,” stand included
- Neewer Collapsible Two-Sided Chromakey Background Panel ($50): Thick muslin panel that's reversible for blue or green screen effects, measures 60”x78, stand sold separately
- Webaround Big Shot ($60): Compact 56” circle that slides onto your office chair for easy green-screening of talking-head videos
2. Use the right camera settings
Use a high-resolution camera. It should shoot high quality video, meaning 720p or higher, and with a frame rate of 24 fps or more. Most phone cameras are capable, but may not produce the best results. Shoot in MP4 or MOV format, and check that your video editing software is compatible.
3. Set up proper lighting for your green screen
Lighting for your video is crucial. A properly lit green screen makes keying out the green in post production easier. Light your screen thoroughly and entirely before lighting your subject. They shouldn't be treated as one. First light your green screen to ensure even illumination without shadows or hot spots, then separately light your subject to match the lighting of your intended background.
Consider the type of video footage you'll be using for your new background. Light your subject accordingly, paying particular attention to light direction and color temperature. Light appears cool or warm depending on the kind of bulbs you use. If your new background clip is a sunlit valley, the last thing you want is a subject lit with fluorescent dental-clinic-like light, or, worse, for the sunlight to be coming from the wrong side. Your lighting should match the direction, intensity, and color of light in your background footage.
4. Position your subject correctly
Keep as much space as possible between your subject and your green screen. Not only will this help mimic the lighting of your new background on your subject, it'll help prevent the screen's green tones from bouncing off the screen onto your subject (known as 'spill'). A larger backdrop can help you achieve a greater distance. The focal length of your lens can also be a factor. The ideal distance is typically 6-10 feet, depending on your setup.
5. Avoid green clothing and reflective props
Remember, you'll digitally remove—or key out—the green of your backdrop based on its color hue—or chroma range—in post production. Any other green objects in the frame, or anything the color of your screen, will also disappear. Make sure your subject or subjects are prepared and dressed to "show up". That means no green clothing, accessories, or props when using a green screen.
In fact, the further clothing and props are from green or blue, the better. Colors with just a hint of green can appear semi-translucent. Reflective objects and surfaces can also be a problem. Try removing any shine from your subject's face or head.
6. Edit and replace your green screen background
There are many video editors that offer easy green screen capabilities, some better than others.
Free software includes Windows Movie Maker and iMovie for Mac. Keep in mind that consumer grade software tends to have lower-grade chroma key tools. Sophisticated editing suites such as Adobe Premiere Pro or Final Cut Pro X usually produce better results but can be difficult to navigate for beginners. Look for software that offers specific 'Ultra Key' or advanced chroma key tools for the best results.
Descript makes it easy to remove a green screen background. It's also got everything you need to edit a video and turn it into a visual masterpiece. With Descript's AI-powered Green Screen feature, you can even remove backgrounds without needing a physical green screen during filming.
Here's a quick step by step tutorial on how to use a green screen in Descript:
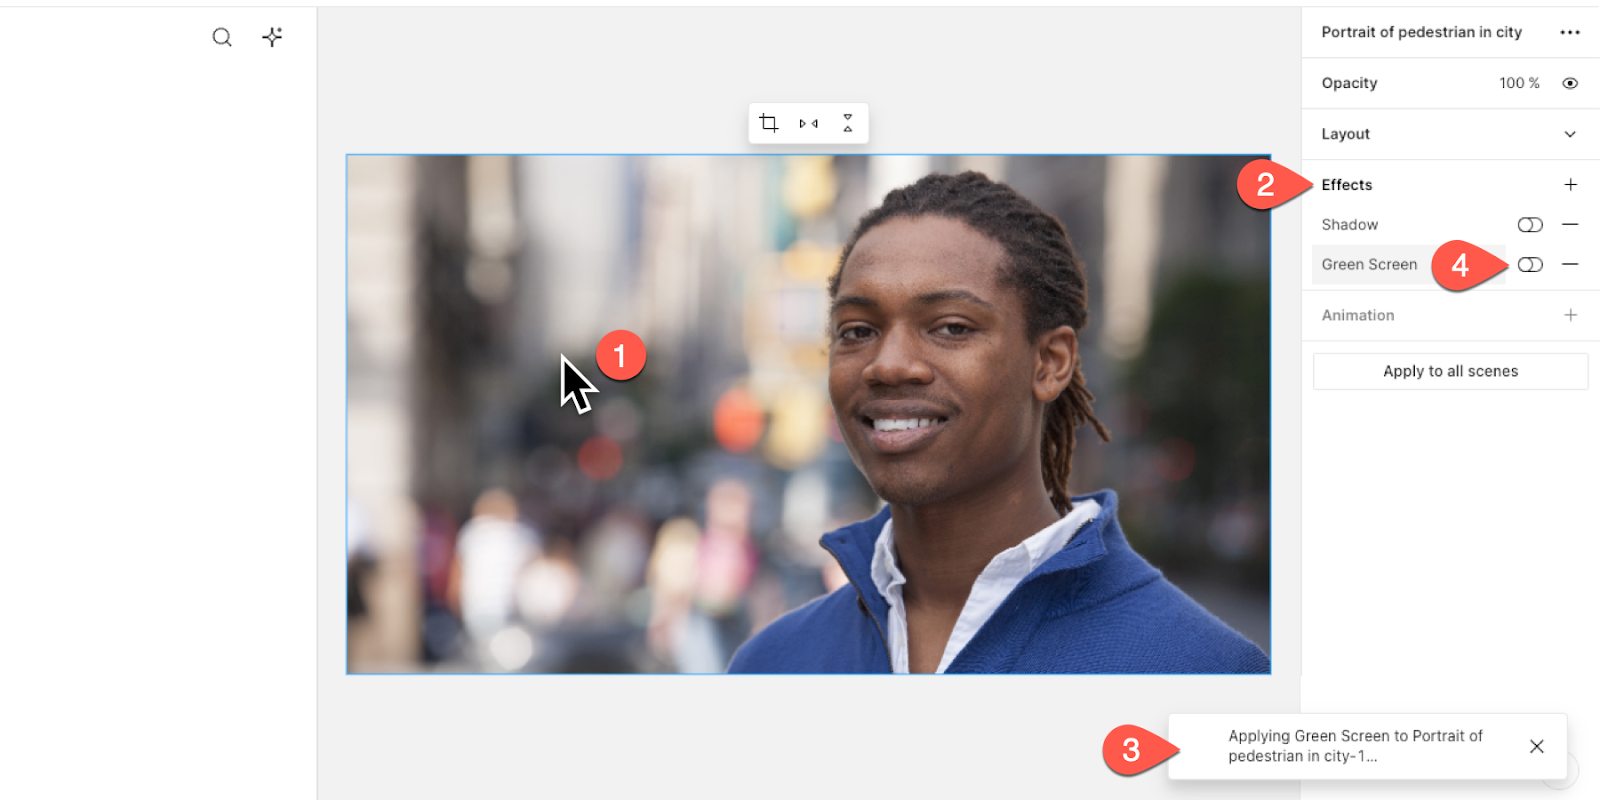
- Open your Descript app and import the video. Select the video element.
- Navigate to the properties panels, select Green Screen, and click “Apply.”
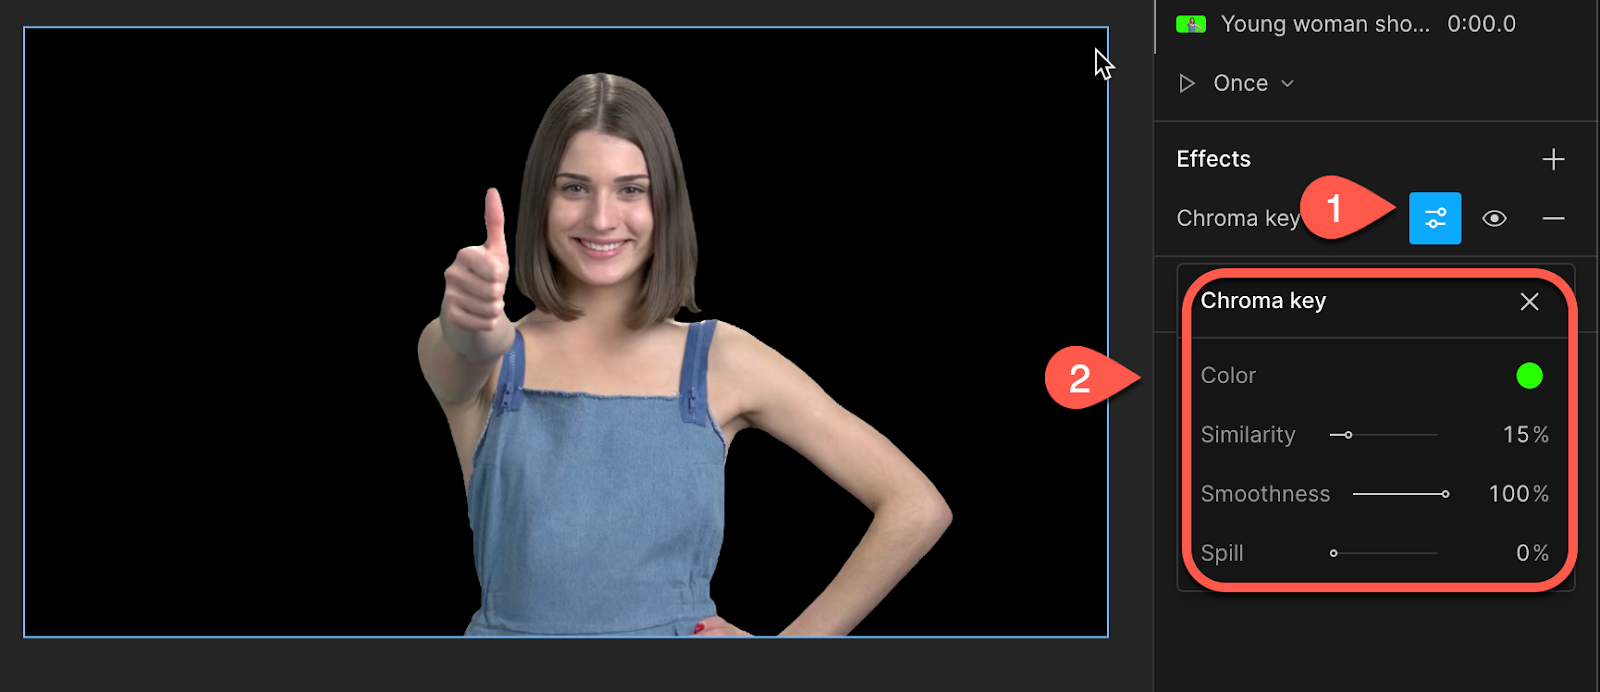
- Descript will use AI to analyze your video and remove the background. Once the effect is processed, toggle it on or off in the properties panel.
To add a new background image or video, simply import any media into the scene. Then, right click and select "Send to back." For the most realistic results, consider adding a slight blur to your background to create a more natural depth of field, especially if your subject appears to be close to the camera.
With a properly lit, well set-up shot, the green screen software will key out most or all of the background. Adjust the settings to optimize your chroma key effects, then make necessary adjustments to your new image or video background.
Consider adding depth of field by applying a blur filter, or add final touches like transitions, or clean up your green screen footage with Descript's trimming tools. For more creative applications, try using a smaller green screen for isolated objects or experiment with virtual sets.
Advanced green screen lighting methods for realistic composites
Achieving a cinematic green screen composite requires careful attention to lighting and color temperature. Start by positioning at least two lights at equal distances to ensure your green backdrop is evenly lit and free from distracting shadows. For a convincing final look, match the color temperature of your lights to the environment you plan to place behind your subject, such as using daylight-balanced lights (5600K) for outdoor scenes according to experts. Incorporate a key light for your subject and a fill light to reduce harsh shadows on their face. By avoiding overexposure and maintaining consistent brightness levels, you’ll integrate your subject more realistically into the new background through tested techniques. For especially tricky setups, consider adding a backlight behind the subject to separate them from the background and avoid any green spill.
6 tips for using a green screen effectively
1. Choose the right shade of green
Choosing the right shade of green makes chroma keying go smoothly and efficiently. If the green is too close to something your subject is wearing, it can spill. Spills happen when parts of your subject get keyed out. A bright green scarf, for example, may look like it's partly invisible or holed.
That's why the industry uses chroma key green. Its hex code is #00ff00.

Make sure your green screen is as close to the standard as possible, and avoid using green props or clothing that could interfere with the chroma keying process.
2. Keep distance between subject and screen
In professional setups, the distance between the subject and the green screen is carefully managed, often using markers on the floor. The ideal distance depends on lighting and camera field of view, but a general rule is to keep the subject at least 6 to 10 feet away.
3. Shoot in high resolution
Using high-resolution footage makes it easier to separate the subject from the green background without sacrificing details like hair strands or clothing textures. This is especially important for subjects with fine details that might blend with the background.
If an actor with curly hair is filmed against a green screen in standard resolution, their curls and strands will blend into the green background, creating jagged or blurry edges in the final composite. The best way to capture everything in detail and make keying easier is to shoot in 4K (or higher). This level of detail helps create clean edges around complex subjects like hair or transparent objects.
4. Avoid reflective surfaces
If you can help it, avoid wearing shiny clothing, glasses, jewelry, or glossy props. Reflective surfaces can catch and reflect green light from the screen and lead to spills on the subjects or objects.
You could use a spill suppressor or color correction to remove the green from the reflections in post. But if you want a simple, smooth keying process, try to avoid anything reflective.
5. Use quality green screen material
Your green screen material is key to getting a good chroma key effect. Materials like muslin and polyester are designed to absorb light and provide a smooth, even surface. If your green screen is reflective or has wrinkles, it can cause shadows and light spots that are difficult to key out. A "green screen kit" is often not your best option as they tend to be low quality. It's better to purchase a paper photography backdrop or green muslin and hang it on a frame.
In big budget productions, special fabrics are designed to prevent creasing and sagging. For smaller productions or those with a tighter budget, there are green screen kits with quality materials for effective chroma keying.
6. Light subject and green screen separately
For green screens to be effective, you'll need two light setups: one for the screen itself, which will ensure it is evenly lit without shadows, and one for the subject.
Expose the green screen backdrop evenly, making sure it has no dark or bright areas. To avoid shadows, try for diffused, non-directional lighting on the entire screen. Diffusion spreads light, evening it out, creating a soft, gentle effect. You can diffuse light by shining it through semi-transparent material, like a softbox or white bedsheets, or by bouncing it off a reflective surface. LED panels are extremely useful for lighting green screens because they're bright, don't get hot, and use minimal electricity.
If you have the resources, start with two 1000-watt lights with softboxes for the screen, and a 650-watt light and a 500-watt light with softboxes for your subject. You might also want a backlight to help highlight and define your subject's outline.
In-depth chroma keying techniques and troubleshooting
Chroma keying thrives on well-chosen software and precise settings. Tools like Adobe After Effects and DaVinci Resolve offer advanced controls for adjusting screen gain and screen balance for polished results. One common challenge is green spill, where the background color bounces back onto the subject, and can be countered by increasing the distance between the subject and screen or using a dedicated spill suppressor according to experts. Meanwhile, inconsistent lighting or hotspots often hamper the process, making it vital to maintain uniform brightness across the backdrop. If fine details like hair edges appear ragged, adjusting matte generation or key density settings can refine the composite without sacrificing clarity based on historical best practices. By meticulously addressing these common pitfalls, you’ll create a seamless blend of subject and background that looks truly professional.
Using a green screen easily in your videos
A green screen can produce blockbuster-worthy results, and may seem like something reserved for professionals. It's not. With the right lighting and the right setup, you can easily—and affordably—marvel your audience like Méliès.
With Descript, you can apply a virtual green screen and add Hollywood-worthy special effects all in one software—whether it's for your next TikTok, YouTube video, or both! If you're already using a green screen, you can use Descript's chroma key tool to replace the green color with your background of choice. For mobile video creators, Descript makes it easy to film anywhere and transform your environment with just a few clicks.
If you're a content creator, save time editing your videos and focus on being creative. Take a free tour today and see why thousands of creators rely on Descript.
How to use a green screen FAQs
What program do you use for green screens?
For green screens, Descript and Adobe After Effects are popular choices. Descript is also a good option: the AI-powered video editor lets you easily remove the green background and replace it with a different image or video. It's a great choice for content creators looking for a user-friendly way to use a green screen. With Descript's Green Screen effect, you don't even need a physical green screen—the AI can identify and remove your background automatically.
How do I change the background on my green screen?
To change the background on a green screen, first, record your video or take a picture with the green screen. Then, using video editing or photo editing software with a chroma key tool, make the green color transparent, and replace it with another background image or video.
How do I use a green screen for a virtual background?
Set up a green screen behind you and make sure it's well-lit and wrinkle-free. Record your video or start your webconferencing call, then select the option to apply a virtual background in your software. The software will then replace the green color with the virtual background you choose.
Can I use blue instead of green for chroma keying?
Yes, you can use blue instead of green if your subject or props have green tones that would otherwise blend into a green screen as recommended by professionals. Keep in mind that blue screens often require more light, and can blend more easily with the sky if you’re shooting outdoors.
How do I match the lighting in my background footage?
Start by analyzing the color temperature and direction of the light in your background, whether it’s daylight or tungsten-balanced sources according to industry guidelines. Then, replicate those characteristics on your subject using matching bulbs or filters to maintain consistency. If the background has strong shadows or highlights, adjust your key and fill lights accordingly.
Is it possible to create a green screen setup on a tight budget?
Absolutely—many creators simply hang a wrinkle-free green sheet or paint a wall with chroma key green matte paint to keep costs down. You can also build a simple lightweight frame from PVC pipes to keep your screen taut and free of shadows. For lighting, consider inexpensive softbox kits or DIY diffusion solutions to achieve even illumination.


