


If you want to start a podcast but don’t have anything to say, don’t. If you think you’ve got ideas that somebody, somewhere might find somehow valuable, but you’re holding back because you don’t know anything about recording software or equipment, you’ve come to the right place. With a little prep work and some trial-and-error, you can absolutely learn how to record audio for podcasts.
The ingredients for a compelling podcast boil down to a tasty reduction of great content and high-quality audio. Great content requires an engaging podcast host, a compelling, sustainable premise, and a steady outpouring of unique information, insights, or entertainment.
High-quality audio requires the right podcast equipment, solid recording techniques, and basic audio editing chops. Let’s explore the the gear and approach you need to record and edit your podcast.
How to record a podcast
Planning
If your podcast involves guests or anyone other than yourself, you will almost certainly wind up recording remotely. Even in a post-quarantine world, everyone has grown so accustomed to remote recording that asking guests to come to your recording space every time suddenly feels like an onerous request.
So as you plan to record multiple podcast episodes, think about how you’ll capture guest audio, knowing they may need guidance or assistance. Some podcasters go so far as to send their guests mics; at the very least, talk with them about finding a nice quiet space, with good wifi (or better yet, an ethernet connection).
And choose your remote recording software carefully — that is, choose a dedicated remote-recording platform, not a video conferencing app that also records audio. Descript recently joined forces with SquadCast. So if you’re a Descript subscriber, you can record your podcast, including video, with guests anywhere in the world, and have the recording waiting for you in Descript once you’re finished.
More on this in a bit.
Equipment
As you assemble your podcast gear, make sure you have these three essential items:
Computer
If you’re not planning to go analog and splice bits of tape together, like a lunatic, you’re going to need a computer to record and edit. A good option for entry-level podcasting is the MacBook Air for its processing power and portability.

If you’re reading this on your computer, skip ahead — you’re all set. Laptops work particularly well for podcasters since they can be transported to remote recording locations. Look for a computer with at least 8GB of RAM, and get the most powerful processor you can afford.
Microphones
Here’s the thing: if you have a good recording setup and the right editing software, the mic you use doesn’t matter that much, so don’t get too hung up on this as a beginner. You can pick up a solid podcast mic for under $100 and use Studio Sound by Descript, and you’ll get incredible audio quality, just like working in a studio.

That said, a seasoned podcaster probably has multiple microphones at the ready so they can quickly accommodate group discussions or special guests. XLR microphones are the industry standard because balanced XLR cables minimize line noise and electrical interference. Add a pop filter into the mix and you’re good to go.
USB mics have surged in popularity because they can plug right into your computer without an audio interface (although if you’re recording multiple people at once, you’ll definitely want an audio interface; without that, recording with multiple USB microphones is really complicated). You can also use handheld voice recorders, which save digital audio files locally; you can then transfer these files to your editing computer.
Headphones
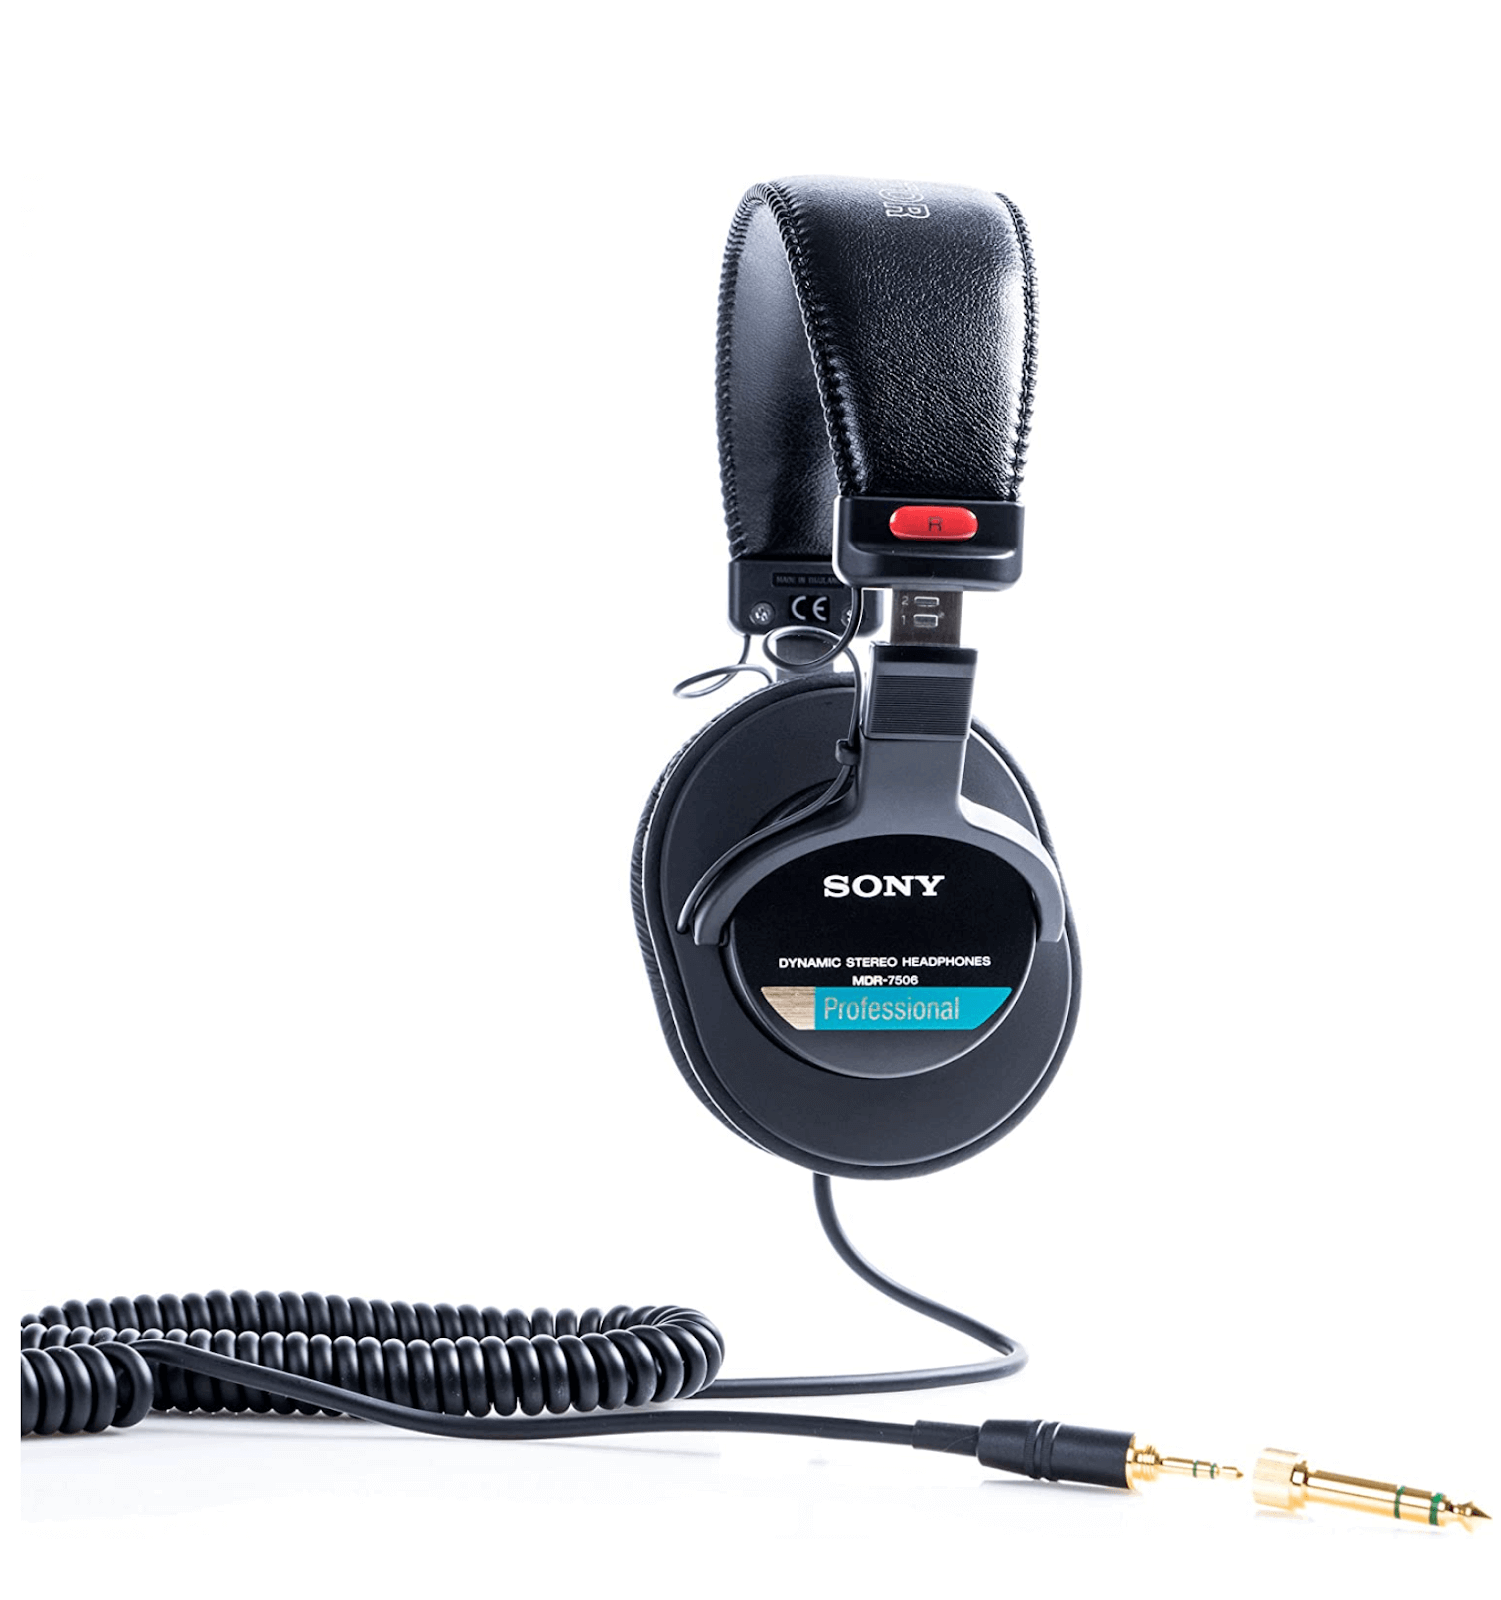
Podcast editors need high-quality headphones to properly hear the audio tracks they’ve captured. Sony’s MDR-7506 headphones are an industry standard. They’re comfortable, they provide a neutral sound, and they only cost $100.
For something even more affordable, check out the Superlux HD 681. They don’t quite match Sony’s sound quality, but they cost less than half the price of the MDR-7506.
Podcast recording software
There are tons of podcasting software tools to choose from, including Pro Tools, Logic Pro, Adobe Audition, Audacity, and our favorite, Descript.
Pro Tools and Logic Pro are beloved in the music industry and really powerful — perhaps a bit too powerful, and too expensive, for a budding podcaster. Audition is better known in the podcasting and sound effects communities because Adobe built it for voice recordings. There’s also Audacity and GarageBand, which are decent free options.
We think Descript is a better option for podcasters, and while it’s true that this is the Descript blog, so what else would we say, consider that Descript’s transcript-based editing allows you to actually see the words being spoken instead of listening through waveforms until you get to the right place. Plus, it’s easy to publish your new podcast to Spotify and Apple Podcasts via various hosting platforms.
Recording podcasts with Descript
Since our integration with SquadCast, Descript has become your all-in-one Digital Audio Workstation (DAW). From recording to editing and publishing to your own podcast hosting platforms, there’s almost nothing you can’t do with Descript.
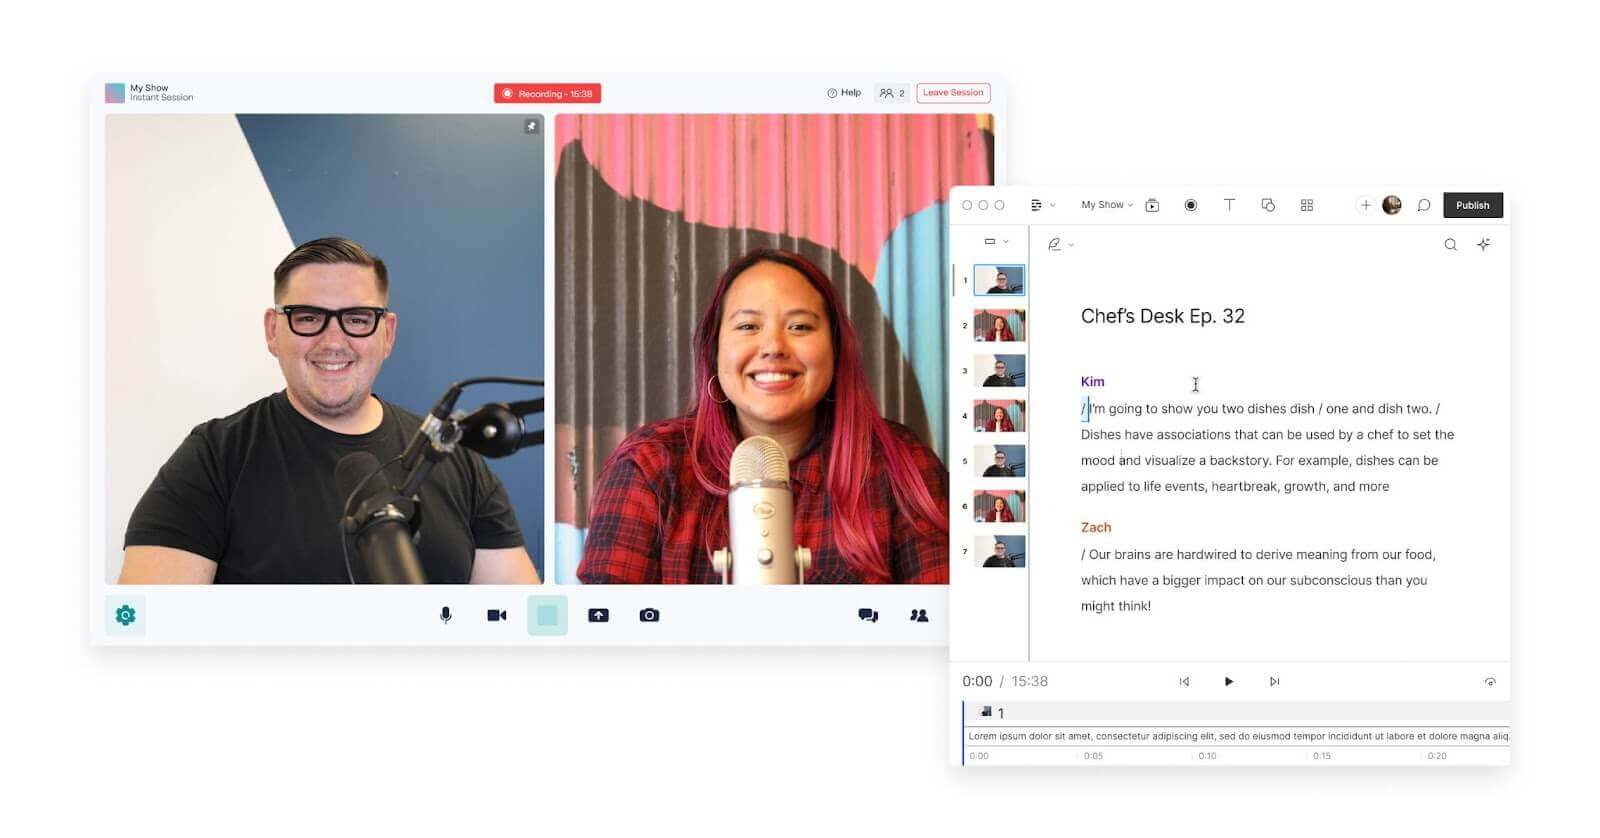
Guests can join recording sessions from their browser or iOS/Android device without an account. Recordings are done locally and uploaded to the cloud progressively, so even if your internet connection goes down, you won't lose sessions. Compared to conferencing tools like Zoom or Skype, where bad internet equals bad recording, the quality is night and day.
Once you’re done recording, you can edit audio files the same way you’d edit text in a doc. It also comes with all the podcast editing and mixing capabilities you need to make a great-sounding podcast, like EQ, compression, ducking, and the ability to say “wherever you get your podcasts” ad nauseam. Plus, you can quickly make social media clips to promote your show when it’s ready. And if you make a video podcast, you can edit that in Descript at the exact same time — no other tool lets you do both.
Remote recording with Descript is easy. Here is a little tutorial for recording podcast audio using Descript software.
- Create a new project. Launch Descript and click the blue “New” button in the top right corner and select “Remote recording” from the drop-down menu.
- Make a free SquadCast account. This will take you over to SquadCast where you can make a free account, then link it to Descript. Now, you’re in your SquadCast recording studio.
- Invite guests. Copy the session link to your remote interview and send it to your co-hosts and/or guests.
- Start recording. Now you can begin recording—just click the red “Record” button to start capturing audio. Remember, even though you’re recording in SquadCast, Descript will automatically give you a transcription of the conversation to edit.
- Edit in Descript. After the session is over, click the red “Leave Session” button, then click “Edit in Descript”, and there you will find your audio recording. Here you can add intros and outros, trim and clip, and include sound effects.
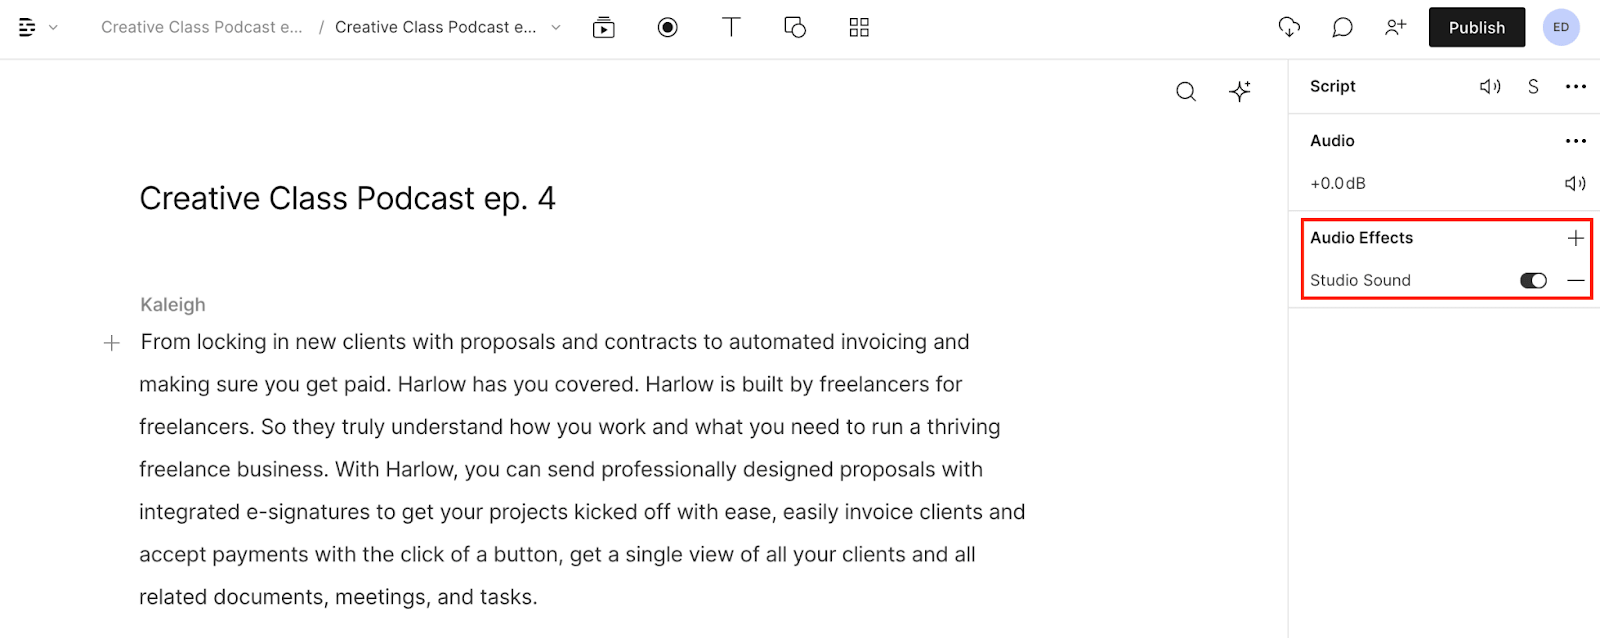
💡TIP: You can get great audio quality by using Descript's Studio Sound feature. Studio Sound will not only remove the background noise, it will break down and regenerate the speakers' voices, so they sound like they were recorded in a studio. You can also polish your audio with EQ, compression, and other tools.
3 tips for recording podcast audio
Before you record your podcast, keep these three key things in mind:
Record in a soundproofed space
The best way to ensure great sound quality is to record in the quietest possible space. If you have access to a professional recording studio, seize the opportunity to record there. If you plan to podcast from a home studio, record in the quietest room available.
For some people, that might be a clothes closet, since hanging clothing acts as a natural sound absorber. If you’re recording in a regular room, choose one with carpeting or lots of soft furniture — both are also great at absorbing sound. Close all windows and doors to keep out background noise.
If some noise does sneak in, all is not lost, you’ll just need to spend a bit of time trying to remove those noises during post-production.
Make sure you have ample volume
You need to get a good, strong audio signal when you record your podcast; otherwise, it might be hard to hear you (and your guests). If your recording is too quiet, you can boost the sound in post-production, but there’s a catch.
Not only will you boost your intended vocals, but you will also boost the faint sounds of background noise or audio hiss. Avoid this problem by getting a sufficiently loud audio signal when you start recording. The best way to do this is to position your guests fairly close to their microphones (tell them to get their mouth about a palm’s length away from the mic).
Consider the microphone
If you have a podcasting budget, you’ll probably want to buy a podcast microphone. But don’t feel like you need to break the bank. You can find some very respectable microphones for around $100 (both XLR mics and USB microphones), or you can scale up for more sensitive mics that capture a greater range of the audio frequency spectrum.
But we don’t think you need to overspend here. Remember that today’s editing technology has lots of tools for helping you upgrade your recorded audio — like our Studio Sound feature, which will help you get studio-quality sound, even if you start off using the mic in your laptop.
FAQs about recording audio for podcasts
Here are three of the most common questions podcasters have about the recording process.
How do you record people in two different locations?
When podcasters collaborate remotely, they have two main methods of recording their parts. The first is to interact live — that is, have a conversation over the phone or on a video chat service and record that conversation using a mixer and editing software. You can also do what's called a double-ender, where the podcasters each record on their own, rather than chatting over phone lines or the internet.
How do you make a podcast sound great?
When it comes to creating the best podcast audio, there’s no one-size-fits-all formula, but a few rules typically apply. Record your participants in quiet rooms using the best microphones that fit your budget. Add subtle amounts of compression using computer plugins. Compression will level the overall sound of your recording so that nothing is overly loud or overly quiet.
You may also want to tweak the amount of reverb, adding some to a dry recording to add a sense of space, or removing it from a speaker who was in an echoey room. Finally, add a bit of equalization (EQ) to bring out certain frequencies. Boosting lower frequencies can create a bit of resonance. Boosting upper frequencies can bring out certain consonants and improve articulation. Middle frequencies are the ones we hear most clearly, so boosting those might sound like a standard-issue volume boost.
Can I create podcasts on my phone?
You can certainly start your podcast by using a call recording app on your phone. You could use the built-in microphone, which is surprisingly good on most devices, but the market is full of high-quality mics for iPhone and other smartphones at a fair price. When it comes time to edit, you’ll want to migrate your audio files to a computer, where you can make full use of editing software like Descript or Adobe Audition. You’ll also use your computer to upload your podcasts to a hosting service and to monitor user engagement on various podcast platforms.


