Video editing tools often come with learning curves so steep you need climbing gear. Descript is different. Yes, we're biased as the creators, but the reality speaks for itself:
- You get multiple media creation features in one place: audio and video editing, screen recording, and transcriptions. This means you don't have to context-switch or multitask across tools.
- Descript's AI-powered features automate menial tasks (like generating transcripts) so you start with the good part—creation.
- Advanced functions like multi-track recordings, filler word removal, and speaker identification happen automatically, so you don't need to know a lot to get started.
In this step-by-step guide, we'll show you how to harness these features to build your project without the usual learning curve that makes most people quit before they've even started.
What is Descript: a beginner's overview
You start out in the Drive View where you can begin a new Descript tutorial for beginners or continue an existing one. Here, you manage your projects, teams, and subscriptions.
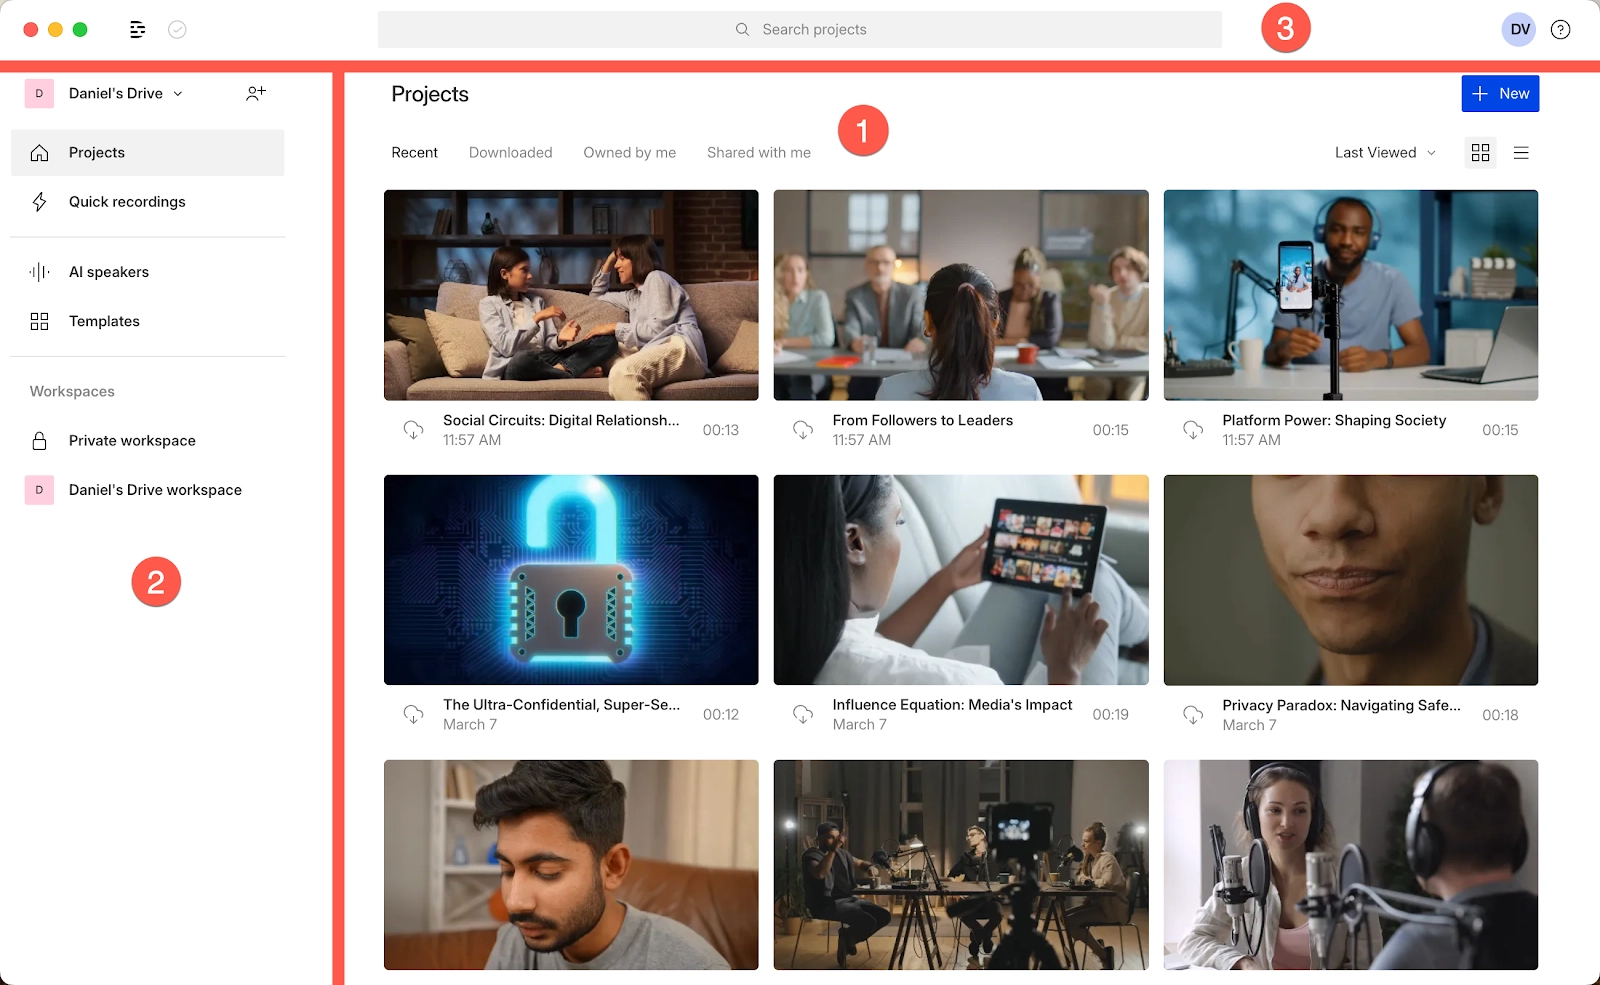
The Drive view has three key sections:
1. Project Panel: you can create new projects or jump back into existing ones here. Move, rename, or delete projects and adjust project access to keep everything organized.
2. The Sidebar: you can switch between drives, purchase new drives, invite team members, and access different tabs in the drive:
- Projects: view all the projects you have access to.
- Quick recordings: view all recordings you make with the Quick recorder (Descript's stand-alone recorder for recordings on the fly).
- AI speakers: view the custom AI voices you can access to generate speech just by typing.
- Templates: if you're on a Pro drive or other paid subscription, this is where you can create custom templates that you can use to speed up your workflow.
- Workspaces: storage areas on your drive. When you add projects to a Private workspace, you can control who gets acces to them.
3. Search bar: At the top of the Drive view, you can search for projects, customize your App settings, and manage your subscriptions and teams.
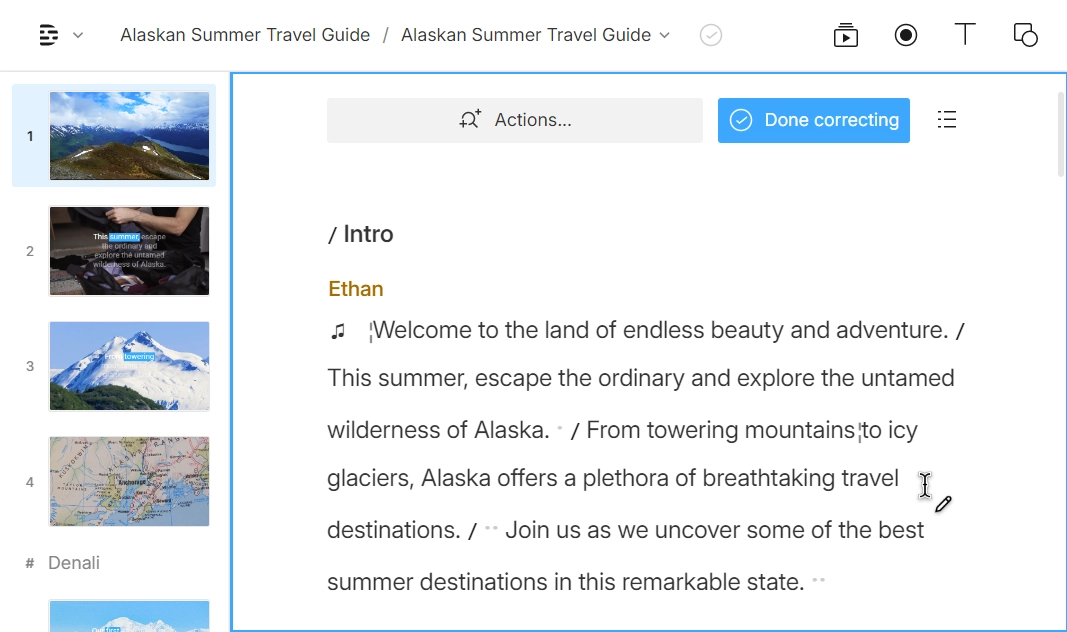
Once you've clicked on a project, it'll open in the Editor—your audio-visual hub for this Descript tutorial for beginners. This is where the AI-powered magic happens, letting you edit every aspect of your project by simply editing text.
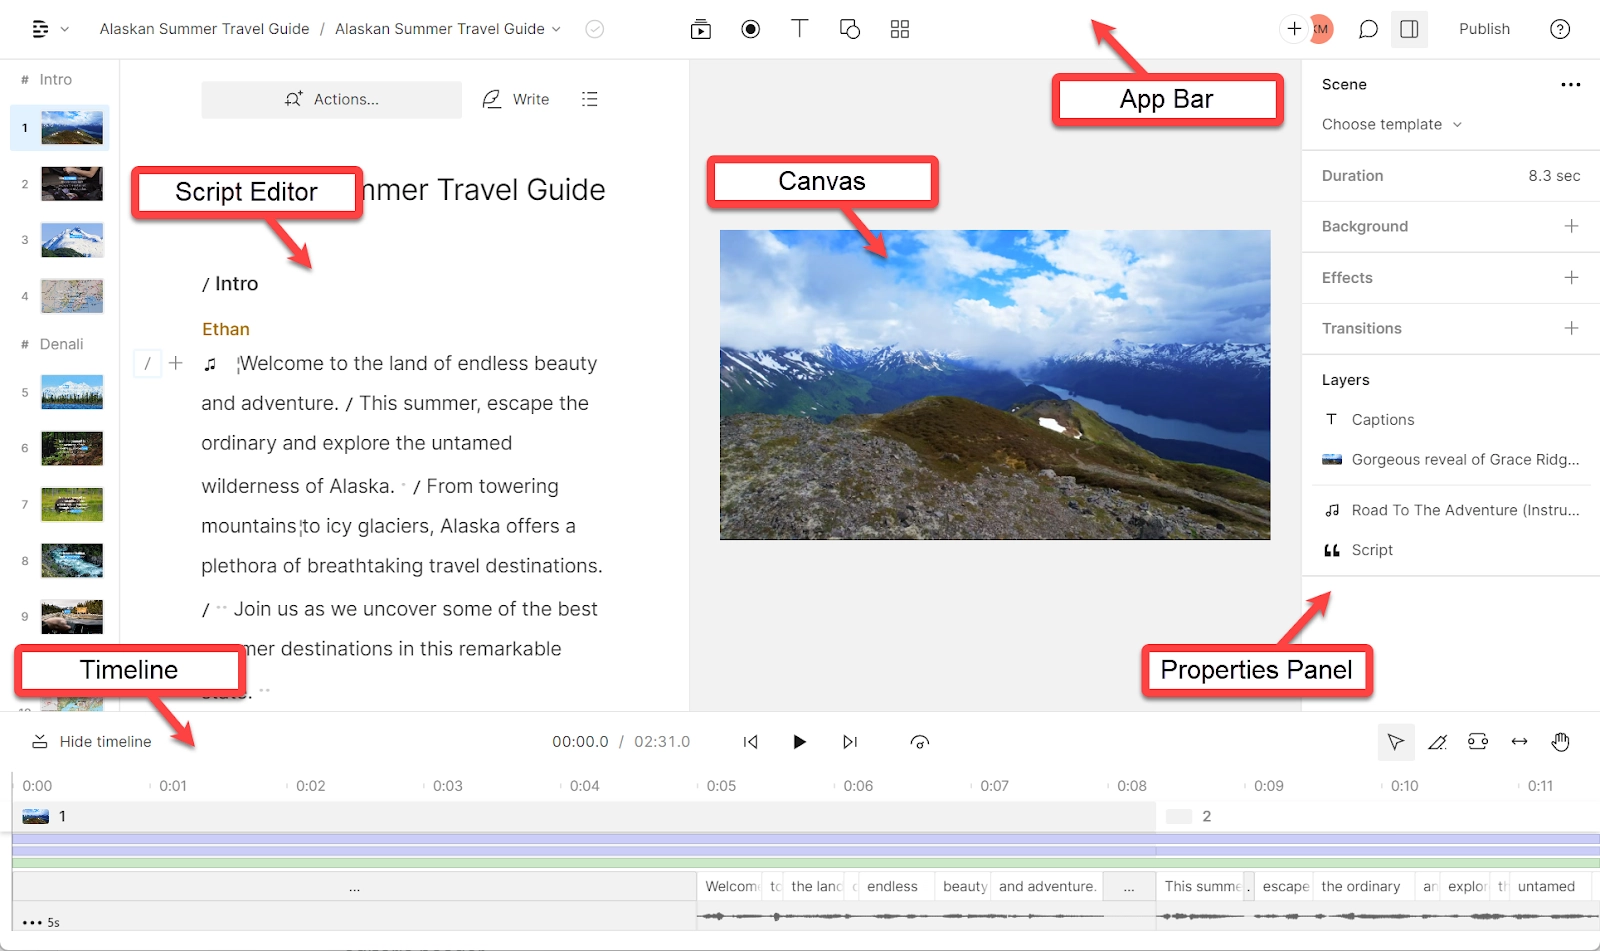
Here are six things you can do in the Editor as part of this Descript tutorial for beginners:
- If you make changes to your transcript, they automatically get applied to your audio and video as well. For example, if you cut out a section from the transcript, it's removed from the entire composition (unless you choose otherwise). This way you don't spend hours cleaning up transcripts only to repeat the same processes with audio and video files. You can also add AI-generated audio and comments in the Script Editor and access project actions and search features from the Action bar.
- With the Scene Rail in the left margin, you can move and adjust scenes like slides in a presentation.
- You can use the Canvas to arrange and adjust the visuals of your scene.
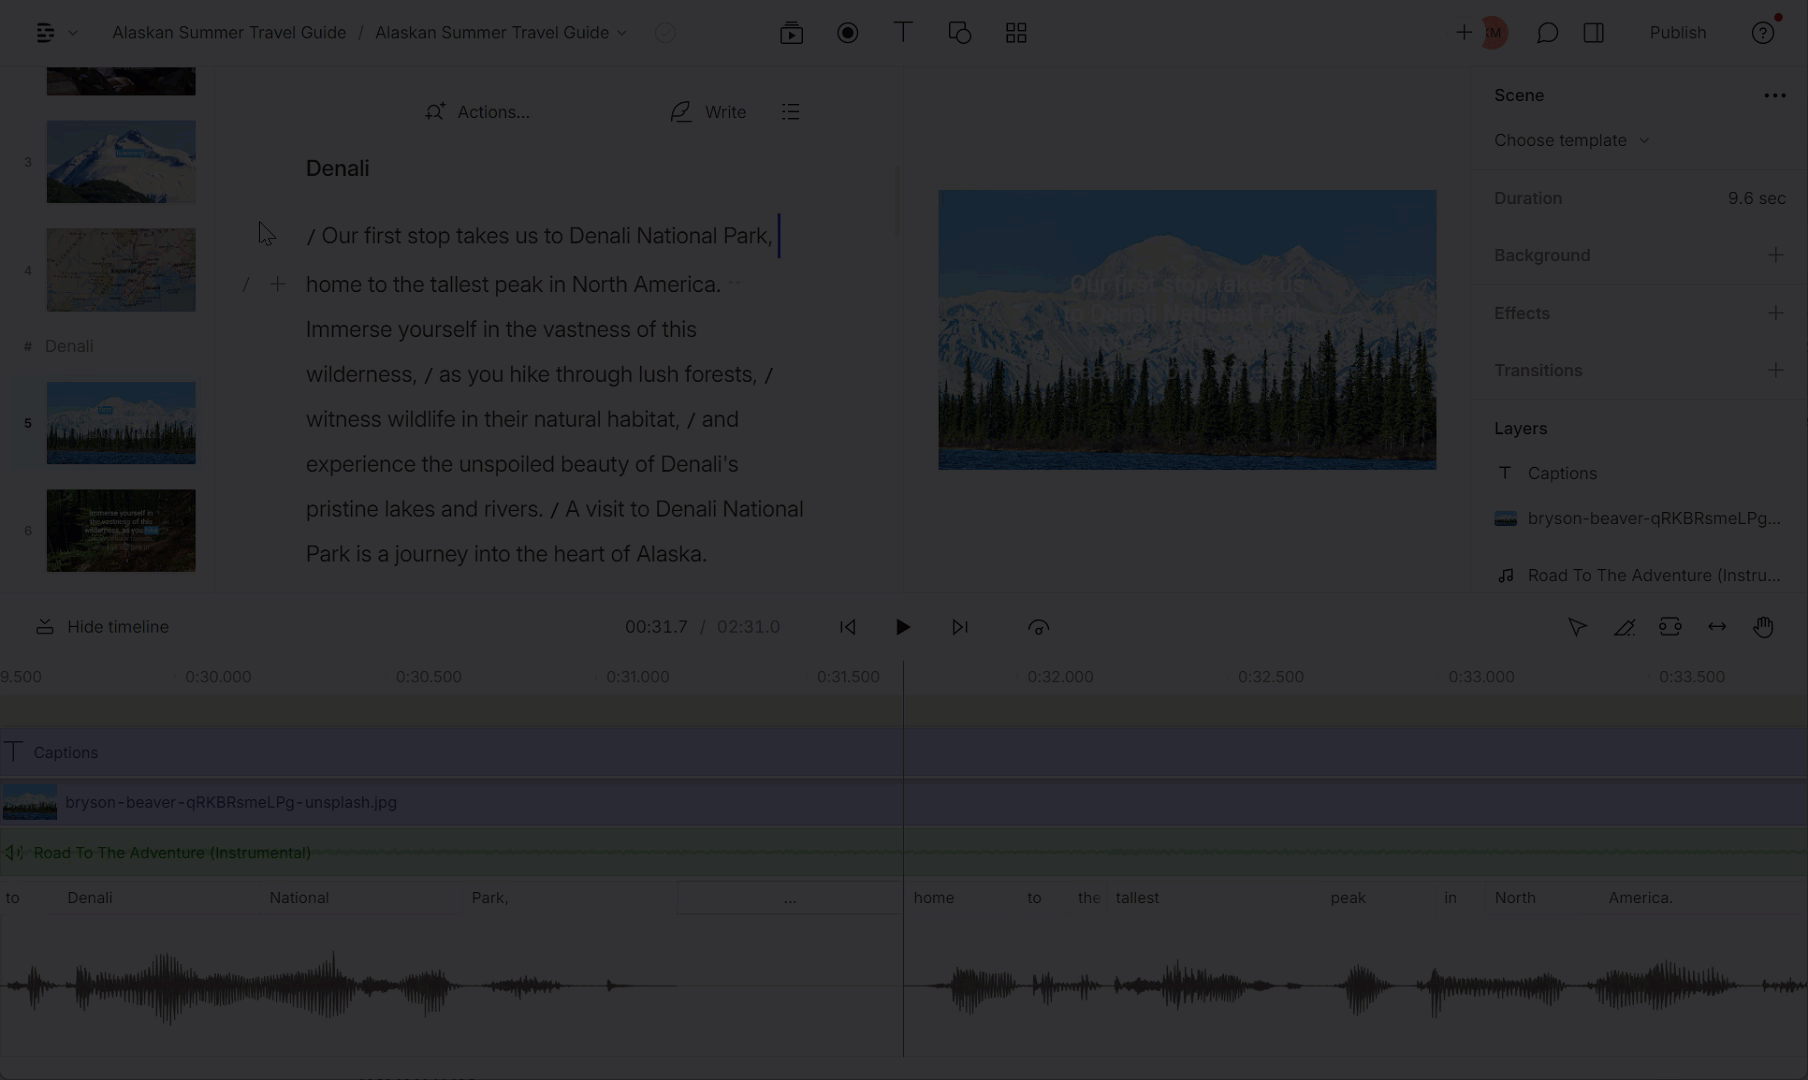
- Your composition will show up on the Timeline, where you can adjust your script's word alignment and make fine edits to your media.
- You can view and adjust the properties of almost everything you select in your project (compositions, scenes, tracks, and visuals) from the Properties panel.
- The App bar is where you can manage the compositions in your project as well as access the Media Library, Recorder, Text, Shapes, and Templates. You can also publish or export your composition, provide project access to collaborators, and access settings and preferences.
📺 Watch a webinar: Descript for Beginners
Descript tutorial for beginners: 6 simple steps
You can start using Descript almost instantly upon installing it. It's straightforward, intuitive, and beginner-friendly—perfect for podcast editing, video editing, or transcription projects without the steep learning curve of traditional software.
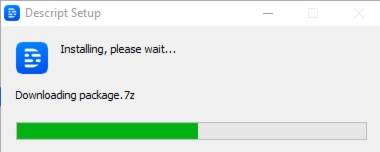
1. Download and install Descript
It's easy to install Descript for both Mac and Windows users.
MacOS users can follow these steps:
- Step 1: Download the Descript Installer for Mac.
- Step 2: Once you've downloaded the .zip file to your computer, unpack it. Then double-click the installer app to begin installing Descript. If you're prompted to confirm opening the file, click Open.

- Descript will start installing the app—taking anywhere from a few seconds to a few hours, depending on your internet speed.
- Step 3: When the download is complete, sign in or create an account to begin using Descript.
Windows users can follow these steps:
- Step 1: Download the Descript Installer for Windows.
- Step 2: Once the .zip file has been downloaded to your computer, click to unpack it. Then, double-click the installer app to launch and begin installation.
- Step 3: Once the download is complete, sign in or create an account. After that, you can start using Descript.
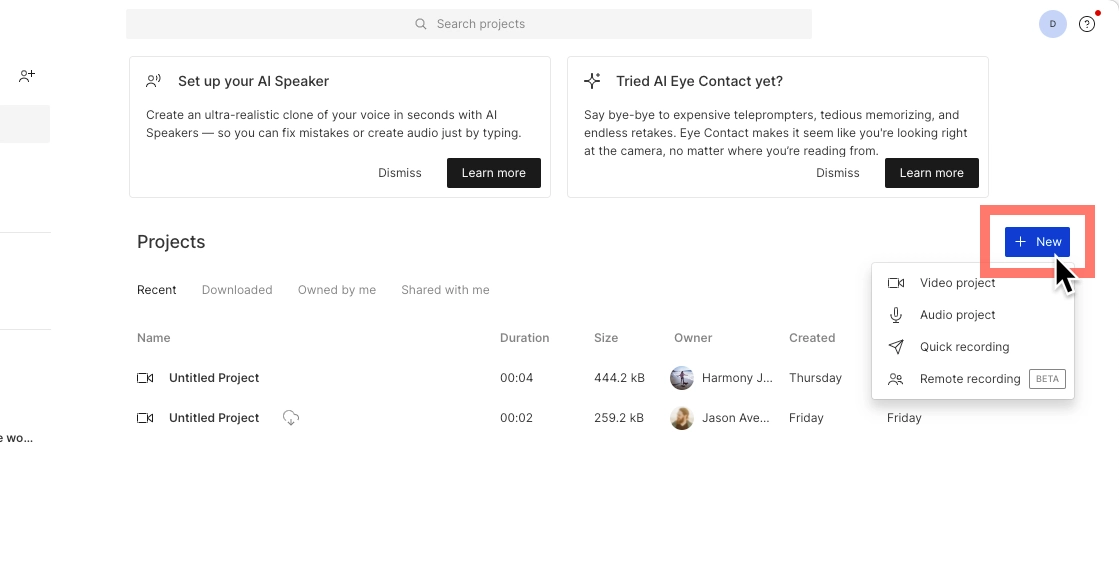
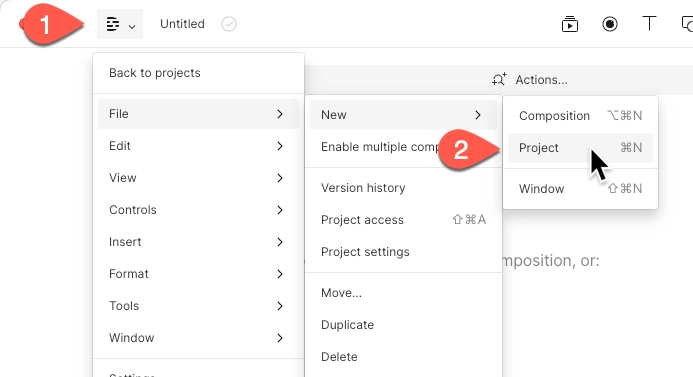
2. Create a project
Now that you've downloaded Descript and signed in, you can start working on your projects. The AI-assisted editing features make it surprisingly easy for beginners to create professional-quality content.
Create a project either from your Drive View or while working in an open project.
To create a new project from the Drive view, click on the + New button and choose the type of project you'd like.
To create a new project from inside an existing one, select the D logo in the top left corner.
Then, click on File > New > New project.
Pro tip: use Command+N or Ctrl+N as a shortcut anytime you want to create a new project.
3. Record audio or import your files
To create, edit, or collaborate in Descript, you can record directly or import a file. Think of this as the foundation of any beginner's workflow in this text-based editing tutorial.
Follow these steps to start an audio recording:
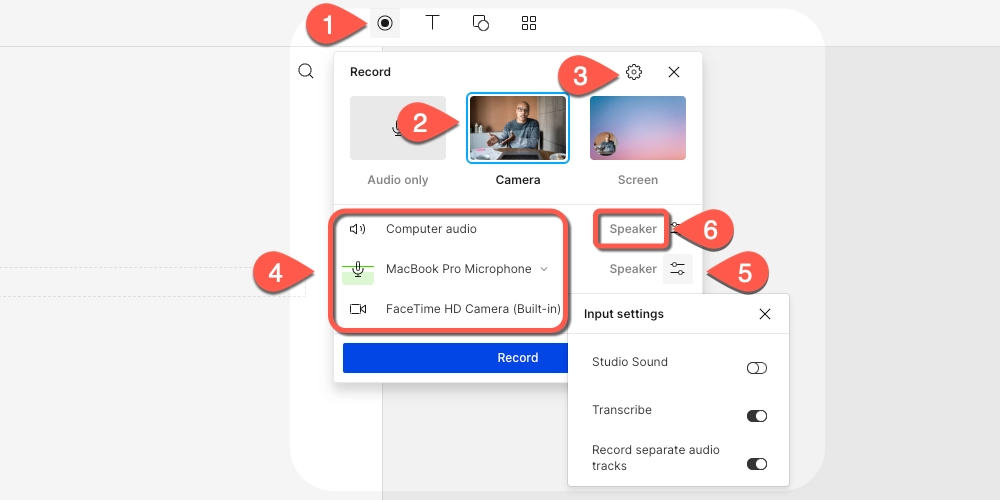
- Click the Record button to open the Record panel at the top of the editor.
- Select Audio only.
- Adjust your recording settings by clicking the gear icon. Click here for more information on recording settings.
- Choose your recording inputs by clicking on either the computer audio icon or microphone icon. If both are enabled, the inputs will be recorded on separate tracks.
- Click the sliders icon for settings and decide if you want to enable Studio Sound or transcription. (You can also apply these after recording) If you are using an audio interface and recording multiple microphone, you can enable Record separate audio tracks for each external input.
- If you'd like, add speaker labels by typing them in the text box next to your inputs.
Record into script
You can find this setting in video compositions, and use it to add your recording to the script. In general, keep Record into script enabled if you intend to transcribe and script edit the recording. Turn it off if you just need to record background audio.
Record your audio
1. Choose one of the three recording options from the dropdown in the bottom right corner of the recording panel:
- Record into script: this will add your recording to your script track.
- Replace selection: this option will show up when you highlight a section of your script before opening the record panel and will replace the script selection. Learn more about Replace selection.
- Record new layer: add your recording as an audio layer. If you haven't recorded anything yet, you'll want to record into script first.
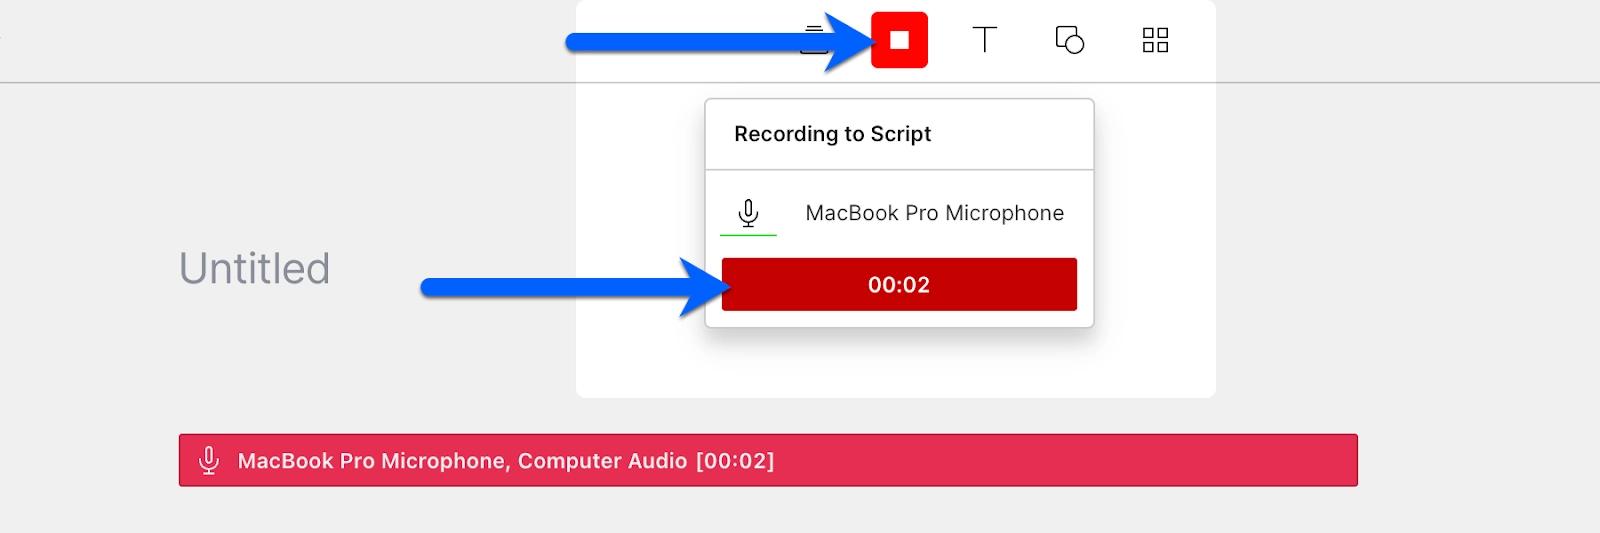
2. Click Record at the bottom of the Record panel to start recording.
3. Press the stop icon or timer button to end the recording.
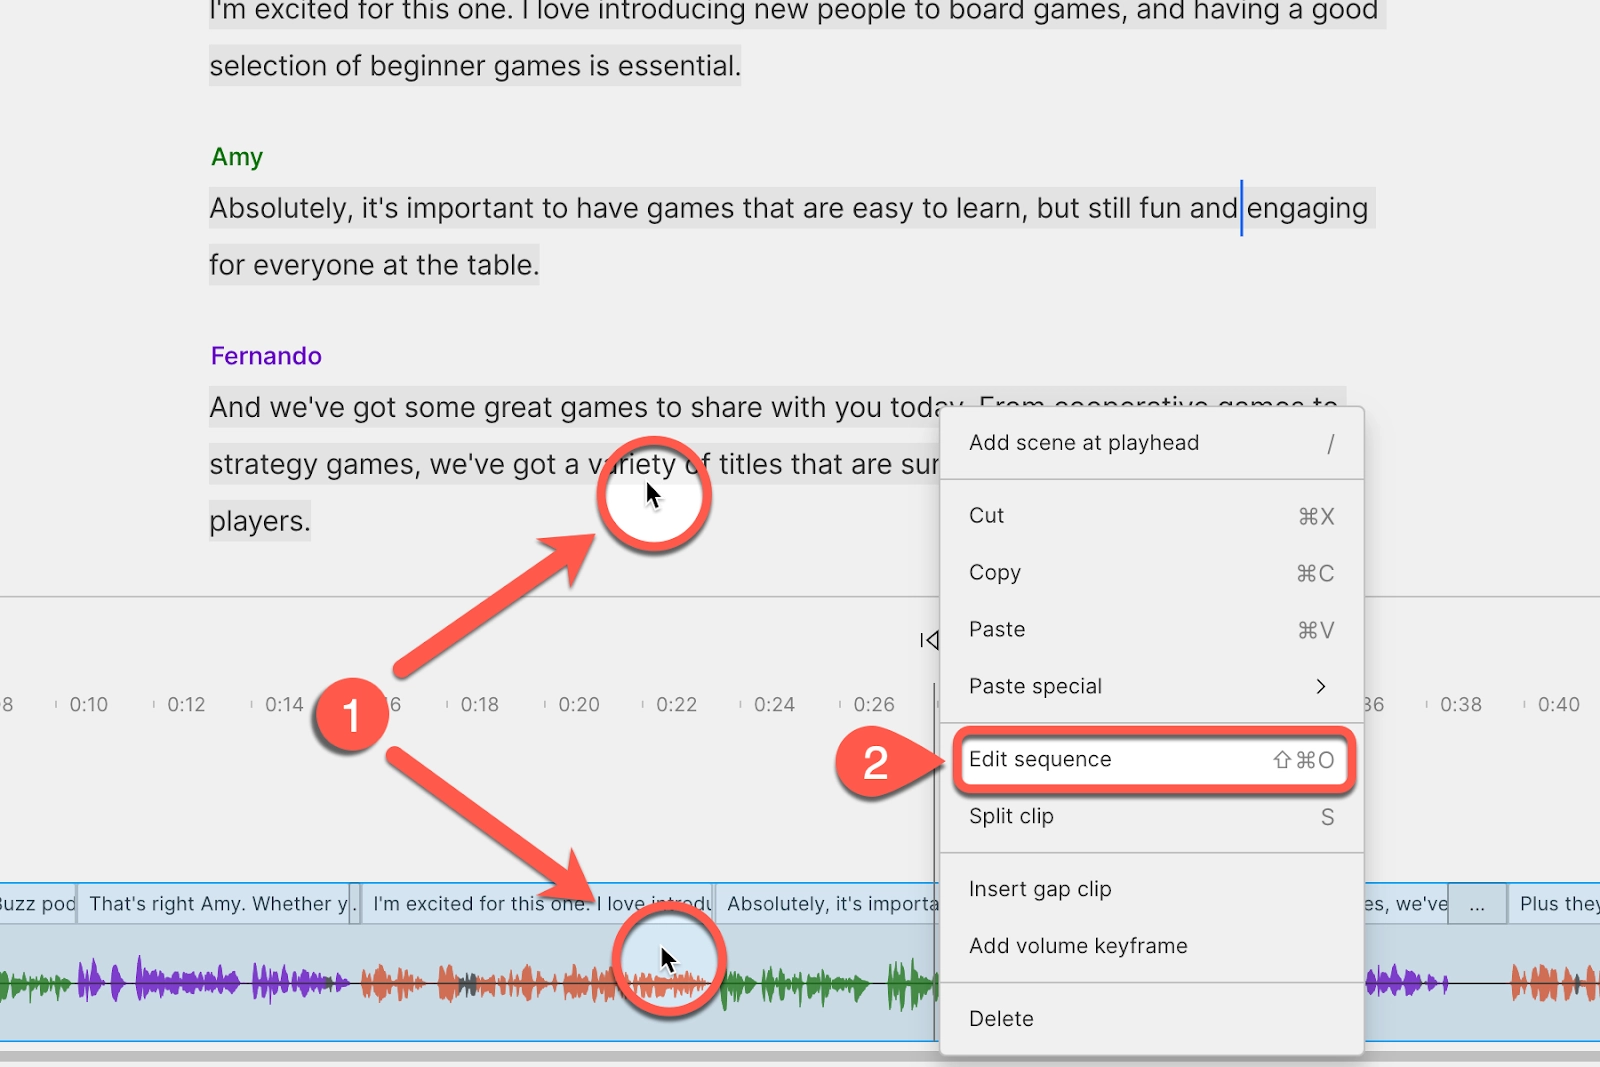
Editing individual tracks of a multitrack recording
If you've enabled multiple inputs, your recorded tracks will be put into a multitrack sequence. You can edit the individual tracks from the sequence editor.
- Right-click your sequence in the timeline or in the script.
- Choose Edit sequence.
You can follow these steps to start a video recording:
- Click the Record button and to open the Record panel at the top of the editor.
- Select Camera.
- Click the gear icon and make adjustments to your recording settings as needed. Click here to learn more about recording settings.
- Choose your recording inputs by clicking on either the computer audio icon or microphone icon. If both are enabled, the inputs will be recorded on separate tracks.
- Click the sliders icon for settings and decide if you want to enable Studio Sound, transcribe, or record separate audio tracks.
- If you'd like, add speaker labels by typing them in the text box next to your inputs.
Record your video
1. Choose one of the three recording options from the dropdown in the bottom right corner of the recording panel:
- Record into script: this will add your recording to your script track.
- Replace selection: this option is available when you highlight a section of your script before opening the record panel and will replace the script selection. Learn more about Replace selection.
- Record new layer: add your recording as a video layer. If you haven't recorded anything yet, you'll want to record into script first.
2. Click Record at the bottom of the Record panel to start recording.
3. Press the stop icon to end the recording.
Multitrack recordings
If you recorded computer audio or enabled record separate audio tracks, each input will be recorded on separate tracks and put into a multitrack sequence. You can edit the individual tracks from the Sequence editor. Learn more about sequences or using the Sequence editor.
You can also record remote interviews in Descript via SquadCast. You can learn more about that here.
4. Transcribe your audio
Descript gives you accurate, multilingual, and near-instant transcription. The AI-powered mechanism works with your needs with features such as speaker labeling and overdubbing. A transcript is generated automatically and synced to your audio, capturing dialogue and even nonverbal sounds.
There are a few ways you can automatically transcribe a file in Descript:
- Add them to your script. Drag and drop the file into the Script editor, or select + to the left of the script and choose File.
- If you've imported a file directly into your Media library, select the three dots to the right of the file's name and click on Transcribe file.
- When creating a sequence or adding files to a sequence from the sequence editor.
Note: Split files longer than 15 hours into smaller segments before uploading them for transcription. This prevents performance issues and ensures you get your transcription quickly.
5. Edit your video by editing text
Editing is how you get every scene and every word to work harder for you. Descript eliminates the time you'd spend manually deleting filler words, correcting the transcript, and delineating speakers. For beginners, this AI-assisted approach to audio and video editing is revolutionary—letting you edit media as easily as you'd edit a document.
Let's look at them one by one:
1. Remove filler words
All filler words appear with a light blue underline in the Script editor so you can review and remove them. Here's how:
- Navigate to the Action bar (magnifying glass icon).
- Choose Remove filler words…
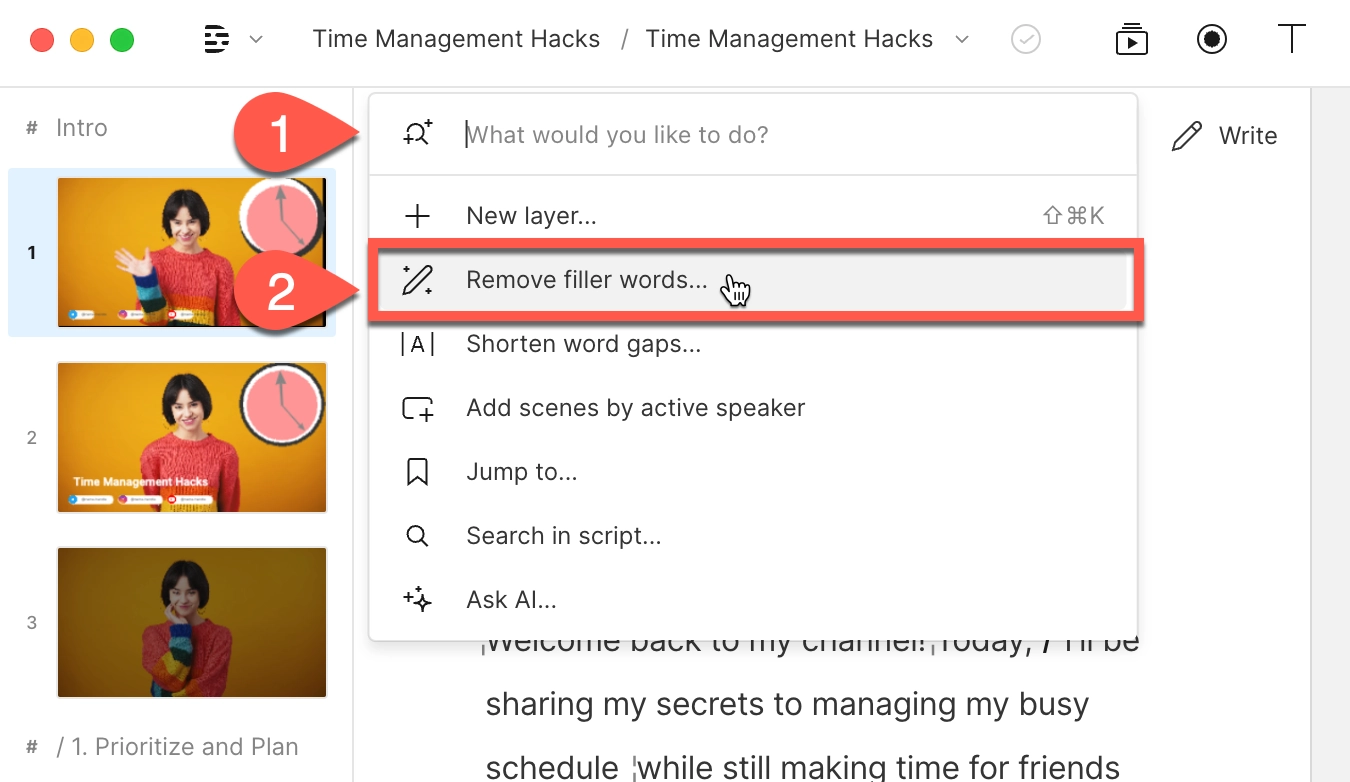
Alternatively, you can find and remove filler words by looking for them with the search tool.
In the sidebar, you'll see a list of all the detected filler words and can choose what to do with them.
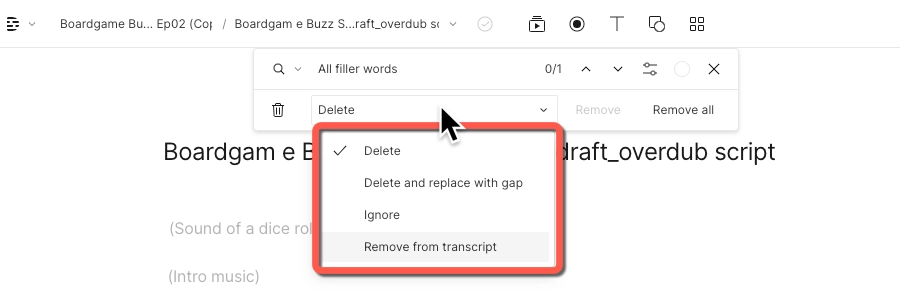
Essentially, you can preview each section with a filler word and edit it in one of four ways:
| Option | What it does |
|---|---|
| Delete | Remove both the text and the audio. |
| Delete and replace with gap | A gap clip (a period of silence) will replace the deleted script content. |
| Ignore | Strikethrough the text in the script while removing the audio. This is helpful when you want to review the filler words you've removed. It's also easy to bring them back if you change your mind. |
| Remove from transcript | Remove the filler word or phrase only from the script without affecting the audio. |
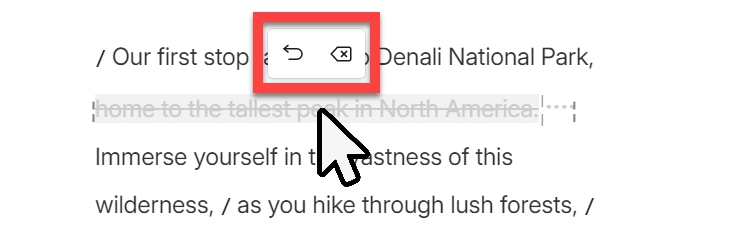
2. Delete text to edit your media
With Delete, you can non-destructively remove both the script content and associated media. Just highlight a section of script, and press Delete (macOS) or Backspace (Windows).

3. Ignore script content
When you choose Ignore script content, Descript will strike through the text or wordless media without removing it.
This is useful when you're iterating and experimenting with your media—before the final edit.
To ignore text, highlight a section of script, and press Command + Delete (macOS) or Control + Backspace (Windows).
After ignoring a word or section in your script, you can hover over the ignored script and choose to Restore it back into the script or Delete it.
Keep in mind:
- Deleted script won't appear in an exported text file or published page.
- Ignored text can be included in an exported transcription.
- Ignored text won't appear in subtitles or published media.
4. Correct the transcript
You can use three hotkeys for quick edits to your transcript:
- Hold down Z and click a word to toggle capitalization on or off.
- Hold down X and click a word to cycle through a space, comma, or period.
- Highlight text and press C to correct text; pressing C enables the correction tool if text is not selected.
5. Use correct text mode
Descript also has a special mode for users who want to focus exclusively on correction called Correct text mode, which will outline your script in blue while correcting.
While working in Correct text mode, you can make corrections to your script without affecting the underlying media.
To enter this mode, you can press the keyboard shortcut Option + C (macOS) or Alt + C (Windows).
6. Identify different speakers
The speaker label helps you distinguish different parts of your script and recorded media. Speakers are essential for generating AI speech and are copied with their associated media to paste into different projects.
Descript detects speakers and automatically applies speaker labels in your recorded media so you don't have to add them manually. Learn more here.
When you need to manually add speakers, follow these steps:
1. Click in the script where you want to add a speaker label.
2. You have two ways you can add a speaker label:
- Type @ on your keyboard.
- At the top of your script, select Actions…, type speaker, and choose Insert speaker label.
3. Choose or create a speaker:
- Create a new speaker: Type their name, and select Create speaker.
- Use an existing label: Select from your previously added speaker labels.
- Add an AI speaker: Pick from your AI speakers or choose one of our AI Stock speakers.

You can also add a speaker on a blank line by clicking the icon with three horizontal dots (…) > Add speaker label.

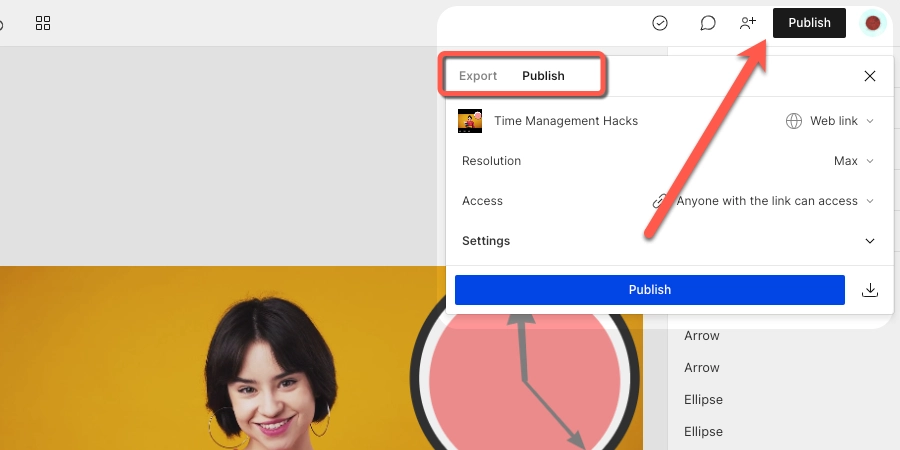
6. Export your project
Congratulations on finishing your project! At this point, you have multiple options to export it to other tools or publish it directly. The Publish tab allows you to publish directly to various integrated platforms, while the Export tab has various options for exporting to your computer. You can:
- Export your content to your computer as a video, audio, GIF, text, or subtitle file.
- Export your Timeline, non-destructively, to continue editing in most major audio and video editing tools.
- Publish a standalone web page with a shareable link and embeddable web player.
- Publish directly to any of our integrated publishing and distribution platforms—including YouTube and many podcast-hosting services.
Select Publish in the top-right corner of the main editor to export or publish a composition.
You can choose between two tabs in the Publish menu:
- The Export tab allows you to export a file to your computer.
- The Publish tab gives you the option to publish your composition directly online to various hosting platforms.
It's much faster to download your published content as a local audio or video file than to export it.
How AI-assisted features streamline editing
Descript’s AI-assisted capabilities go beyond just transcribing; they actively accelerate your entire editing workflow. By using Overdub, you can seamlessly fix mispronounced words or add entirely new dialogue without having to re-record. This helps maintain consistency and extends creative possibilities, especially if you realize you forgot to mention a key point after wrapping up your initial recording. Automated scene editing effortlessly segments your footage based on visual and audio cues, so you don’t have to spend hours sifting through raw content. Together, these AI-powered tools reduce friction and allow you to focus more on storytelling rather than mundane tasks. It’s all part of Descript’s mission to simplify content creation, even if you’re starting with minimal technical knowledge.
Why Descript is ideal for beginner creators
Descript gives newcomers a head start—you don't need to learn multiple apps, workflows, or setting combinations. You don't even need fancy gadgets. While most video editing software has a steep learning curve, Descript's user-friendly interface makes it accessible for beginners. Descript has features like:
- Studio Sound: to remove background noise and echo so your recordings have a studio-like feel.
- AI Actions: to remove retakes, edit for clarity, and even turn into blog post.
- Overdub: to replace awkward or incorrect speech with AI cloning.
- Green Screen: to remove or swap out video backgrounds.
- Social Clips: to find and highlight your best moments.
Want to try them out yourself? Sign up now.
Handling plan limits in Descript
Descript’s free plan is a great way to explore the platform but does come with certain restrictions, such as reduced transcription hours and limited export options. If you often work on larger projects, you may find advanced AI features like Overdub are restricted under the free tier. Upgrading to a paid plan unlocks expanded collaboration tools, higher-quality exports, and more robust AI-driven functionalities. This can be invaluable for teams or power users who need flexible storage and advanced editing capabilities. To see which plan best fits your needs, you can review the official plan details in Descript’s documentation. With a range of tiers, Descript ensures both hobbyists and professional creators can find the right balance between cost and capability.
Frequently asked questions about Descript
What can I do with Descript?
With Descript, you can create and edit podcasts, videos, audio tracks, and transcripts in one place. You can also use Descript to publish your edited content across various video hosting platforms such as YouTube or Restream and podcast hosts like Buzzsprout, Captivate, and Transistor. The cross-platform functionality works on both macOS and Windows, with a web version available for browser-based editing.
Is Descript good for video editing?
Descript is a great choice for video editing for beginners, particularly for creators who value streamlined, text-based editing. You can use it to edit video by editing the transcript—an excellent choice for dialogue-heavy projects. Descript also includes features such as screen recording, multi-track editing, Green Screen, Studio Sound, and automatic subtitles to help creators manage multiple tasks in one place.
How do you transcribe using Descript?
To transcribe using Descript, upload your audio or video file to the platform, and Descript will automatically convert it to text. If your audio has more than one speaker, Descript will identify and label each person. Alternatively, select the Options menu (three dots icon) to the right of the file's name, and select Transcribe file.
Does Descript support multiple languages?
Yes, Descript offers AI-based language support for users working across different locales. According to the research, its multi-speaker detection even works well with varied accents. You can simply import your file, and the platform’s transcription engine recognizes and processes multiple languages automatically. This makes Descript more accommodating to an international user base. For more details, check out Descript’s official page on transcription.
Are advanced editing features available on mobile devices?
Descript primarily focuses on desktop and web-based editing, offering the most seamless experience on these platforms. While you can access certain features through its web application, the full power of AI-assisted editing is optimized for desktop workflows. According to the research, mobile support remains limited, particularly if you plan to use advanced tools like Overdub or automated scene detection. For an optimal experience, it’s recommended to perform all major edits on a Mac or Windows device.