


Fixing audio on a video means addressing noise, levels, and room tone, in that order. Noise reduction first, because leveling amplified hiss just makes the hiss louder. Descript's Studio Sound runs the sequence in one pass.
Ever watched a beautifully shot video that was ruined by terrible audio? You're not alone. Video dominates our digital lives—it's how we entertain ourselves, gather information, and socialize. With three-quarters of all video viewing happening on mobile devices, we're consuming video constantly—and noticing every audio flaw along the way.
Here's the uncomfortable truth: video isn't just a watching experience, it's a listening one. Bad audio can tank even the most visually stunning content. Whether you're creating for YouTube or the big screen, your dialogue and soundtrack aren't optional extras—they're essential to your story. The good news? Even the worst audio problems can often be fixed in post-production. Let's dive into how.
Technical causes of poor audio and diagnostic methods
Poor audio quality often begins with simple issues such as inadequate microphone placement or background interference. Placing a microphone too close to a bustling air conditioner or failing to monitor audio in real time can lead to irreparable hiss and hum. Insufficient headroom during recording means your audio might get clipped, causing distortion that’s difficult to remove later. Low bitrates and overly compressed audio files can also strip away the natural warmth of a voice track. Diagnosing these flaws often starts with critical listening and visual inspections of waveforms in tools designed for audio editing. Checking cables, connections, and recording settings is the next step to rule out hardware faults and ensure that your audio receives a clean, uninterrupted signal. According to the EBU R 128 standard, ensuring consistent loudness levels can also help identify sudden peaks or dips that signal deeper issues in the recording chain.
Why fix bad audio quality in videos?
Video and audio go hand in hand: The moving image draws us to the screen, but sound is what keeps us glued to it.
Editing video audio — or mixing, as it's referred to in video production — is a critical part of video editing. In fact, sound is just as important as the visual footage in a video (and for some, more important). Learning how to fix bad audio quality in a video is an essential skill for any content creator.
“People will watch something with poor video quality if the audio quality is good, but they won't watch something with good video quality if the audio quality is poor,” says Tiff Bauer, a former video producer at Descript. “This is something to keep in mind both in the edit, and before you even begin to shoot video or capture audio for your project.”
Here are reasons why sound matters so much when fixing bad audio quality in a video:
- Sound is immersive. Visuals alone usually don't tell the whole story. Balanced, synchronized, and clear audio tracks underpin your images and deepen your viewers' experience with them. For example, human voice, like voiceover narration, can shape a story by providing context to the events on screen. Sound effects can make actions more impactful.
- Sound is emotional. Think of how music infuses a scene with a certain feeling or sensation. It can make an uplifting sequence feel brighter, or a sad one feel more somber. “It can help make things more intense or slow things down,” says Tiff. Sound also helps evoke memories. The structure in your brain that processes sound is also responsible for storing your memories.
- Silence speaks volumes. The absence of sound sends a powerful message. It can add suspense or drama to a scene by drawing your viewers' attention to the screen. Used properly — i.e. sparingly — silence can sharpen your storytelling.
In the interest of your project's overall quality, don't slack on sound. It's one of the most overlooked steps in the process and low quality audio — overbearing background music, muted voices, or unwanted noise — can distract your viewers' attention and make your pretty footage unwatchable. Knowing how to improve audio quality in video is crucial for creating professional content.
Data-backed audio quality benchmarks
While “better audio” sounds subjective, there are measurable standards to aim for if you’re striving for professional-sounding videos. Targeting a bitrate of at least 128 kbps and a sample rate of 44.1 kHz helps preserve the nuances of your recording. Many broadcasters and streaming platforms abide by recommendations like the EBU R 128 standard to maintain consistent loudness levels across different content. This standardized approach prevents viewers from constantly adjusting volume and secures a more uniform listening experience. Combined with balanced frequency ranges and minimal compression, following these guidelines ensures your video audio meets widely accepted quality benchmarks.
The fastest way to fix bad audio quality in videos
If you want to fix bad audio quality in a video, the fastest way to do it is with Studio Sound by Descript. In one click, Studio Sound will transform your audio and make it sound like it was recorded by a professional, removing background noise and enhancing speech clarity.
Here's an example.
Here's a quick tutorial for a single video file:
- Open up your Descript app. If you don't have an account yet, create a free one in minutes.
- Click Create Project. Then drag and drop your video file into the Descript panel.
- Descript will create a transcription of your video file. Identify all the speakers in your video and add their names.
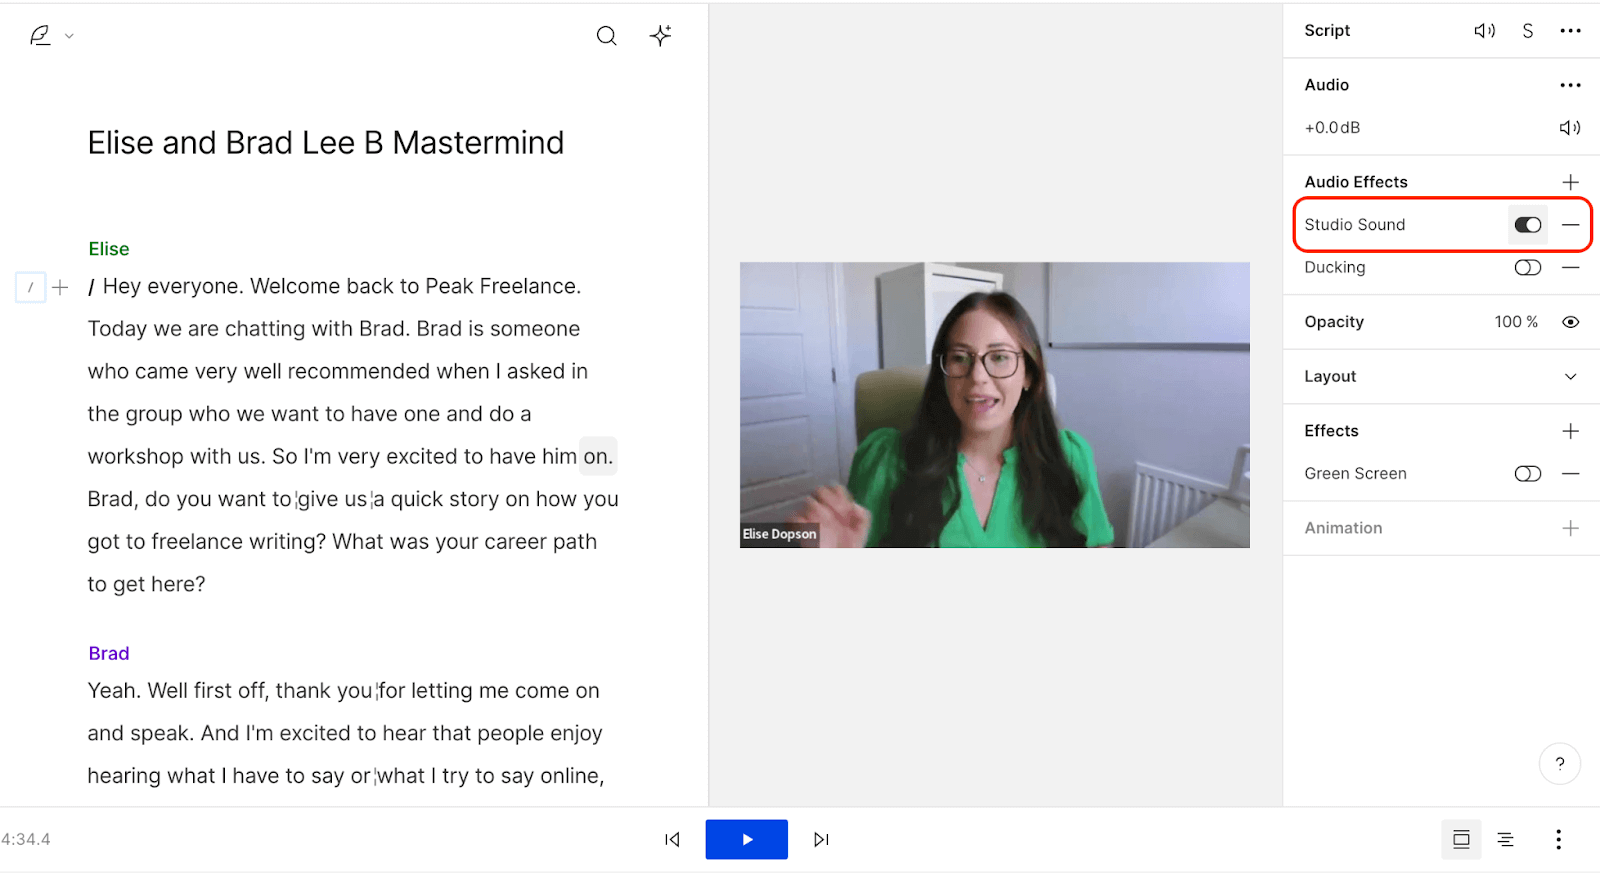
- Head to your Properties Panel on the right side of the screen.
- Click Audio Effects. Then toggle Studio Sound on.
A message will appear saying Studio Sound is being applied after you turn it on. This may take several minutes, depending on your file size.
Ok so, how does it work? Magic? Not exactly.
Most noise reduction tools like Audacity or Adobe Audition apply adaptive filters or subtract sound, which leaves your voice sounding tinny or dampened. These approaches often fail to make video audio clearer and can sometimes worsen the overall quality.
Studio Sound regenerates the speech part of an audio recording and gets rid of noise and echoes in the room. It also adds equalization (EQ) and compression to make your voice sound better and produce high quality audio for your video. This approach is more effective than traditional methods to fix low quality audio from video.
5 steps to fix bad audio quality in videos
But the best offense is a good defense: if you take the right steps after you've got your rough edit of your video in your editing software of choice (which we think should be Descript, of course), you'll have an easier time with audio quality overall. Regardless whether you're remote recording or in-studio, there are a few basic steps involved in editing sound to memperbaiki suara video (fix video sound).
“Everyone has a different workflow,” Tiff says, but generally you start by organizing and assembling, “and then you can finesse the timing a little bit, add music and add flourish.” Here are five steps for editing sound in your video.
1. Add clips and organize your timeline
Start by adding clips to your timeline and putting it in order. Place audio and video clips where they need to be before moving on to making finer audio edits. A disorganized timeline can cause problems and waste time later on in the process.
Be sure to think about timing so that the right sounds come in at the right moment. Try to synchronize image and sound. If you add audio effects, for example, make sure they line up with the actions on screen.
You can learn how to use the timeline toolbar here.
2. Add music and/or voiceover
Now that the timing of your sequence is right, add music, voiceover, or both. Find songs that suit your project's pacing, and make sure the music doesn't overpower the video's other audio elements, like narration. Be sure you have the rights to the music track before publishing your video or to give proper credit to the artist.
For a synchronized voiceover, record directly into your editing timeline while playing your video. This way your audio clips end up more or less where they're intended, and there's no need to import audio files.
- Simply drag audio into your script where you want it to play, and then fine-tune with the Timeline Editor.
- Or, to make a music intro, click and drag the word tags in your Script Track to make space at the start of your sequence. Then drag and drop your music into your Pinned Track, i.e. the dark gray timeline above the Script Track meant for sound effects or additional audio.
To add voiceover in Descript:
- Open a new composition or place the cursor in the script where you would like the new recording to go. Next click the Microphone button at the top of the application window.
- To select your input device, click on the gear icon and then choose from the list of available options in the selection dropdown.
- If you would not like Descript to automatically transcribe your audio, uncheck the Automatically transcribe recording box. But you really shouldn't do this in most cases, as editing in the script is one of the most useful and powerful reasons to use Descript.
- Next add your speaker label and, if applicable, the input channel of your microphone/input device.
- Once you're ready, click the Record button and your recording should immediately begin.
3. Adjust volume levels for clarity
Audio mixing is about balance. The goal isn't to bring all of your audio tracks to the exact same level; it's to edit the audio tracks so they sound balanced relative to one another. This balance depends on the nature of your audio. For example, some mics or voices are more resonant than others. Using headphones, close your eyes, listen, and adjust based on what you're hearing.
Consider each audio clip independently to fine-tune different aspects of your soundtrack, like making dialogue stand out from background music, so it ducks down when someone's speaking, and comes back up when they're finished. Adjusting your levels can also help reduce background noise (although it's always best to try to reduce noise during the recording phase). Or use Descript's Studio Sound feature to cut out noise with a couple clicks and fix bad audio quality from video instantly.
There are several ways to adjust levels in Descript: You can change the volume of individual clips in the Timeline. You can change the volume of tracks in the script. Or you can add volume automation. Finally, you can boost the levels of an entire file using volume normalization.
4. Trim clips for better audio flow
Now that your audio clips are where they need to be and your volume levels are right, you can start editing your soundtrack's finer aspects to make your video audio clearer. You may want to trim down longer clips, like music tracks, or cut out certain sounds in a clip. Try not to leave noticeable gaps in your audio. Unless the silence is intentional, the listener should always be hearing something.
You can use the Trim Tool to trim your clips in Descript.
5. Create smooth audio transitions
Audio transitions make sound flow seamlessly from one clip to the next. One way to do this is to apply fades and crossfades to your tracks to avoid abrupt changes in the audio sound.
You may also need to adjust audio levels in specific places within a clip, such as where it overlaps with a music or voiceover track. For this, apply keyframes to the clip. A keyframe marks the beginning or the end of a transition—i.e. where the volume starts to increase or fade.
A video editor like Descript allows you to apply audio transitions to your video, adjust the volume levels with keyframes, and adjust levels using ducking.
How to quickly fix bad audio quality in videos
With Studio Sound by Descript, you can produce higher quality sound for your videos with just a click — no fiddling with settings or buying expensive plugins.
Even if you do all the right things in the first place, like proper microphone placement and adjusting audio settings, Studio Sound can give your recorded video a little extra love before you push it live. It's the simplest solution for how to fix bad audio quality in a video without needing advanced technical skills.
FAQs
How can I remove a constant humming sound from my video audio?
Using specialized noise reduction tools can help target the specific frequency band of a humming sound. You can further isolate the problem by analyzing the waveform or spectral view in your editing software. Make sure your original recording settings had enough headroom to avoid clipped frequencies. For future recordings, monitor audio in real time with good headphones, so you catch unwanted noise immediately. This approach aligns with best practices mentioned in the content gap research, ensuring a cleaner, more professional final product.
What is the ideal loudness level for video audio?
The recommended loudness level often follows the EBU R 128 standard, which suggests a target of around -23 LUFS for broadcast. This universal guideline helps viewers avoid abrupt changes in volume when switching between different types of content. It also provides enough headroom to handle transients or spikes without causing distortion. Note that some creators may slightly adjust these values based on their platform or personal preference. As long as you remain consistent and avoid clipping, your video’s audio should sound balanced and clear.


