Creating step-by-step tutorials to help others learn new skills. Sharing how you beat the last stage of that popular game. Constructing walk-throughs to help a new hire hit the ground running. There are many reasons to use screen recordings. Knowing the right tools and steps can be the difference between a smooth production and one filled with frustration and tears.
If you have a Windows 10 or 11 system, you already have the first part covered. There are several options for recording your screen—most of which are completely free to use and compatible with the device you’re already using.
If you’re still stuck, you’re in the right place. Continue reading to learn how to screen record on Windows, including the tools you’ll need and tips for editing the footage in post-production.
How to record your screen in Windows with Xbox Game Bar
Every Windows 10 and 11 computer has a tool called Xbox Game Bar. It’s what gamers use to capture epic wins (and fails). However, you can also record other activities on your screen. Note that it can only record one application window at a time—and it won’t record your desktop or File Explorer. Here’s how to use it for screen recording in Windows.
- Open the Xbox Game Bar
- Access the recording toolbar
- Configure recording settings with the Capture widget
- Adjust video and audio quality
- Click Record
Step 1. Open Xbox Game Bar
There are several ways to open the Xbox Game Bar. The quicker method is to press the Windows + G keyboard shortcut. Another option is to search for “Xbox Game Bar" and select it in the menu.
Step 2. Access the recording toolbar
The Xbox Game Bar will appear as a floating toolbar with various icons. Click the Settings wheel button in the toolbar.
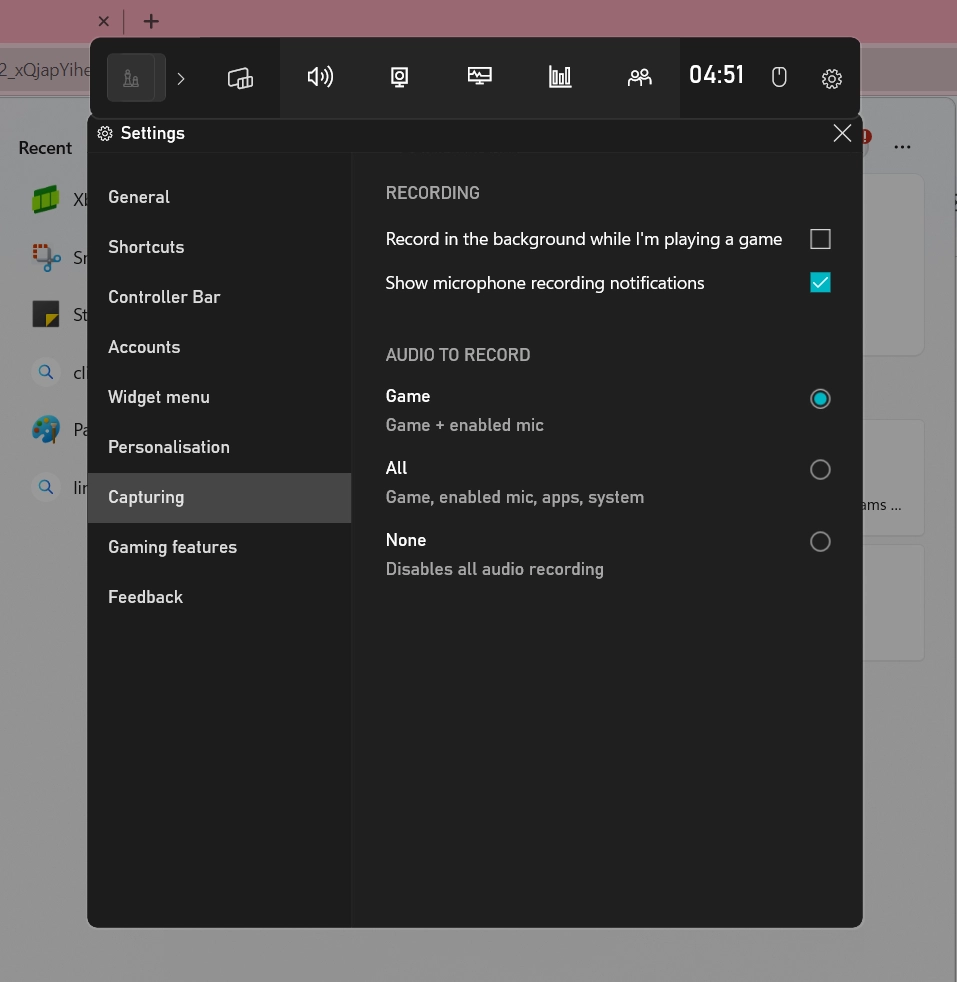
Step 3. Configure your recording settings in the Capture widget
Next, click the Capture button to set the video quality and format of your recording. Here, you’ll choose settings like whether you want to record in the background as you play a game, or if you want to record only the audio of your mic or everything that’s playing (e.g., background music).
 |
Step 4. Adjust your video and audio quality
To set your video and audio quality, go to your Settings and then go to Gaming and select Captures.
You can set your video frame rate at this stage—it’s automatically set to 30 frames per second (fps), which is recommended. Then, you can update the video from Standard to High for better quality, choose whether you want to capture audio immediately when recording gameplay.
Step 5. Click Record
Now, you’re ready to record. Go to your Xbox Game Bar floating window and click the Record button. The Xbox Game Bar will now start recording your Windows computer screen in the background.
To view your recordings, click See my captures in the Capture floating window. This will open another window, showcasing a gallery of all your recordings.
 |
📱 Apple user? Here’s how to screen record on iPhone, iPad, and Mac
How to record your screen with the Windows 11 Snipping Tool
Snipping Tool is another useful screen recording tool that is preinstalled on most Windows 11 PCs. Unfortunately, not all Windows PCs will be compatible with the latest Snipping Tool, which has recording features. We’ll start by checking the version of your operating systems.
You should also know that Snipping Tool generally won’t capture audio—so if you need narration or system sound, you’ll want to try Xbox Game Bar or a third-party option like Descript.
Go to your Windows Start menu button and select Settings. Next, click on System, then scroll down and click on About. Another screen will open in the same window, showing the specs of your computer. Check to see if your Windows 11 version is 22621.1344 or higher.
Then follow these steps:
- Start Snipping Tool and select the window
- Crop the area of the screen to record
- Press the Start recordng button
- Press Stop and save the video
Step 1. Open Snipping Tool and select the window
To open the Snipping Tool, go to your Windows Search bar, type in Snipping Tool, and click on it. A window will appear that looks like this:
Next, click the Record button with the camcorder icon (the camera icon is for screen capture only) to let the tool know you want to use this feature. Then click on the +New button in the top left corner of the window to begin a new screen recording.
Step 2. Crop the area you want to record
What’s great about using the Snipping Tool to screen record on Windows is that it allows you to crop the area you want to record manually. This is useful for removing areas that reveal private information. After clicking +New, you can select an area by left-clicking your mouse and dragging the white dotted line over the section you wish to record.
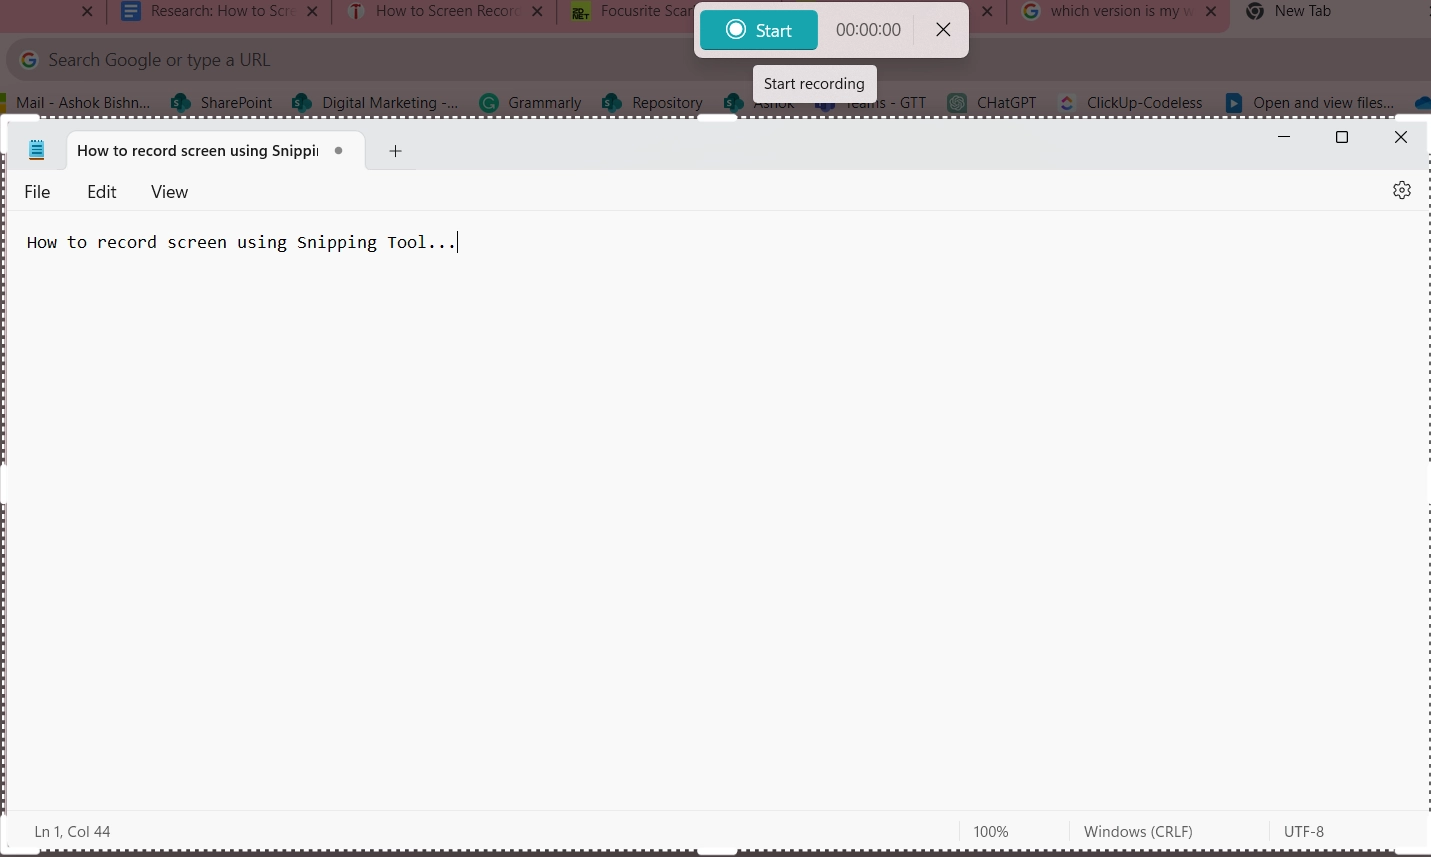
Step 3. Press the Start recording button
Click the Start button in the floating window at the top of your screen to initiate the recording on a Windows device. Drag the edges over the portion of the screen you want to record (or the entire screen).
 |
Step 4. Press Stop and save the video file
Once you’re done recording, press Stop. Save it by selecting the Save as option in the Snipping Tool window in the top right corner (it looks like an old-fashioned floppy disk).
💻 Chrome users: Here’s how to screen record on Chromebook
How to record online videos on Windows using Descript
Nobody wants to juggle five different apps just to capture, transcribe, and share a quick tutorial. Descript does all of that in one place—not just for short clips, but for almost anything you record: podcasts, meetings, remote interviews, and yes, those never-ending demos you’ve been meaning to polish.
The platform allows you to screencast and simplifies sharing, reviewing, and editing recorded content, ensuring efficient teamwork. And let’s not forget the high-quality remote recording feature that makes basic meeting software (like Zoom) look so 1992.
If you want an advanced video recorder, this is it. Here’s how to get it.
Step 1. Download the free Descript app for Windows
Descript is totally free for anyone to use, so go ahead and create your free account.
Click the Download link at the bottom of Descript’s website to get the Windows screen recorder, or click this link to go there immediately.
Step 2. Create a new project
After the installation finishes, type Descript into your Windows Search bar and select it.
When Descript opens, you will see a dashboard of all your projects. To start a new one, click the blue New button. (This is also where you’ll find your video recordings when you’re done.)
Step 3. Start recording your Windows screen
Select the Record button to start creating your video. Make sure to add a title for your video—use a descriptive name so it’s easy to find later.
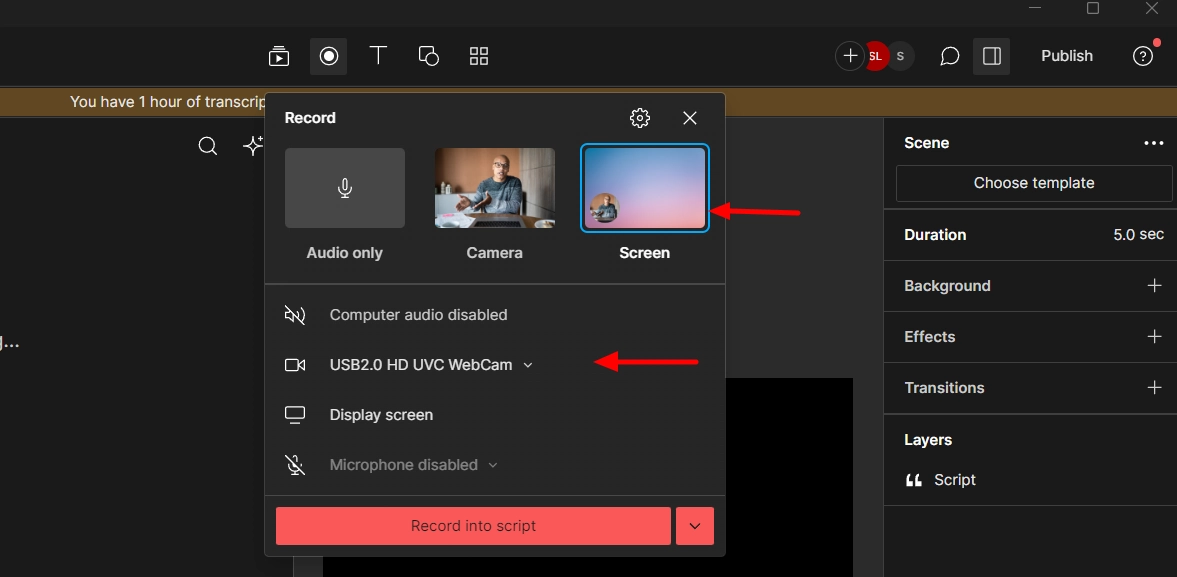
Choose whether you want to record using your screen or camera. If you want to record your webcam while you’re recording your screen, you can do so by selecting the Screen and then Webcam to choose your webcam (or the None option).
You can also disable your computer audio and select the microphone you want to use—or none if you don’t plan to speak in the video.
 |
Once you’re ready, hit the large Record into script button, and it will auto-generate a script for your screen-recorded video. (If you need a little extra breathing space, use the countdown timer. It’ll give you an extra 10 seconds to get set up before the screen recording starts.)
Step 4. Edit your video footage with AI
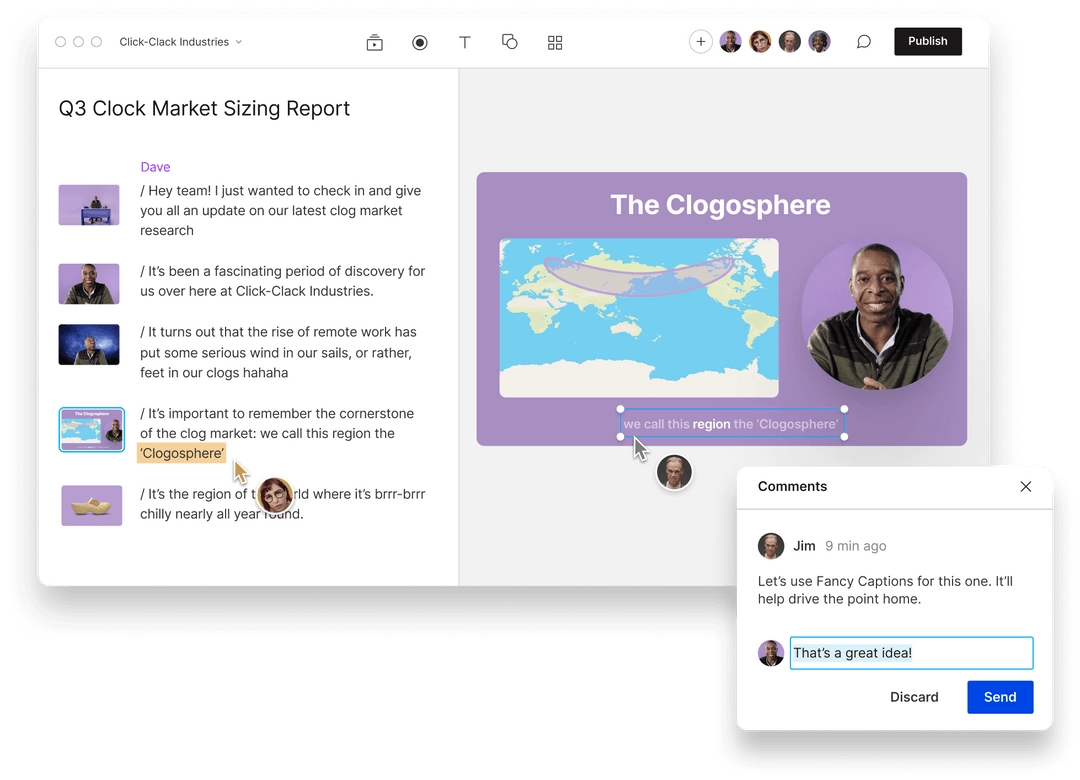
After recording, you’ll find your videos in your dashboard, ready to download, trim the recording length, edit, publish, and share. The beauty of Descript is that Windows screen recording is just one feature you can use inside the powerful video editor.
Descript offers advanced features extending beyond basic screen recording. It allows users to edit and record audio and video, remove unwanted sections (like ums and uhs), add effects, and make precise edits to create professional-looking (and sounding) videos, like quickly eliminating mistakes using overdubbing to add what you meant to say.
 |
There are also built-in transcription capabilities that automatically transcribe your recorded videos. Having a text-based version of your content makes it easier to search, edit, and repurpose the recorded material.
Plus, Descript provides convenient options for publishing and sharing your recorded videos with your audience, colleagues, or friends. Export your content in various formats (like MP4 files for social clips) to upload to popular platforms like YouTube or other social media channels.
The best screen recorder for Windows 10 and 11
Descript is considered one of the best Windows screen recorders. Its user-friendly interface is intuitive and easy to navigate. Even beginners can quickly grasp the functionalities and start recording and editing videos in just a few clicks. No clunky screen recorder software or major learning curves here.
Millions of brands, creators, and YouTubers are already using Descript because it offers advanced features like:
- Countdown timers for extra breathing room when recording your screen
- Automated transcriptions to edit your screen recording like you’d edit a Google Doc
- Specialized remote recording software designed for capturing a podcast with guests
- Collaboration tools to work share, edit, and host screen recordings with your team
- Special effects like Green Screen, Eye Contact, and Studio Sound
The best part? Descript’s free screen recorder isn’t limited to Windows; it’s also available for macOS. This cross-platform compatibility allows users to seamlessly switch between different operating systems without compromising their workflow or the quality of their recordings.
If you’d like to start capturing and editing footage like a pro, take a free tour of Descript today.
How to record your screen in Windows FAQ
Can I record my screen in Windows 10?
Yes. Press Windows + G to open the Game Bar. Click the Record button and enable the microphone icon for audio recording. Click the Stop button, or press Windows key + Alt + R, to stop recording. Find the recorded video in the Captures or Videos folder. Just be aware that Game Bar captures only one app at a time, not your entire desktop.
How do I record part of my screen in Windows 10?
Windows 10’s Xbox Game Bar doesn’t allow you to select a specific section of the screen—it only records an entire app window or the full screen. If you need to record just part of your screen in Windows 10, you can:
- Use Descript’s Quick recorder: Install Descript for Windows and launch the Quick recorder from the notifications area (system tray). You’ll be able to select the section of your screen you want to capture and then save or edit the clip in Descript.
- Use third-party tools: There are also free applications that let you select smaller screen regions if that’s all you need to capture.
- Open Snipping Tool from the Windows Search bar.
- Click the camcorder symbol to enable recording.
- Click +New to start a new recording.
- Crop the area you want to record.
- Click Start to begin recording.
- Save the file using the “Save as” option.
How do I record my screen and audio in Windows?
Does Windows 11 have a built-in screen recorder?
Yes. Windows 11 includes two built-in tools for screen recording. The Snipping Tool lets you select part of your screen and record a short video. The Xbox Game Bar can capture your entire screen or a specific application. Both save files as MP4 by default, and you can edit your footage in Descript if you want advanced editing or audio enhancements.
To record your computer screen and audio in Windows, download Descript’s free screen recorder for Windows. Open a new project and press the Record button, and select the desired screen recording options (making sure that audio capture is enabled).