Instagram Reels are short vertical videos up to 90 seconds, built for discovery in their own feed. The ones that work open with a hook in the first second, carry on-screen captions, and ride trending audio. Descript resizes, captions, and tightens clips for Reels in the browser.
Have you noticed Reels taking over your Instagram feed lately? From coaches and entrepreneurs to podcasters and travel bloggers, many people are amassing followers and even making money by creating these engaging short videos.
Instagram Reels offer immense potential for showcasing your skills and creativity and is an excellent platform for promoting your business. But if you've never made one before, where do you start?
This guide will teach you how to make Instagram Reels as a beginner and discusses pro tips about creating Reels suggested by renowned Instagram creators. You'll also learn how to edit Instagram Reels like a professional creator and understand how intuitive video editing tools like Descript (that's us) can make the Reel creation process much more manageable.
TL;DR: How to make Instagram Reels
Here’s a quick overview of how to make Instagram Reels:
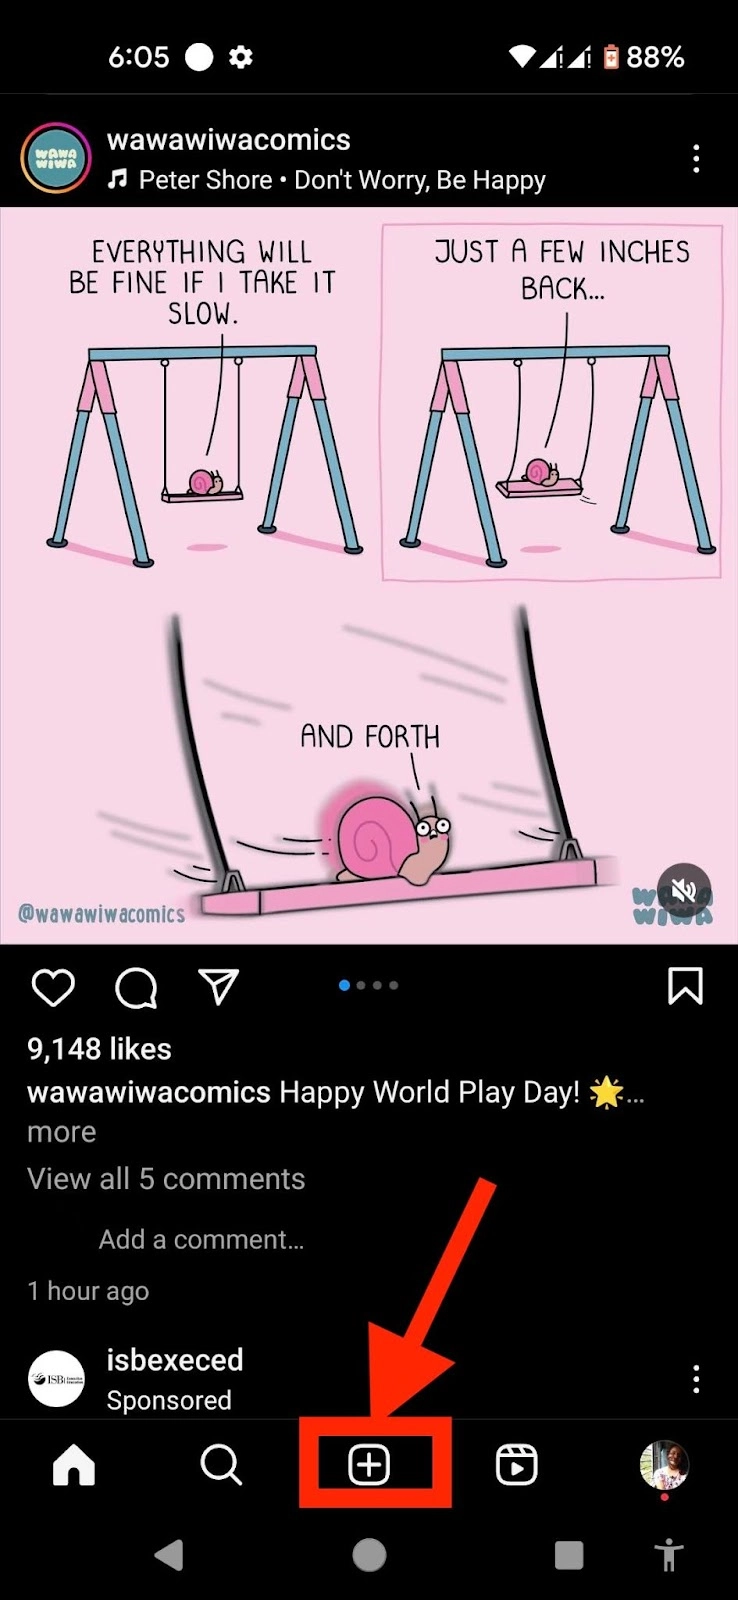
- Open Instagram & tap the + button.
- Select REEL at the bottom.
- Select and upload photos or videos from your phone.
- Instagram will suggest audio to auto-sync your clips to a track. You can skip it or choose your audio.
- You’ll get a preview of your Reel. Swipe up to edit—add effects, music, and text overlays.
- Trim & arrange clips.
- Add a cover image & write a compelling caption.
We cover these steps in detail later on in the article. Keep reading to learn more.
Note: If you can’t see these options, remember that Reels isn't available to everyone. According to Instagram, some accounts may be able to see Reels but can’t record them.
What are Instagram Reels, and why should you make them?
Instagram Reels are short video clips of up to 90 seconds that you can create directly within the Instagram app.
With short-form video becoming the top content format for marketers in 2024 and delivering the highest ROI, Reels offer several advantages:
- Highest watch rate: Reels boast a 13.08% watch rate, surpassing TikToks and YouTube Shorts, making them ideal for better audience connection.
- Massive reach: Unlike regular Instagram videos, Reels are designed for maximum discoverability (and potential virality) on Instagram’s Explore page, giving you access to a vast audience beyond your current followers.
- Account growth: With an impressive 1.48% engagement rate, the highest among types of Instagram posts, Reels can organically attract new followers through increased likes, comments, and shares.
- Enhanced creative expression: Reels allow you to ditch the limitations of static photos, experiment with storytelling formats, showcase your personality, and better connect with your audience.
- Competitive advantage: A potential TikTok ban in the US may drive users to Instagram, creating a gap that Reels, with its similar content and features, is perfectly positioned to fill.
How to create Instagram Reels: detailed step-by-step guide
Need more detailed instructions? We’ve got you covered with our step-by-step guide to making Instagram Reels. We’ll also share screenshots for each step to keep you on course.
Here’s how you can create and upload an Instagram Reel through the Instagram app on Android or iOS.
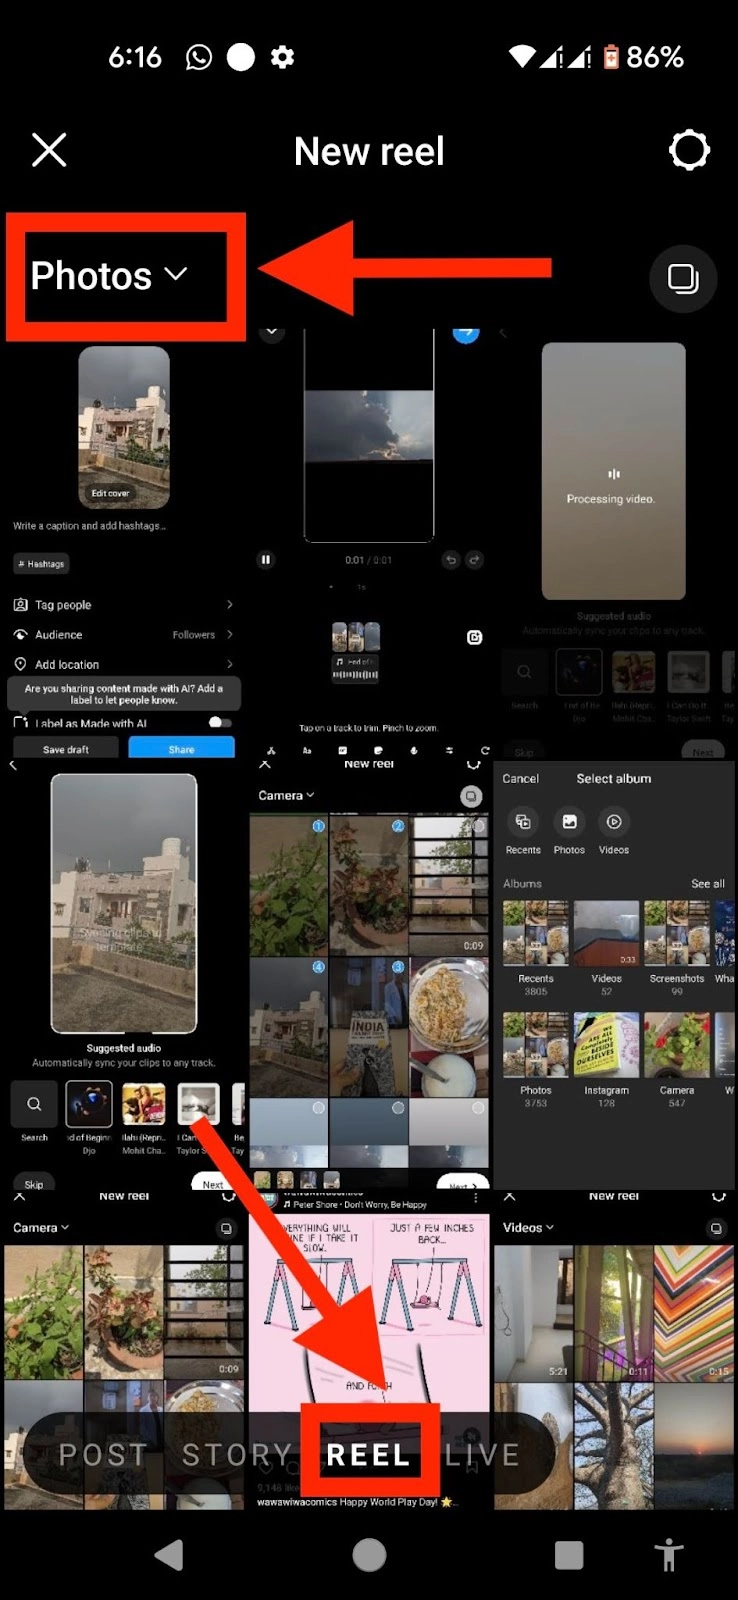
1. Tap the + icon at the bottom of your Instagram app or swipe right anywhere in Feed.
2. Tap REEL at the bottom. You can add media from your Camera, Photos, or Videos. Tap the dropdown at the top left for options. Choose Camera to start recording.
3. Tap and hold the circular record icon at the center to record a clip. You can also tap it to start recording and tap it again to end the clip.
4. To add a video from your camera roll or gallery, just tap the camera icon in the bottom left corner.
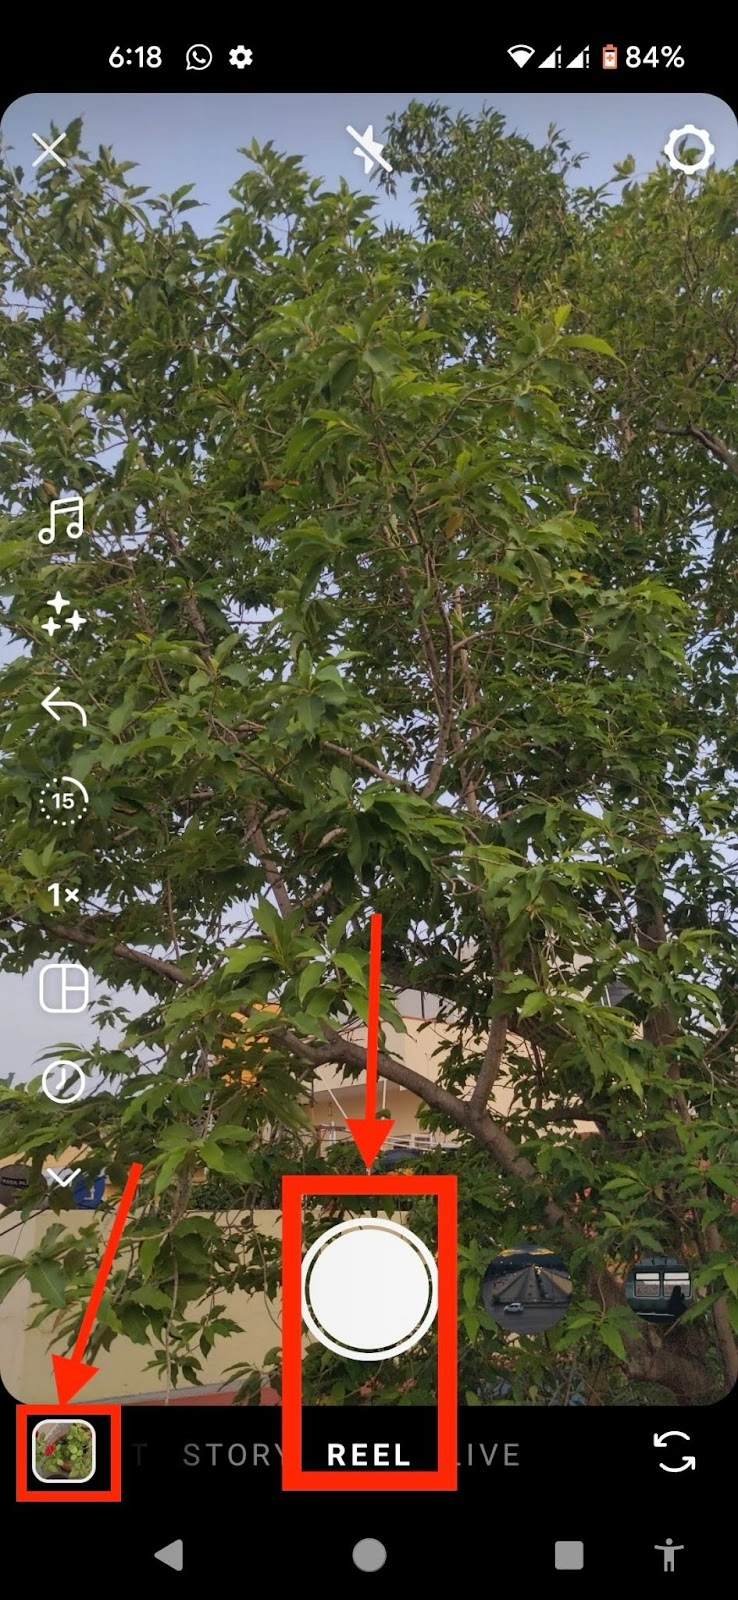
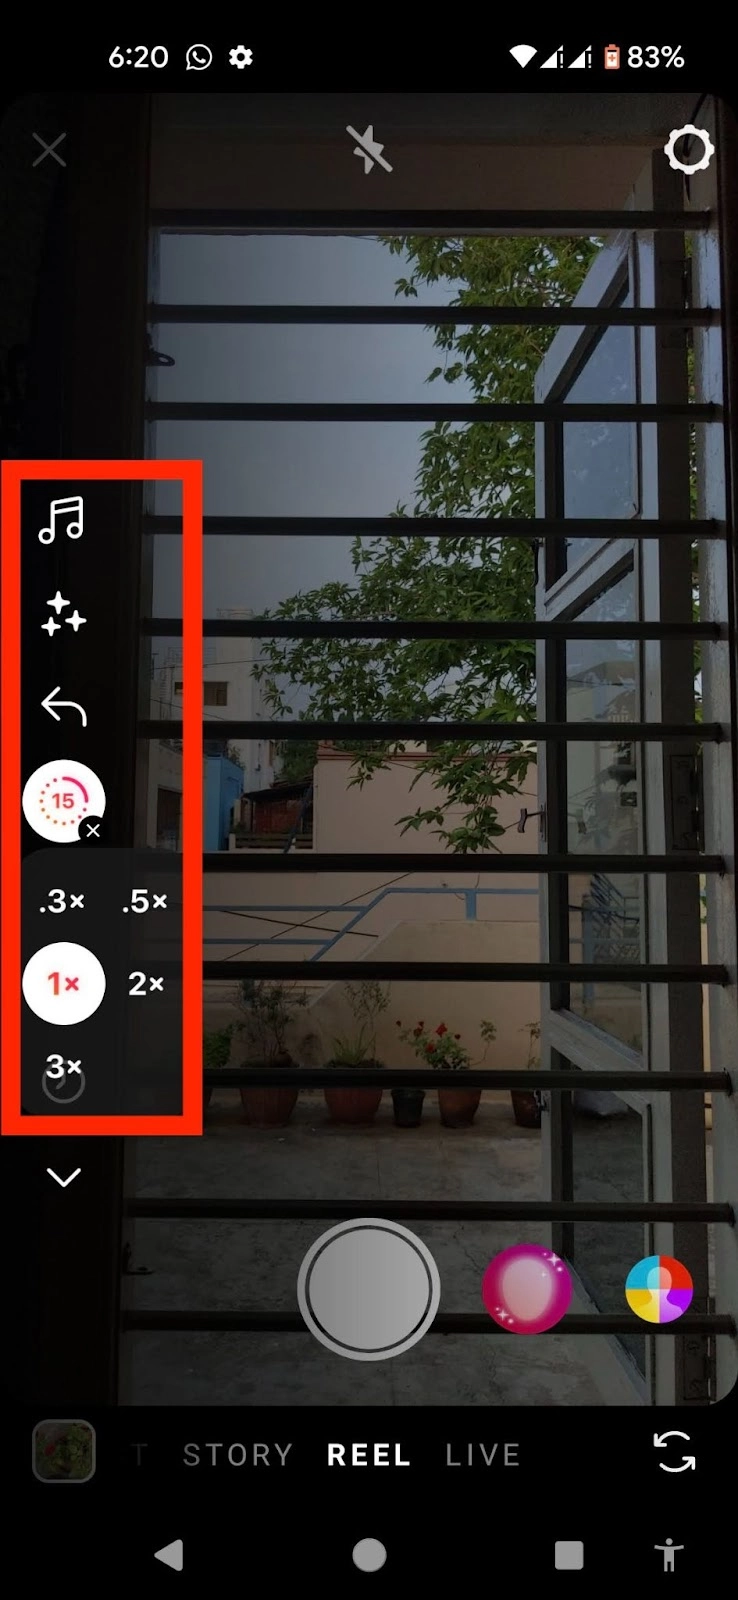
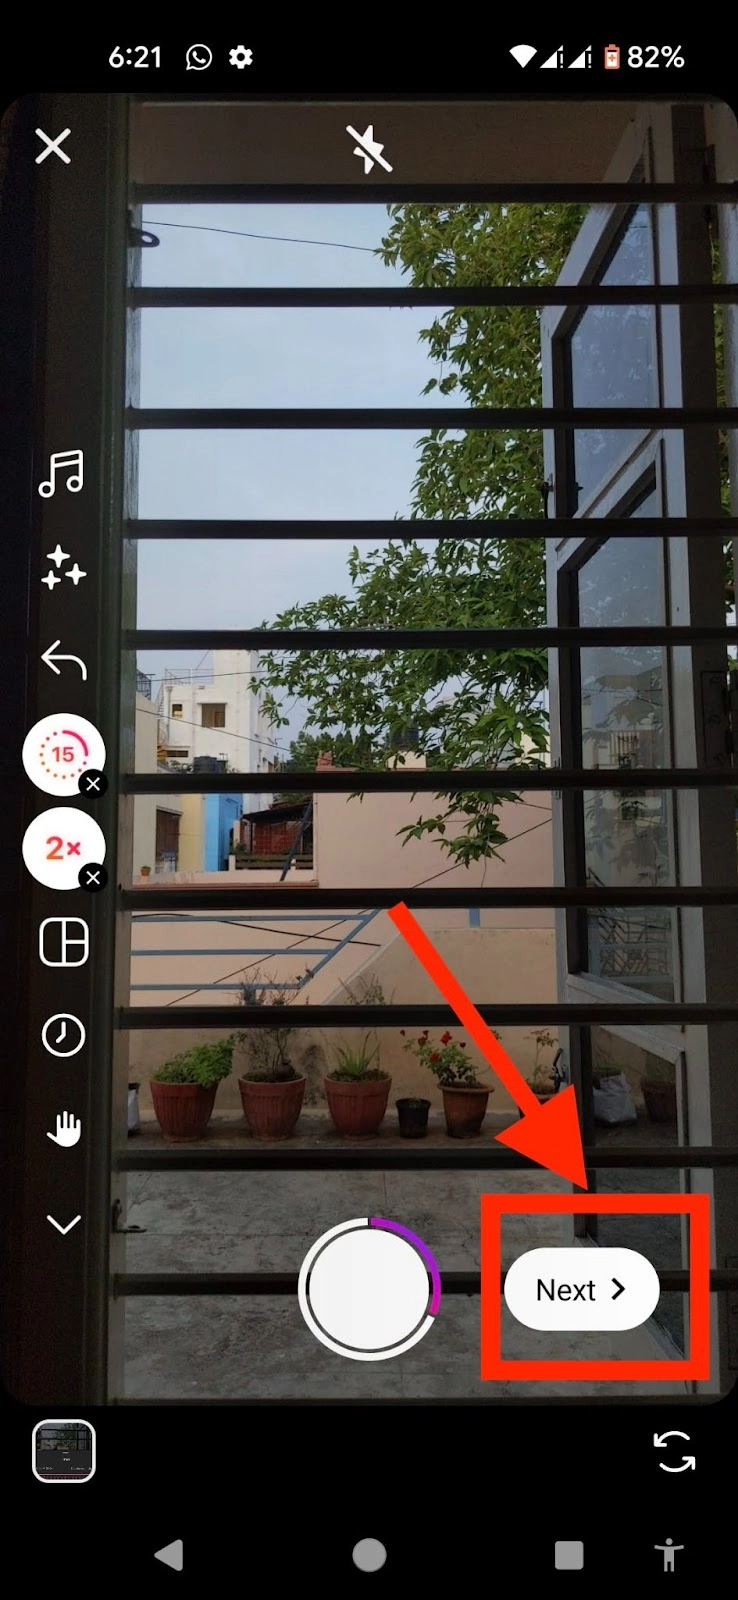
5. Use the Reels tool menu on the left to add audio, effects, and layouts to your Reel. You can also adjust the duration of your Reel (15, 30, 60, or 90 seconds) and change the speed at which you record your Reel (0.3x, 0.5x, 1x, 2x, or 3x).
6. After recording or adding your clips, tap Next in the bottom right corner.
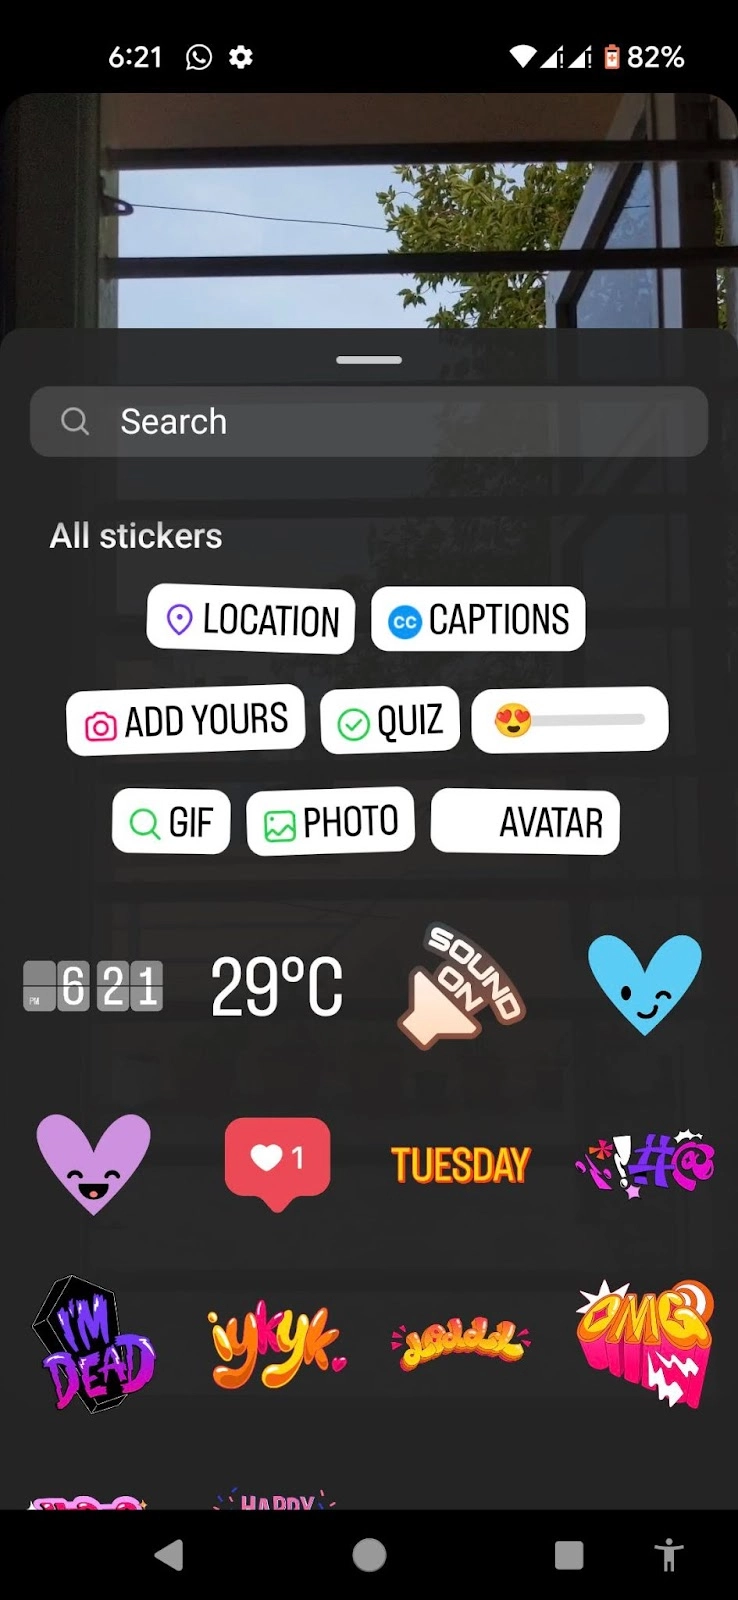
7. At the top, you’ll see various icons. Use:
- The musical note icon to add audio
- The Aa icon to add text
- The sticky note icon to add stickers
- The stars icon to add an effect
- The down arrow to download your Reel to your device
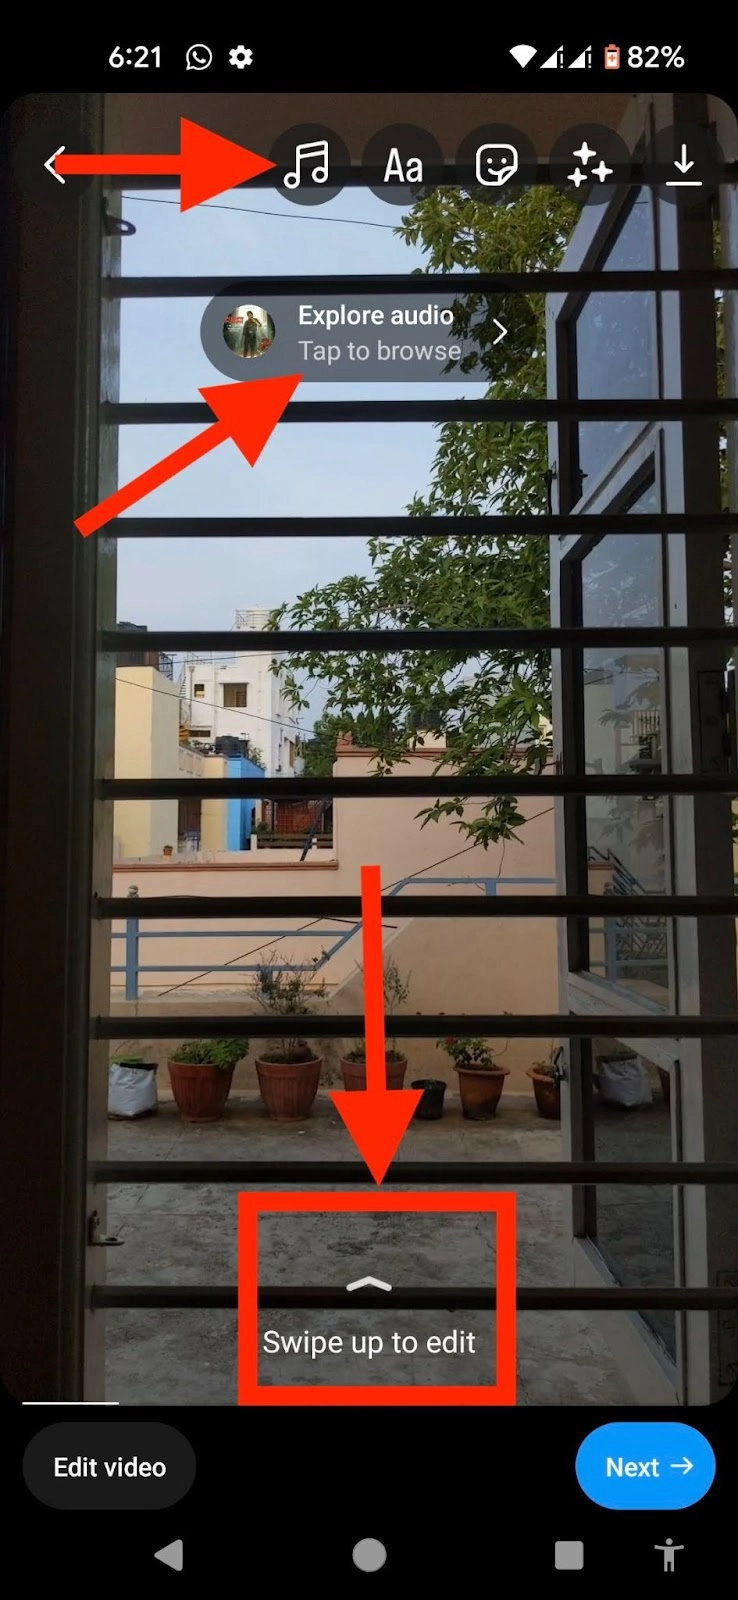
8. To edit your video further, you can tap Edit video in the bottom left or swipe up.
9. From here you can edit your Reel, including all that you’ve added, like text, stickers, and music, on a timeline. Scroll through the timeline to see the whole reel.
10. Tap on the respective text or stickers to edit them, or tap and hold them to move them to another part of your reel. Tap on the music to replace it.

11. You can also tap Reorder on the bottom right to rearrange the sequence of images and clips. Tap and drag a clip to move it, then tap Done when finished. Use the trimmers on each clip to change their length.

12. Once satisfied with the Reel, tap the blue arrow in the top right corner. Then, tap Edit cover to choose a cover photo for your Reel or upload one from your device.
13. You can also write a caption, add a location or fundraiser, or share your reel on Facebook.
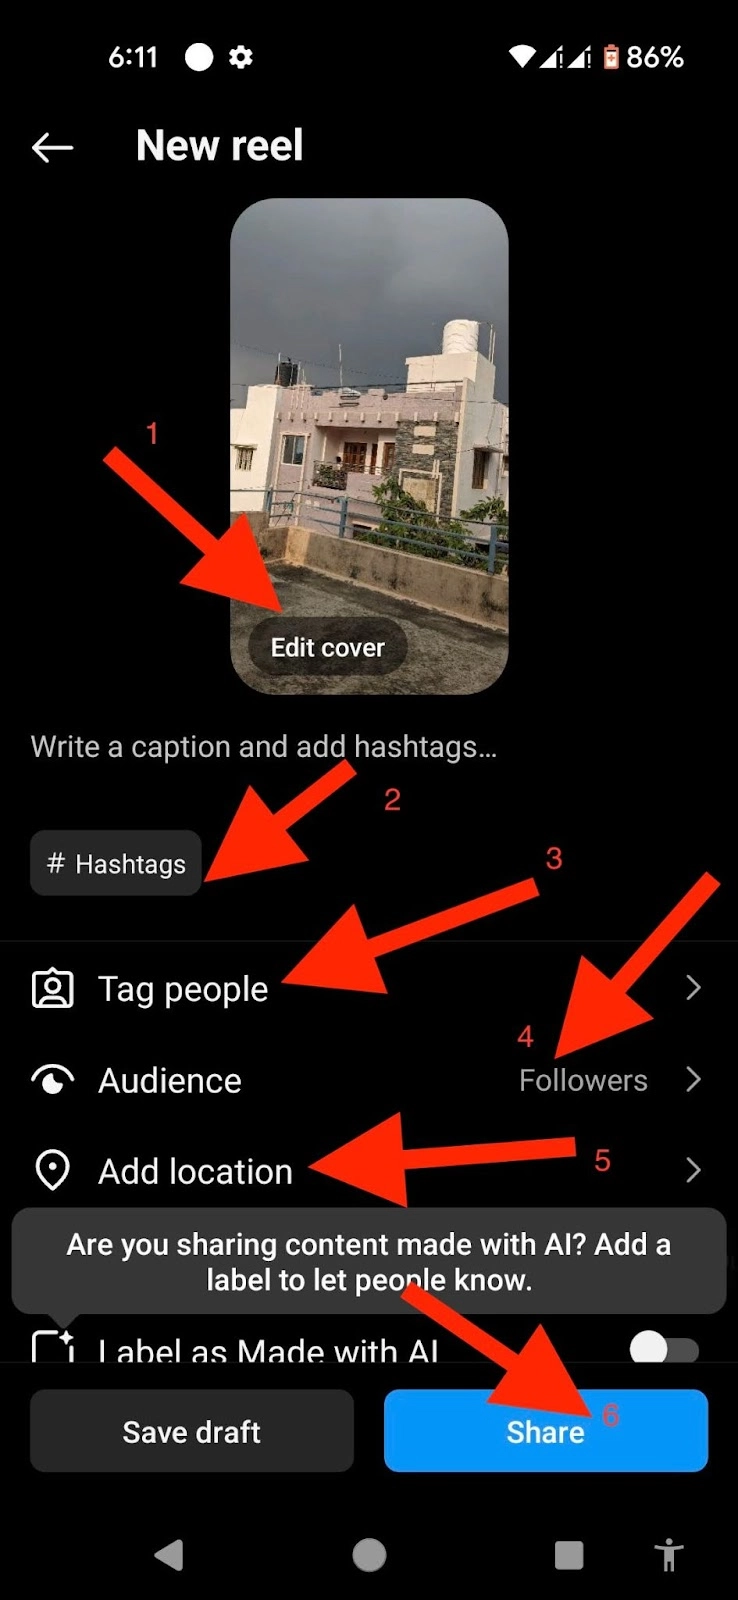
14. Tap Next in the bottom right, then tap Share. Your Reel will automatically be shared with Instagram Reels. To improve discoverability, consider sharing it to your Feed. Look for the toggle next to Share to Feed and make sure it's turned on.
You could also:
- Save your Reel as a draft to edit or publish later
- Schedule your Reel to go live later
- Copy your Reel’s link to share it on other platforms
Pro tip: Experiment with your Reel content as you like. Add multiple photos, record one or multiple clips, or combine video clips and static photos—as long as the entire Reel is under 90 seconds. Check the length of your Reel with the progress bar at the top.
📱 Make better edits: The 8 best apps for making Reels on Instagram
How to create and post Instagram Reels from your computer
Follow these simple steps to create and upload a Reel on Instagram from your Mac or PC.
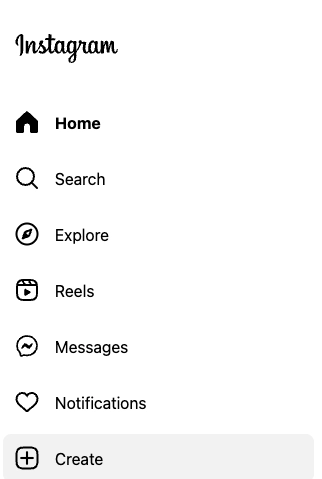
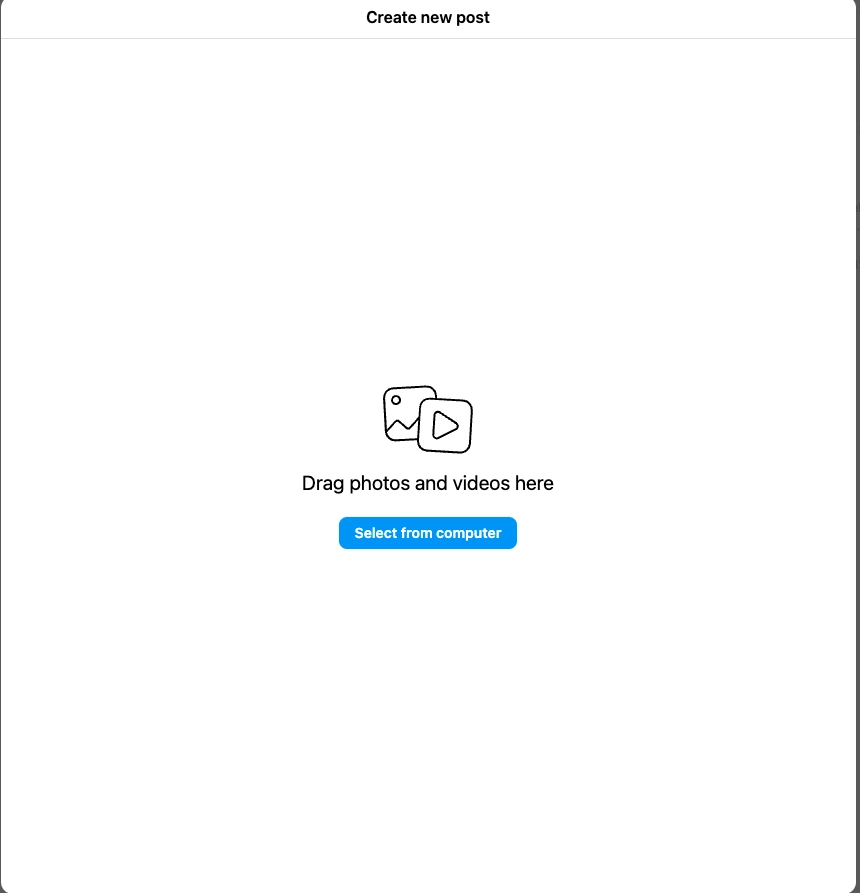
- Login to Instagram.com on a browser and click + Create on the left pane.
2. Click Post. Click Select from computer and choose the video(s) you want to share from your device. Video posts uploaded from your PC automatically get uploaded as Reels.
Note: Only your followers can see your Reels if you’ve got a private account. You’ll need a public account to share Reels with everyone on Instagram—followers and non-followers.
3. To add more clips, click the stacked squares icon in the bottom right corner, then click + to add another file.
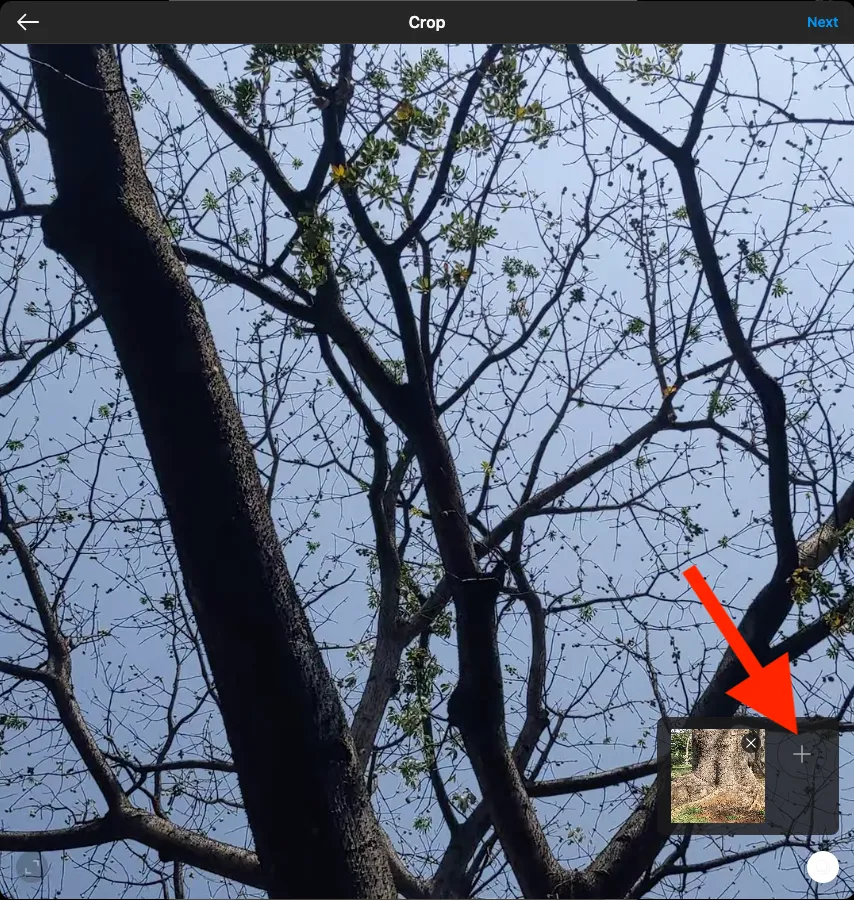
4. Once you’ve added all clips, click Next in the top right. From here, you can:
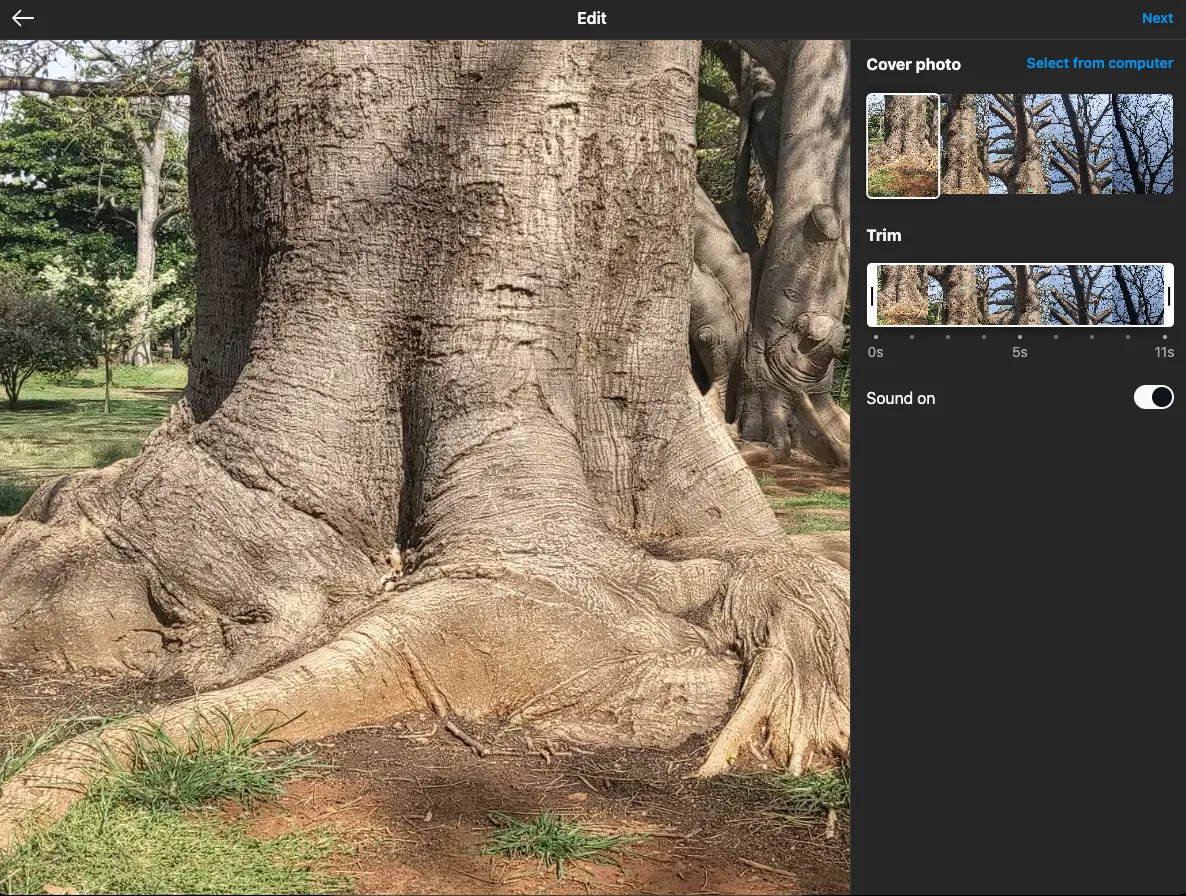
- Choose a cover photo from the clip or click Select from computer to choose one on your device
- Use the slider on the right, below Trim, to trim the beginning or end of your clip
- Turn the sound in your clip(s) off or on
5. After making the adjustments, tap Next on the top right. Add the (optional) final touches to your Reel, including a caption, location, tags, alternate text, etc., and adjust your post's settings.
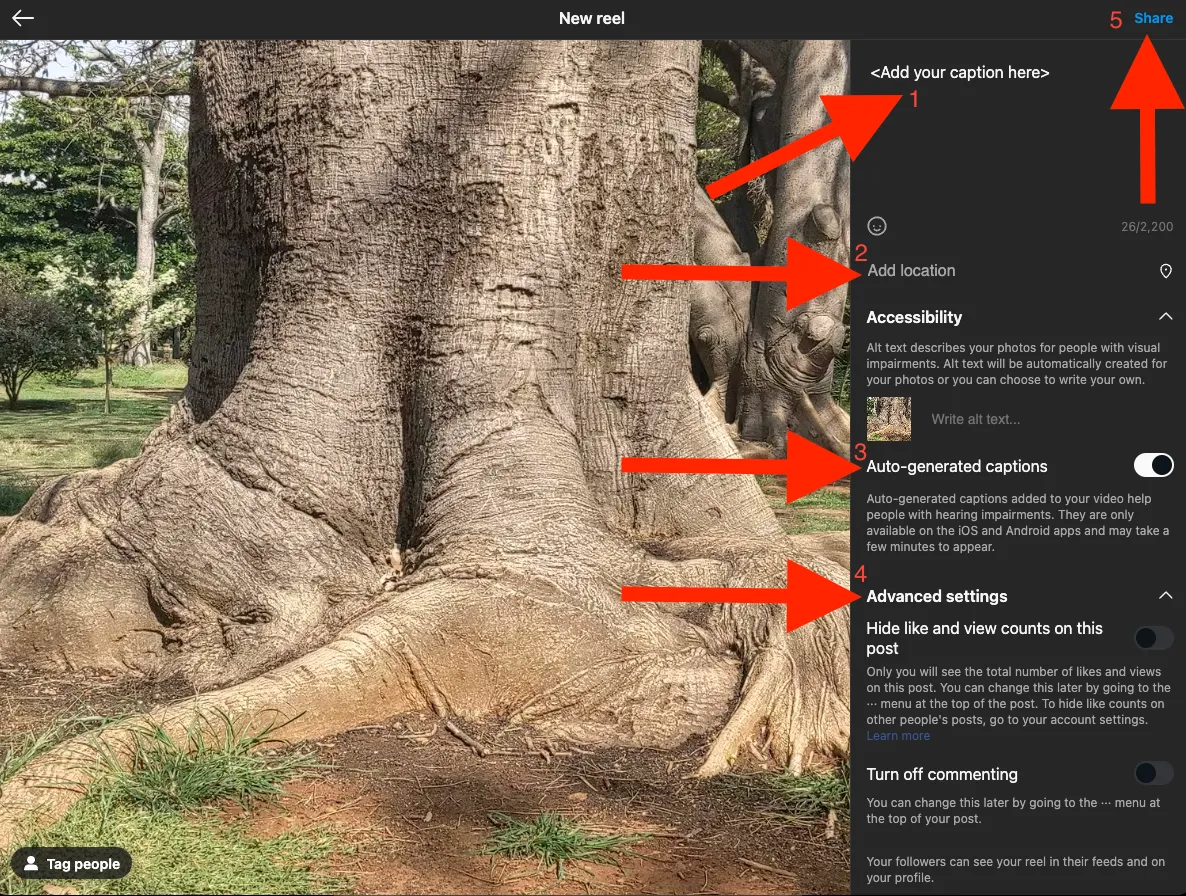
6. Tap Share at the top right. You can share the Reel with other connected platforms or accounts if you like.
Note: Remember that you won’t be able to record or edit original clips natively on Instagram on your computer. You can only add pre-recorded, pre-edited clips from your computer.
How to make the best Reels: tips and best practices
- Prepare an Instagram Reels script
- Hook viewers early on
- Use the right audio
- Capitalize on trends
- Understand how the Instagram Reels algorithm works
- Use interactive elements
- Adhere to technical specifications
- Post original content
- Optimize for discoverability
Prepare an Instagram Reels script
Plan your Reel with a video script beforehand. Outline the key points, visuals, and flow you want to capture. A well thought-out script ensures your message is clear and engaging without feeling overwhelmed.
Pro tip: Analyze your Reels’ performance to see what resonates with your audience and adapt your content strategy accordingly.
Hook viewers early on
Seth O'Brien AKA Isabelle O'Brien, a creator with over 125k Instagram followers, says the first three seconds of your Reel are vital. They set the premise for your video and give your viewers a reason to stay till the end.
Grab attention with a catchy intro, a surprising element, or a thought-provoking question to make them stop scrolling immediately.
Use the right audio
Have you ever played a Reel on a loop just because of its catchy music? Choosing the right music or sound effects can complement your content and elevate the mood. If your Reel has a voiceover or dialogue, ensure you adjust the audio levels and avoid letting the music overpower the message.
Capitalize on trends
Use trending audio or Reel styles to improve your chances of going viral. Photographer Matthieu Quatravaux grew his following from 3K to 13K in one month by adapting a trending moment to his unique style. His best tips to make trends work:
- Don't copy the trend as is; avoid repetition.
- Identify the core purpose of the trend and then blend it with your personality
- Throw in unique angles or unexpected twists to surprise your audience.
Understand how the Instagram Reels algorithm works
The Instagram Reels Chaining algorithm collects potential Reels users might be interested in, including content from followed accounts and similar videos they've recently engaged with. It then applies signals like content quality, interaction, and timeliness to select the most relevant Reels ordered by predicted interest.
Low-quality, recycled, or violating content is removed from recommendations.
Pro tip: To optimize for the Reels algorithm, brands and creators should post entertaining, inspiring, and experimental Reels that use Instagram's creative tools and original audio. Avoid low-res, text-heavy, or recycled content.
Use interactive elements
You can pick from several elements to make your Reels stand out:
- Try text overlays and stickers. Facebook’s Social Creative Lead, Laurise McMillian, recommends enhancing ready-made photos or clips from your camera roll with in-camera effects, text, and GIFs to provide context and boost engagement, especially when you have limited time to create fresh content.
- Use creative transitions between clips to maintain a smooth flow and keep viewers watching.
- End your Reel with a clear call to action. Ask a question, encourage viewers to visit your profile, or direct them to a specific product or website.
Adhere to technical specifications
Follow Instagram’s recommended specs for Reels to avoid wasting your effort on a Reel that gets downranked by the algorithm.
- Aspect ratio: Instagram recommends maintaining a 9:16 aspect ratio for optimal viewing on mobile devices. You can use Descript’s video resizer feature to optimize your videos for Instagram in seconds.
- Resolution & frame rate: To achieve high-quality visuals, Steven Wommack, a popular creator who shares mobile video editing tips and tricks, recommends setting your camera to 1080p so Instagram doesn’t need to compress your high-res uploads on Reels. He also advises to turn off the HDR mode. Finally, ensure that your media quality in Instagram (Settings and Privacy) is set to the highest quality.
- Video length: Keep your Reel concise and engaging. The maximum video length for Reels is 90 seconds, but experiment with shorter Reels of 15–30 seconds to see which performs better for you.
Pro tip: Descript’s powerful video editing tool lets you easily adjust your video format, trim clips, and ensure your Reel meets Instagram's specifications before uploading.
Post original content
Instagram recently updated its Reels algorithm to prioritize original content. Reels that just share videos from other accounts may see a decrease in their reach and engagement.
Here’s how you can use it to your advantage:
- Develop your own engaging concepts and storylines for your Reels.
- Film and edit your own footage, using tools like Descript to add your creative touch.
- As Creator Development Coach Sydni Claire advises, use royalty-free music or record your own audio to personalize your Reels.
Optimize for discoverability
No matter how good your Reel is, your effort will go to waste if no one watches it. Take the time to optimize your Reels for discoverability and viewership.
- Craft a compelling caption that provides context and entices viewers to watch.
- Use relevant hashtags to help people find your Reel. Research popular hashtags related to your niche or content.
- Share your Reel to your story and broadcast channel (if you have one) for additional reach and to remind your followers to check out your latest creation.
How to edit Instagram Reels like a professional creator
Recording and posting Reels is a great first step. But with so much content competing for attention every second, you need to invest time and effort in polishing them.
Here's your roadmap to professional-level editing for your Instagram Reels—with insights from insiders and top creators:
1. Precision trimming & assembly
Don't be afraid to experiment with the clip order. Play around to find the sequence that best tells your story and keeps viewers engaged.
Instagram's editing tools are a good starting point for cropping, transforming, adding music and voiceover, etc., but for serious control, consider professional Instagram video editing tools like Descript’s AI video editor. It lets you edit your videos like a doc—just edit the auto-generated transcript and watch Descript trim those sections from your Reel. This ensures your Reel stays fast-paced and keeps your audience hooked.
Descript’s timeline is also more user-friendly than Instagram’s, especially for beginner content creators. And, if you have a long video (like a podcast episode), you can repurpose it into not one or two but dozens of Instagram Reels using Descript's Find Good Clips feature.
2. Enhancing visual appeal
Visuals are king on social media. Creating videos for social media is a great way to show your personality and maybe turn your passion project into a profitable business.
Descript offers a treasure trove of visual effects for your creations—from classic transitions and animations to trendy overlays— to keep your viewers interested.
Fashion creator Wesley Breed swears by jump cuts and zoom shots. These keep your Reel dynamic and exciting, preventing viewers from skipping to the next one.
Descript goes beyond effects, though. It also makes it easy to add captions to your Reels, making the message stand out with titles and quotes in various fonts.
3. Boosting audio quality
Great visuals deserve great audio. While Instagram provides basic audio controls, you can use specialized tools like Descript for truly professional sound quality. For instance, Descript's Studio Sound feature effortlessly eliminates background noises from your audio track.
You can also use Descript to adjust music and sound effects so they complement your visuals and dialogue, not overpower them. This subtle touch creates an immersive audio experience that draws viewers in.
4. Adding the finishing touches
Before you tap Share, preview your Reel and double-check it for any last-minute tweaks. Also, check your caption and hashtags for typos and inconsistencies. This extra attention to detail will pay off big time with a polished and engaging Reel your audience will love.
Tip: Descript allows you to create custom intros and outros using templates to make your Reels more catchy and memorable.
Want to learn more editing and publishing workflows in Descript?
How to make Instagram Reels work for you
Think of your Reels as mini-billboards on a crowded highway— you need them to stand out in a fast-scrolling world.
Don't be afraid to experiment, inject your personality, and showcase your unique expertise. The more Reels you create, the more comfortable you'll become, and the more likely you are to find your unique voice and achieve that coveted "viral" status.
Ready to post your first Instagram Reel and start gaining followers?
Don't let the technical aspects hold you back. From seamless trimming and transitions to professional-grade multicam and audio editing, do it all with Descript.
Sign up for Descript’s Instagram Video Maker today!
Instagram Reels FAQs
How do you make Reels go viral?
While there’s no guaranteed recipe on how to make Instagram Reels viral, creators suggest following these popular tips:
- Hook viewers in the first three seconds with humor, surprise, or a question.
- Leverage trends: Use trending sounds, hashtags, templates, and formats.
- Tell a micro-story: Showcase a mini-adventure, solve a problem, or offer a tip.
- Post strategically: Aim for consistent posting and peak audience times.
- Collaborate & leverage features: Partner with other creators and use Instagram’s creative tools to create high-quality uploads.
How do you make a Reel with photos and music on Instagram?
To create a reel with photos and music on Instagram, follow these steps:
- Open the Instagram app and navigate to the Reels section (swipe right or tap the "+" icon).
- Choose REEL at the bottom.
- Upload photos: There are two main ways:
- Individually: Tap and hold the capture button to film short video clips for each photo (essentially creating a slideshow effect).
- Batch upload: Tap the gallery icon (square with a plus sign) in the bottom left corner. Select the photos you want to include.
- Adjust timing (optional): Once your photos are loaded, tap and hold to rearrange them. You can also use the trimming tool at the bottom to adjust the length each photo appears on screen.
- Add music: Tap the music icon (note icon) at the top of the screen. Browse the Instagram music library or search for a specific song. You can also adjust the part of the song you want to use by sliding the timeline at the bottom.
- Edit and polish (optional):
- Text overlays: Tap the "Aa" icon to add captions, titles, or quotes directly onto your photos. Choose from various fonts and animations.
- Effects: Explore the effects tab (sparkle icon) to add transitions, overlays, or other visual enhancements.
How do you make trending Reels on Instagram?
To create trending reels on Instagram, follow these steps:
- Go to the Reels tab on Instagram and tap the camera icon.
- Navigate to the "Templates" tab within the video editor. Here, you can explore various Instagram Reels ideas and templates, including recommended, trending, and saved options.
- Choose a template that aligns with the trending styles you want to follow and tap "Use Template" to start creating your reel.
Tip: Combine the power of templates with strong hooks, storytelling elements, and strategic hashtags to stand out, even within a template format. Explore trending sounds, hashtags, and formats on Instagram's Explore page and see which elements you can adapt for success.
How do you make an Instagram reel with multiple videos?
To create an Instagram reel with multiple videos, follow these steps:
- Open the Instagram app and navigate to the Reels section (swipe right or tap the "+" icon).
- Choose REEL at the bottom. You have two options:
- Record new clips: Press and hold the capture button to film your clips
- Combine existing videos: Tap the gallery icon (square with a plus sign) in the bottom left corner. Browse your saved videos and select the ones you want to include in your Reel
- Reorder and trim: Once you have your clips, tap and hold to rearrange them. You can also use the trimming tool at the bottom to adjust the length of each video segment.
Edit and polish: Add music, effects, text overlays, and more using Instagram's built-in editing tools or a third-party video editor like Descript.