.webp)
Video post-production is a big, multisyllable term that might be intimidating for beginners. But it’s simpler than it seems. If you consider video footage as your raw material, post-production is where you cut and polish it into a valuable gem.
In post-production, filmmakers and video creators put their story together, polish up the color and sound, add graphics and text, and more. It’s a series of video production processes that turn standard footage into engaging videos. This guide shares how to do it.
What is video post-production?
Video post-production is the final stage of creating video. It’s where you edit footage, make the content appear more seamless, and add visual effects (such as music or subtitles) to produce content that’s accessible to all. In other words: it’s the process of turning unpolished video footage into the final product that your audience will see.
Pre-production vs. production vs. post-production
There are different stages of the video production process. Before we dive further into the final stage, let’s explain each one:
- Pre-production. This stage encompasses everything prior to hitting the record button. It’s where you’ll plan your storyboard, write a video script, and make sure you’ve got the resources (such as talent and filming equipment) you need to start shooting.
- Production. You’re in this stage once you start shooting. It can involve shooting your main footage, B-roll, and anything else you planned in your shot list during the previous stage.
- Post-production. This is where you edit the footage you’ve filmed to create the final version of your video. It involves tweaking the colors, adding special effects, and splicing your footage together using a video editing tool.
6 key elements and stages of video post-production
- Rough cut and picture lock
- Color correction and grading
- Sound design and audio editing
- Visual effects
- Graphics and titles
- QA and final review
1. Rough cut and picture lock
The first stage of any video post-production phase is to import your footage into a video editor to cut and arrange your clips.
This is known as the rough cut—emphasis on rough. You don’t need to spend hours perfecting every transition in this stage; just put your footage together in a narrative that makes sense to you. Watch it through again and again, and make note of where things feel too slow or the continuity is off so you can make adjustments.
And above all, be ruthless in what you cut out.
“The best tip I could share with you is to eliminate the unnecessary fluff in your video,” says Kristi Dawn, editor at Musicfinch. “You can determine which parts to cut by watching the video yourself and be the judge of your video, cutting out the parts that you feel are boring or redundant.”
2. Color correction and grading
Sometimes the color of your video can become distorted. If you’re filming indoors, for example, yellow overhead lighting can throw off the colors in your video and give everything an orange hue. Make your footage appear more realistic by adjusting the white balance, exposure levels, and contrast.
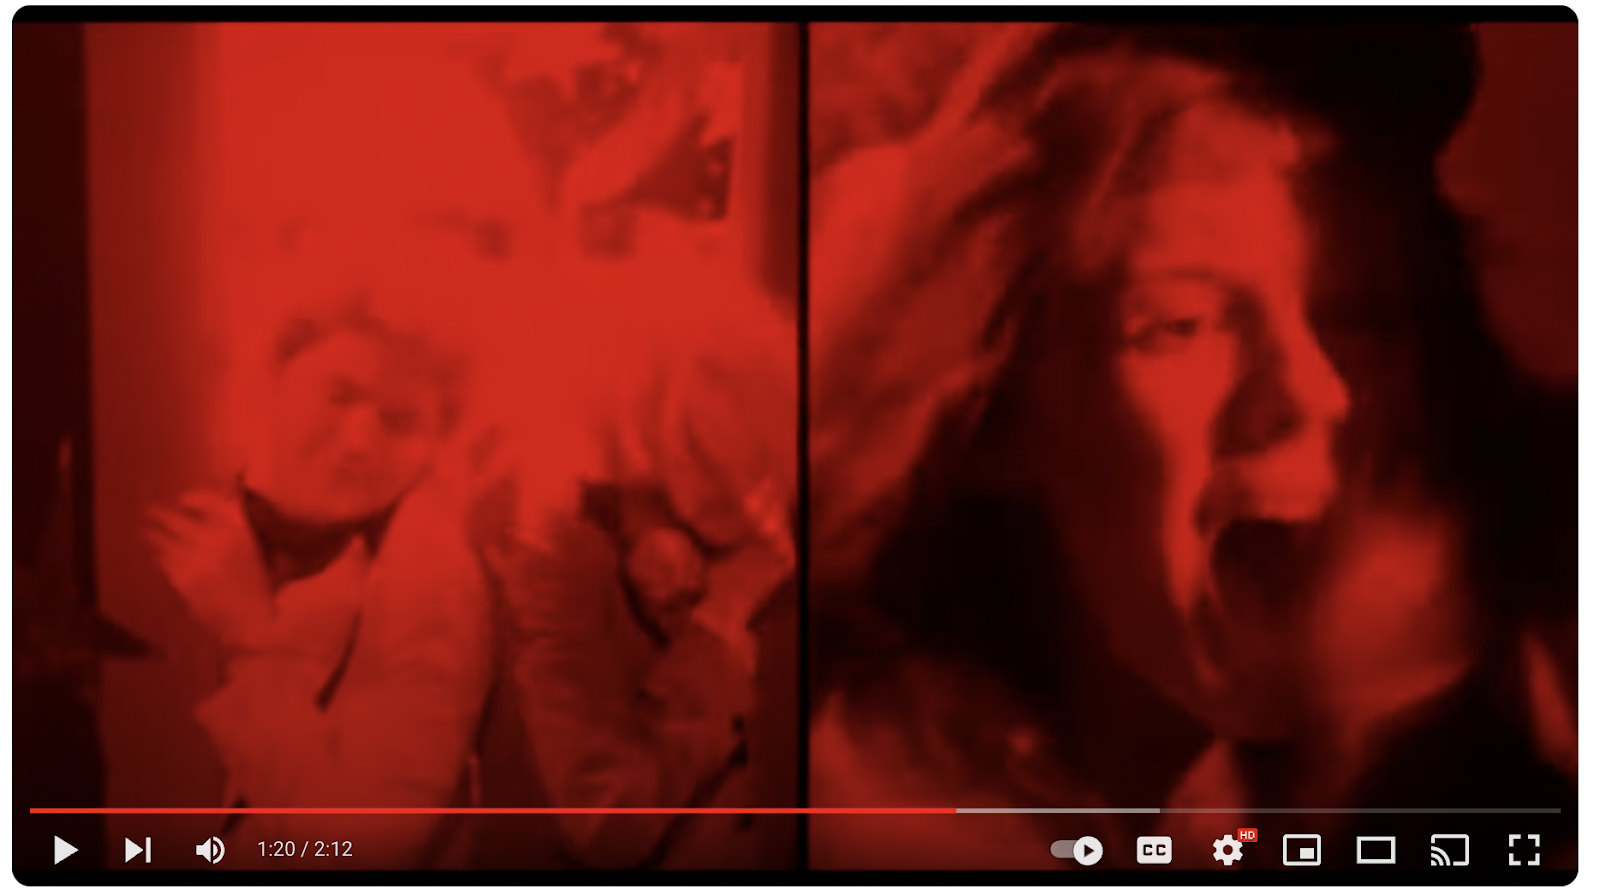
Colorists also use color grading to manipulate on-screen hues. If you’re producing a horror movie or a tense scene, you might tone down the colors and create a gloomy or mysterious effect—like we see in the Carrie movie trailer. Color is a great way to induce emotion.
3. Audio design and sound editing
In a world where we’re overrun with video content, your sound needs to be top-notch if you’re to stand any chance at engaging viewers. This stage of the post-production workflow brings your audio up to industry standards while also making the video more interesting to watch.
At this point, you or someone on your post-production team, like a foley artist or an automated dialogue replacement (ADR) engineer, will use sound design techniques like:
- Add sound effects. Sound effects, often abbreviated to SFX, are another layer of audio that makes your video more interesting. We can see this in horror movies—the creak of an opening door creates dramatic effect and hooks you into the suspense.
- Record voiceovers. Whether you’re recording a how-to video or adding context to your movie by letting the audience hear inside your subject’s mind, help people follow along by recording voiceovers in post-production.
- Balance audio levels. Microphones can pick up different amounts of sound depending on your filming location and the distance between the subject and their microphone. Keep things consistent—and prevent accidentally jumpscaring your viewers with a shockingly loud scene—by balancing audio levels.
4. Visual effects
Producers can use visual effects to manipulate what you see and make the impossible appear possible. For instance, in Avatar, the producer used special effects to make it appear as though the actors and actresses were in space.
Even if you’re not about to launch your subjects out of orbit, you can use special effects (sometimes referred to as VFX) to add personality to your video. That includes:
- Motion graphics. This technique combines audio with video to make it look like your subject is moving or rotating. If you’re depicting something that’s spiraling out of control, for example, you might want to rotate the subject on-screen.
- Green screen. If you want to change the background of your video, green screens can pick out your subject and replace the background with a stock image or video. Unlike advanced motion graphics, this is accessible to indie creators or producers on a budget—you can get the same visual effect inside Descript without investing in a physical backdrop.
- Computer-generated imagery (CGI). CGI is the most expensive type of visual effect and is often reserved for Hollywood directors. It uses 3D computer-generated graphics to manipulate footage and create out-of-this-world visuals.
5. Titles and captions
Regardless of what type of video you’re producing, most companies have accessibility regulations that help people with disabilities engage with content. This includes adding titles or captions to your video in post-production.
It’s also just a good idea. If someone is hard of hearing and uses captions to interact with online videos, you’d unknowingly alienate those people from your content by skipping over them in post-production. But by generating a transcript and adding subtitles to your video with a tool like Descript, you can meet those accessibility laws and expand your audience in one.
6. QA and final review
Before your video goes out into the world, take one final look. This is the final stage in the video production process where you give the video a detailed watch-through and confirm everything is up to scratch.
It’s easy to lose the bigger picture of your video project if you’ve spent hours refining the minor details. It’s why many creators leave a gap between editing their video and signing off on the final version.
“My number one tip for post-production is to take at least an hour-long break between exporting and sharing the video,” says Ken Morris, producer and photographer. “We talk about eye fatigue as in the actual fatigue of looking at a screen but creative fatigue happens too.
“It’s very easy to lose our objectivity about our videos and photos so I always take a break between finishing my editing, exporting, and sending my video to a client or social media.”
4 expert tips to master video post-production
Organize your workflow
The first stage of post-production is to import your video files into your editing software. It’ll make your life easier if you can do this in some sort of order.
“Organizing all of your footage and audio beforehand sounds like a big commitment, but it truly saves you so much time in the long run, and prevents you from shuffling through your clips again and again.” – Jess Quinlan, content creator and social media manager for Toast Weddings
James Costa, video director and producer, says: “The absolute first thing I always do when a shoot is done (or done for the day) is, I collect all media cards and save the raw footage in two places: an external hard drive and in the cloud. I’ll label the raw footage by date in the following format: a master file the date (year, month and day) so the footage appears chronologically on my drive file list and the project name.
“Then in that master folder I’ll create sub folders with all assets, one for raw footage, one for graphics, one for audio files, etc,” James says. “In the raw footage file, I further sort the files by date, project name and shooter or camera number.”
James continues: “In my editing software I create import folders with the same name as the folder the footage is stored in. Once all footage is imported, I create more sub-folders in the editing software to further sort the raw footage. It could be by scene number or by content such as interviews, B-roll, scene number, etc—whatever each individual project needs.”
Master your editing software
Post-production software makes it possible to turn your footage into a polished final product. Popular video editing tools include Apple’s Final Cut Pro, Adobe Premiere Pro, and Descript.
We’re biased, but we think Descript truly is one of the best video editing software choices out there. Its editing tool can support you throughout every stage of the post-production process at lightning speed using artificial intelligence features like:
- Studio Sound to refine sound quality
- Eye Contact to readjust your glaze
- Green Screen to remove your background
- AI Voices to fix audio mistakes
Take some time to experiment with your video editor of choice. Record a short project (or your screen inside Descript) and play around with the features. If you get stuck, there’s a bunch of useful tutorials to get you up to speed.
Invest in quality audio
There’s a lot to worry about in the visual details of a video, which means it’s all too easy to forget about audio quality. Use professional microphones, check levels before you start shooting, and do a retake if the audio wasn’t up to snuff.
But if things don’t go to plan, you can refine sound quality in the post-production stage using a video editing tool like Descript.
Studio Sound uses artificial intelligence to detect background noise and remove it from your audio track. It’ll cancel out acoustic echo and enhance audio quality, leaving you with professional grade sound—even if you didn’t record it with an expensive microphone.
Prioritize storytelling
No matter how much high-quality video footage you’re working with, you run the risk of losing a viewer’s interest if your video doesn’t tell a story. Studies have shown that stories are more memorable than facts. If you want to educate or entertain your audience, you need to weave stories into your narrative.
Head back to the storyboard you create in pre-production and make sure the narrative comes through in the final edit. Descript allows you to read your automatically-generated transcript, rather than playback the entire video. Skim your transcript, click and drag to rearrange different sections of the narrative, and edit your video like you’d edit a Google Doc.
Streamline your video editing process with Descript
There’s more to editing video than trimming clips. It’s an easier task to manage when you have professional video production software that comes complete with essential features like:
- Automated transcription to edit your video like you’d edit a Word document
- AI features like Green Screen, AI Voices, and Eye Contact
- Studio Sound to refine audio quality and remove background noise
- Add stock footage—including images, video, and music—to your video
- Sound mixing tools to blend multiple audio tracks seamlessly
Turn raw footage into a polished finished product with Descript’s free video editor. Join for free today and get premium features as standard.